17
SOLO EVO technical data sheet
The package includes a cable that can be used to connect the
power supply of SOLO EVO. The supplied cable has a length
of 4 meters and is resistant to water and atmospheric agents,
therefore it can be used outdoors.
The wide supply voltage range accepted by SOLO EVO makes
it possible to connect to the power supply provided by most of
the control units for gates and garages.
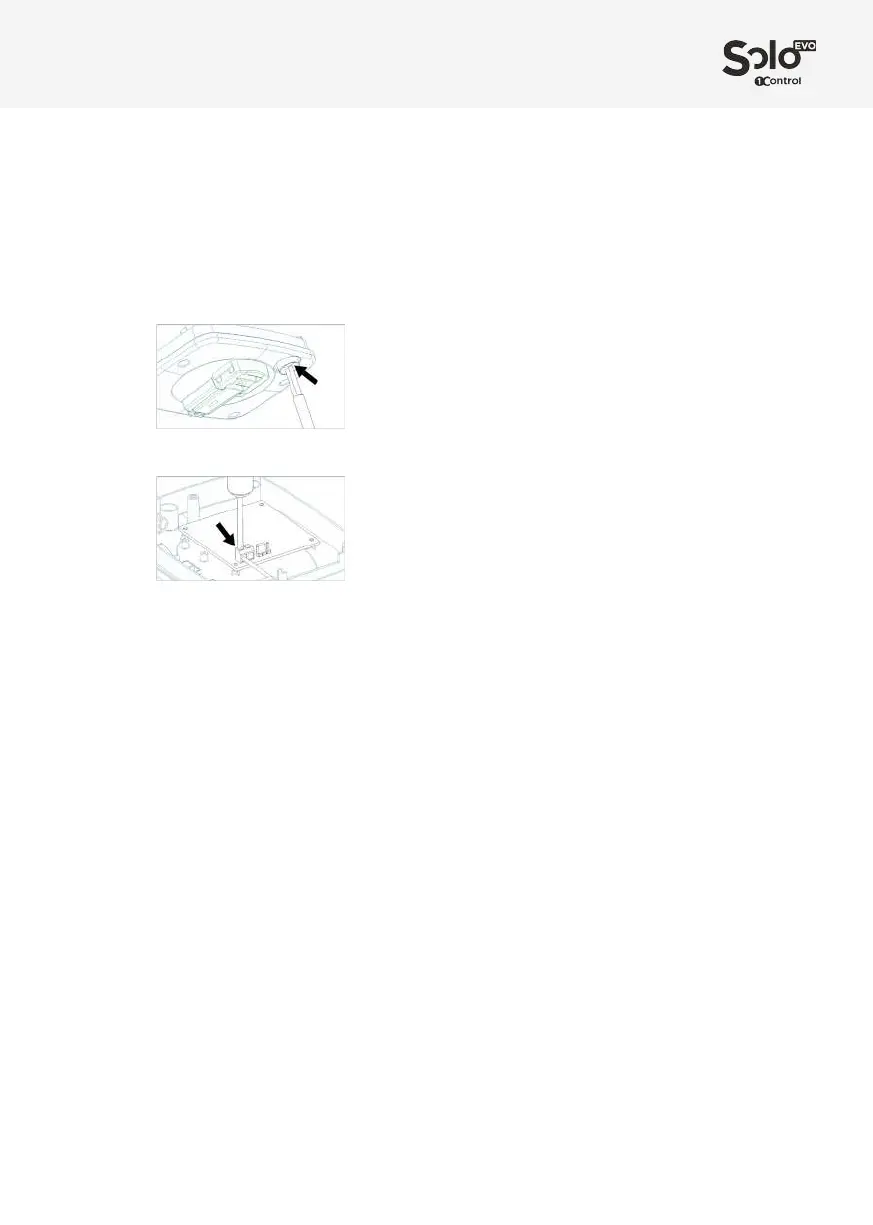
SOLO EVO is equipped with an already mounted IP66 cable
gland that must be used to route the power cable. It is
necessary to remove the batteries and puncture the cable
gland with a small screwdriver before inserting the power
cable.
Then connect the power supply to the clamp, making sure to
observe the polarities indicated.
Once the power cable has been inserted and connected,
secure it using the small strap supplied and close the device
using the 4 screws supplied.
Date and time
SOLO EVO is equipped with an internal clock that is used
to check users temporal access rights. The internal clock
manages the European Daylight Saving Time autonomously.
The date will be set automatically by the app when it rst starts
up.
Dati e limitazioni
SOLO EVO can control up to 4 dierent remote controlled
automations.
It can be used by 50 people/smartphones, and you can buy
additional users from the app..
App
The “1Control” app is free and can be downloaded from iPhone
and Android stores.
It is compatible with the following systems:
- Smartphone iPhone 4S or later with iOS 9 or later
- Android Smartphone with 4.3 or later and Bluetooth LE 4
The 1Control app can handle and control more than one
1Control device at the same time.
First Installation
1. Power the device up (see Power Supply chapter)
2. Download the 1Control app from your smartphone store
3. Connect to EVO SOLO using the app and set a secret PIN
code
4. Clone the remote control following the in-app Wizard
5. Place SOLO EVO near the automation to be controlled
Copying a remote control
Copying a remote control is done following the in-app wizard.
SOLO EVO can automatically recognize the type of remote
control that you are copying and provide the appropriate copy
procedure via the app.
Note: when copying a remote control it is better to be near
the relevant gate or garage. The complete list of compatible
remote controls is available on the 1Control website or in the
full Instruction Manual.
Sharing
Device administrators can share an access memorized on the
SOLO EVO app.
All users who wish to receive a share must register via the app
by entering their phone number.
NB: You cannot use the same phone number to register from
dierent smartphones.
The administrator may share an access with a user by
indicating their phone number. You can set time constraints
(start and end date, days of the week, hours of the day) to
shares.
To share an access, you do not need to be near the device.
This can also be done remotely.
Restoring to factory settings
You can completely delete all data memorized on SOLO EVO
by restoring it to factory settings. To restore, press and hold the
internal button for more than 10 seconds. The device can be
reset for up to 2 minutes.
Restoring the device causes the loss of all memorized remotes
and invalidates any shares which have been created..
After-sales service
In case of problems please email support@1control.it or call us
on +39 329 169 7057.
Package contents
1 SOLO EVO device
1 IP66 cable entry (pre-installed)
1 support for wall or pole fastening
2 dowels for wall attachment with required screws
2 pole fasteners
2 batteries (already installed)
4 locking screws
1 power cable 4 meters
Other data
Dimensions: 39x102x134 mm
Weight (including batteries): 350g
GTIN/EAN Code: 8056772850154
 Loading...