7
WARNING: Do not use product if proper t cannot be obtained.
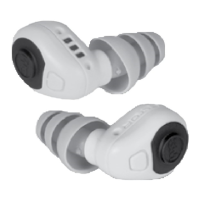
Attaching Eartips and Optional Retention Cord (not included with EEP-100)
Use only 3M™ PELTOR™ Eartips designed for use with this product. Do not insert the
earpiece directly into the ear without a correctly attached 3M PELTOR eartip.
Note: For the EEP-100, the retention cord may be purchased separately (see "Reorder").
1. To attach the optional retention cord, place one end of the retention cord onto the eartip
stem (Fig. A:4 and Fig. E:1).
2. Push eartips (Fig. A:5) onto the eartip stem (Fig. A:4 and Fig. E:2).
3. Fully seat the eartip at the base of the eartip stem (Fig. E:3).
Fitting 3M
TM
PELTOR
TM
TEP-200, LEP-200 and EEP-100 Earplug
The earpiece should be powered off prior to insertion. Eartips should be clean and in good
conditionbeforetting.
1. Select a proper eartip size for your ear canal.
2. Hold the earplug with the eartip attached (Fig.F:1).
3. Insert eartip into ear canal while pulling the ear outward away from the head and upward
with the opposite hand (Fig.F:2).
4. Rotate the earplug toward the back of the head (Fig.F:3).
5. With the earplug powered off, check to ensure you have a good eartip t. Pull the earpiece
gently. It should not come out of ear easily. If it does, repeating insertion. Listen to steady loud
noise with eartips in both ears. The noise should sound softer. Cover ears with tightly cupped
hands. Noise should sound about the same whether or not ears are covered. If you cannot
obtainagoodt,tryadifferenttypeorsizeofeartip.
CAUTION: For greater comfort and safety, remove eartips slowly with a twisting motion to
gradually break the seal.
Fig. F:2 Fig. F:3
Fig. F:1
Fig. E:1 Fig. E:2
Fig. E:3