3
(G) FITTING THE HEADSET
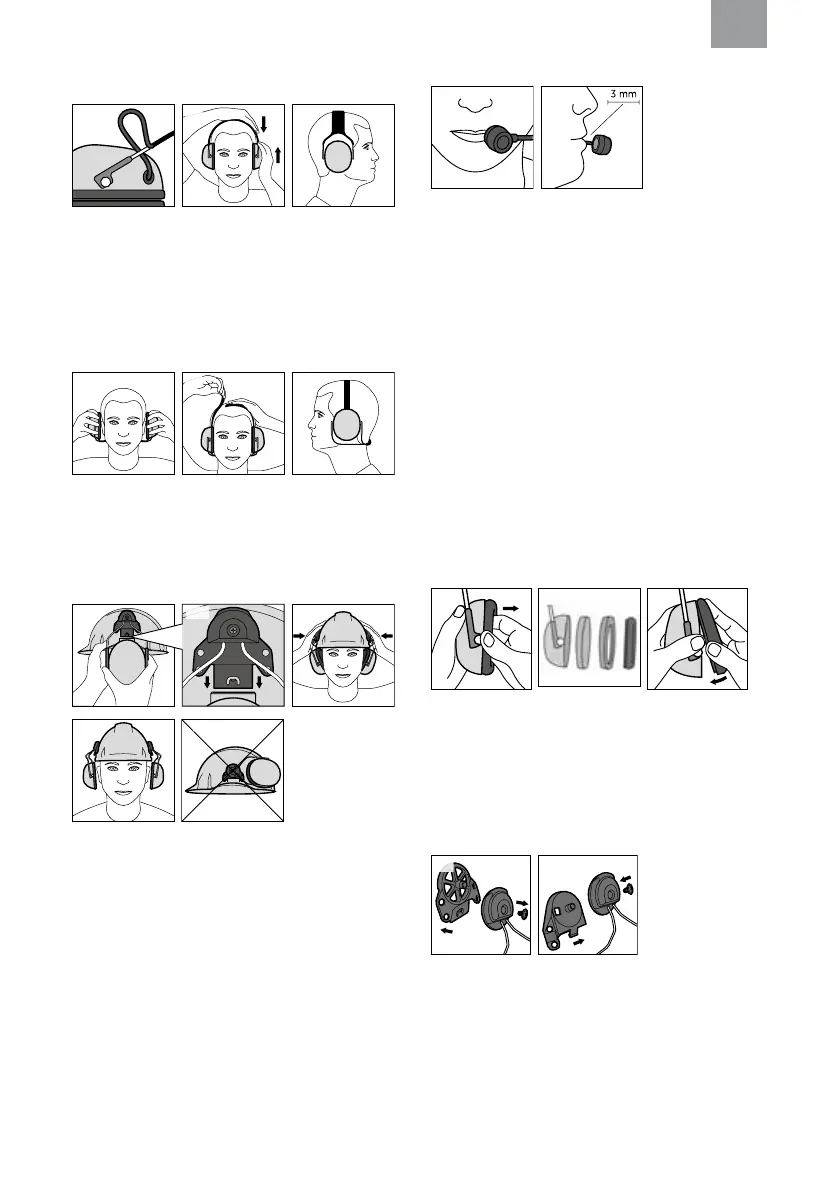
Headband and foldable headband
G:1
G:3
G:2
G:1 Slide out the cups and tilt the top of the shell out, as the
cable must be on the outside of the headband.
G:2 Adjust the height of the cups by sliding them up or down
while holding the headband in place.
G:3 The headband should be positioned across the top of
your head as shown and should support the weight of the
headset.
Neckband
G:4 G:5 G:6
G:4 Place the cups in position over the ears.
G:5 Keep the cups in position, place the head strap on top of
your head and lock it tight in position.
G:6 The head strap should be positioned across the top of
your head and should support the weight of the headset.
Helmet attachment
G:7
G:8
G:9
G:10
G:11
G:7 Insert the helmet attachment in the slot on the helmet
and snap it into place (G:8).
G:9 Work mode. Make sure that the cups and the headband
wires do not press on the edge of the helmet when in work
mode as this can cause noise leakage.
G:10 Ventilation mode. To switch the unit from work mode to
ventilation mode, pull outward on the ear cups until you hear
a click. Avoid placing the cups against the helmet (G:11) as
this prevents ventilation.
Microphone
C:1
C:2
To maintain noise cancelling performance, the speech
microphone should be positioned very close to your mouth
(less than 3 mm or 1/8 inch).
(H) CLEANING AND MAINTENANCE
Use a cloth wetted with soap and warm water to clean the
outer shells, headband and ear cushions.
NOTE: Do NOT immerse the hearing protector in water.
If the hearing protector gets wet from rain or sweat, turn the
earmuffs outwards, remove the ear cushions and foam liners,
and allow to dry before reassembly.
The ear cushions and foam liners may deteriorate with use
and should be examined at regular intervals for cracking and
leakage. When used regularly, 3M recommends replacing
the foam liners and ear cushions at least twice a year to
maintain consistent attenuation, hygiene, and comfort. If an
ear cushion is damaged, it should be replaced. See Spare
Parts Section below.
REMOVING AND REPLACING THE EAR CUSHIONS
H:1
H:2
H:3
H:1 To remove the ear cushion, slide your
ngers under the edge of the ear cushion and rmly pull
straight out.
H:2 Insert the foam liner.
H:3 Then, t one side of the ear cushion into the groove of
the earcup and then press on the opposite side until ear
cushion snaps in place.
REPLACING THE HELMET ATTACHMENT PLATE
H:4
H:5
For proper tting on different industrial safety helmets, the
helmet attachment plate may need to be replaced. Find the
recommended attachment in Table D. Plates for P3K attach-
ment are included on delivery. Other plates can be obtained
from your dealer. A screwdriver is needed.
H:4 Loosen the screw holding the plate.
H:5 Replace the plate, ensure the plate is positioned correctly
and tighten the screw.
GB

 Loading...