2
5DTACTICAL.COM 5DTACTICAL.COM
3
PARTS & TOOLS ASSEMBLY
TOOLS NEEDED
PARTS
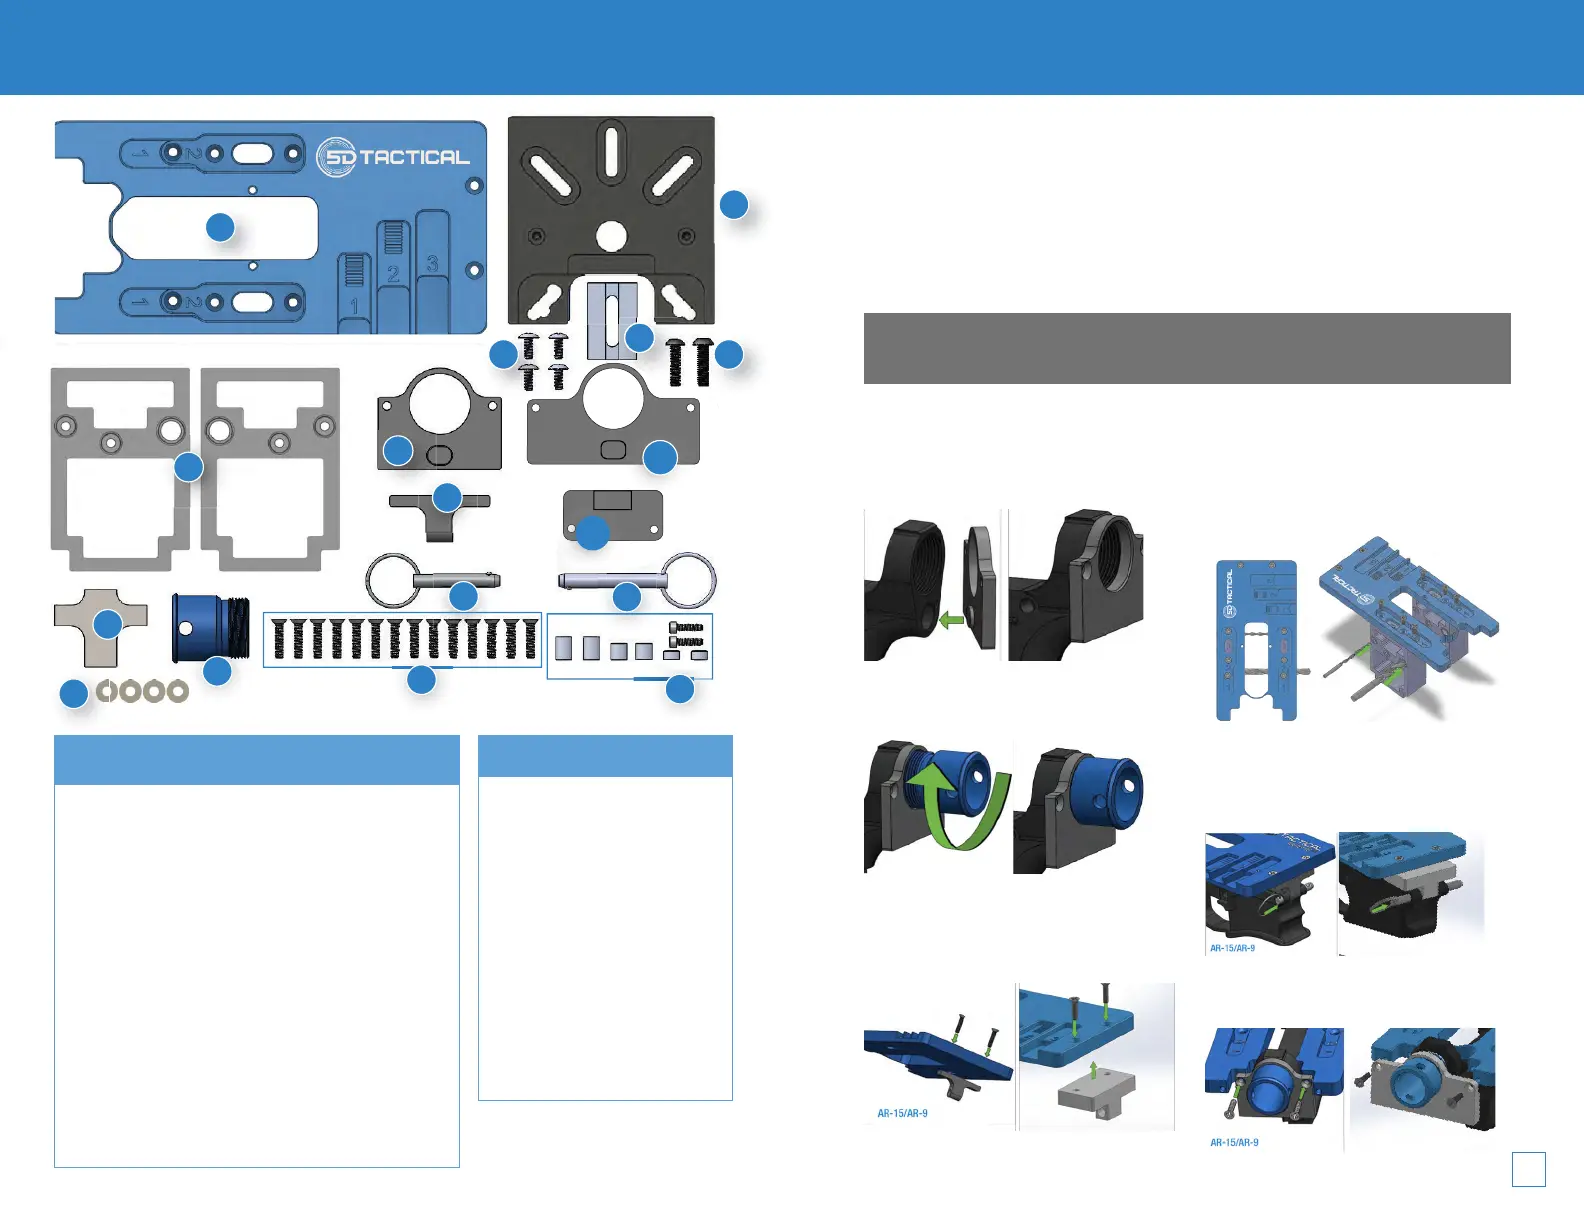
A....Guide Plate
B....Router Adapter
C....(4) Router Adapter
Screws
D....Router Adapter Side
Block
E....(2)Router Side Block
Screws
F....Side Plate
G...AR-15/AR-9 Buffer
Plate
H.... AR-10/.308 Buffer
Plate
1. Router
2. Drill
3. 5D Tactical ReadyMILL™
4. 3/8” Drill Bit
5. 21/64” Drill Bit
6. 5/32” Drill Bit
7. Vise
8. Shop Vac
9. #2 Phillips Screwdriver
10. 7/64’ Allen Wrench
11. Eye Protection
12. Ear Protection
13. WD-40 or Cutting Fluid
I....AR-15/AR-9
Takedown Adapter
J.... AR-10/.308
Takedown Adapter
K....AR-15/AR-9
Takedown Pin
L.... AR-10/.308
Takedown Pin
M....Drill Guide
N....Buffer Adapter
O...(12) Jig Screws
P...Guide Pin Set
Q....(4)Router Adapter
Washers
1-1
1-2
1-3
1-4
Clean surface of the 80% receiver and
apply masking tape to the sides.
Apply the Buffer Plate to the back of
the receiver as shown. Use gray Buffer
Plate for AR-15/AR-9 receivers and black
Buffer Plate for AR-10/.308 receivers.
Loosely thread the Buffer Adapter into
the receiver until the Buffer Plate is
pressed against the back of the receiver.
Loosely Install the Takedown Adapter
to the Guide Plate using (2) Jig Screws.
Use smaller silver Takedown Adapter for AR-
15/AR-9 receivers and larger black Takedown
Adapter for AR-10/.308 receivers.
1-5
Orient ambidextrous Side Plates, with
larger 3/8” bushings to the rear. Set
Guide Plate atop Side Plates with numeral ‘3’
visible through guide plate.
1-7
1-8
Align the Buffer Plate with the holes
in the rear of the Guide Plate. Loosely
install (2) Jig Screws.
*ALWAYS WEAR EYE AND HEARING PROTECTION WHEN OPERATING POWER TOOLS*
At 5D Tactical we understand you have chosen to spend your hard earned money
with us, and because of that, we strive for 100% customer satisfaction. Your Router
Jig Pro caries a Lifetime Warranty against manufacturer’s defects. Please contact us
by phone at 508-834-4223 or email SALES@5DTACTICAL.COM with any questions
or concerns regarding the use of your Router Jig Pro.
Replacement parts, build kits, and 80% lowers are available for purchase on our
website; 5DTactical.com
PART 1: JIG ASSEMBLY
1-6
Loosely thread (6) Jig Screws and insert
the 3/8” (biggest) and 5/32” (smallest)
drill bits in the Side Plates as shown and then
tighten all screws.
Thank you for your Router Jig Pro purchase.
Remove drill bits. Align receiver with
the Takedown Adapter, and pass
the Takedown Pin through the receiver and
adapter. Use the correct size Takedown Pin
for the receiver.
A
B
C
D
E
F G
I
P
O
N
G
A
* IMAGE COLORS MAY VARY FROM ACTUAL PRODUCTS
F
H
M
L
K
J
Q
H
J


 To Next Page
 Loading...

