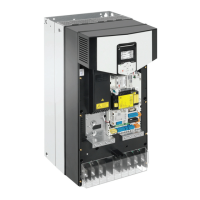
• Where control cables must cross power cables, make sure that they are arranged
at an angle as near to 90 degrees as possible.
• Do not run extra cables through the drive.
• Make sure that the cable trays have good electrical bonding to each other and to
the grounding electrodes. Aluminum tray systems can be used to improve local
equalizing of potential.
The following figure illustrates the cable routing guidelines with an example drive.
min. 300 mm (12 in)
min. 300 mm (12 in)
min. 500 mm (20 in)
min. 500 mm (20 in)
min. 200 mm (8 in)
90°
1
2 4
4
3
2
1
3
2
3
Motor cable1
Input power cable2
Control cable3
Brake resistor or chopper cable (if any)4
■ General guidelines – North America
Make sure that the installation is in accordance with national and local codes. Obey
these general guidelines:
• Use separate conduits for the input power, motor, brake resistor (optional), and
control cabling.
• Use separate conduit for each motor cabling.
The following figure illustrates the cable routing guidelines with an example drive.
70 Guidelines for planning the electrical installation

 Loading...