Navigator 500
Sodium analyzer 4Setup
20 OI/ASO550–EN Rev. G
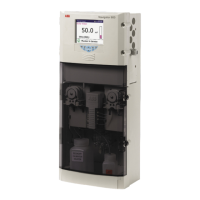
4.1.2 Fitting and filling the reservoir (option)
Referring to Fig. 4.2:
1. Push reservoir
A into clip B.
2. Slide the lower end of the reservoir tube
C onto
reference electrode filler tube D.
3. Remove filler cap
E from the reservoir A.
4. Fill the reservoir with 3.5 KCI solution and squeeze the
reservoir tube
C repeatedly to expel any bubbles.
5. Unscrew filler plug
G 1 turn from the fully-closed position
to avoid creating a vacuum.
6. Ensure O-ring F is in place and replace filler cap E.
4.1.3 Sensor panel
1. Fill the reagent solution container with appropriate
solution.
2. Open the shut-off valve upstream of the wet-section panel
and adjust it until sample is overflowing from the overflow
pipe of the constant-head unit.
The maximum and minimum flow rates are 400 to 100
ml/min (24.4 to 6.10 cu in./min).
3. Ensure that sample is passing from the constant-head unit
to the flowcell and that the entrainment of reagent is
operating; the entrainment should be regular, not
intermittent.
Allow at least one hour before carrying out a calibration.
4. If the wet-section is a multiple wet-section configuration,
check / set the DIP switches on the wet-section PCB –
see Appendix C, page 78.
5. Start-up the transmitter as described in the Section 4.2.
6. Perform a two-point calibration:
– for single-stream wet-sections refer to Section 5.2,
page 22
– for multi-stream wet-sections refer to Section 5.3,
page 23
7. The wet-section is now ready for use.
4.2 Transmitter start-up
Ensure all electrical connections have been made and switch
the power to the transmitter on. If the wet-section is being
commissioned for the first time, programming and calibration of
parameters is required – refer to Section 5.2, page 22
(single-stream) or Section 5.3, page 23 (multi-stream) to perform
a calibration for the first time.
The menu structure, general operation and menu descriptions,
including Calibration are detailed Section 7, page 42.
Note. The reservoir is supplied partially-assembled.
Assemble only immediately before using the wet-section (to
avoid the possibility of solution drying out if the wet-section
is stored for any length of time).
Note. Ensure the reservoir tube is not kinked and
does not contain air bubbles.
Fig. 4.2 Fitting and filling the reservoir
 Loading...