Step 4: Connect to the Snap Server for the First Time
Your Snap Server is preset to get an IP Address automatically.
If your network does not assign IP Addresses
Your Snap Server is preset to get an IP Address automatically.
automatically,
Your Snap Server is preset to get an IP Address automatically.
Your Snap Server is preset to get an IP Address automatically.
use the
Your Snap Server is preset to get an IP Address automatically.
Connect Using Snap Server Manager
Your Snap Server is preset to get an IP Address automatically.
Connect Using Snap Server Manager
Your Snap Server is preset to get an IP Address automatically.
procedure below to assign one manually
Your Snap Server is preset to get an IP Address automatically.
procedure below to assign one manually
Your Snap Server is preset to get an IP Address automatically.
If your network does not assign IP Addresses
procedure below to assign one manually
If your network does not assign IP Addresses
Connect Using Snap Server Manager procedure below to assign one manuallyConnect Using Snap Server Manager
Your Snap Server is preset to get an IP Address automatically.
Connect Using Snap Server Manager
Your Snap Server is preset to get an IP Address automatically.
procedure below to assign one manually
Your Snap Server is preset to get an IP Address automatically.
Connect Using Snap Server Manager
Your Snap Server is preset to get an IP Address automatically.
procedure below to assign one manually. procedure below to assign one manually
server number. The server number is a unique,
, where
server number. The server number is a unique,
, where
numerics-only string that appears on a label on
server number. The server number is a unique,
numerics-only string that appears on a label on
server number. The server number is a unique,
numerics-only string that appears on a label on
the
numerics-only string that appears on a label on
underside of the server chassis
numerics-only string that appears on a label on
underside of the server chassis
numerics-only string that appears on a label on
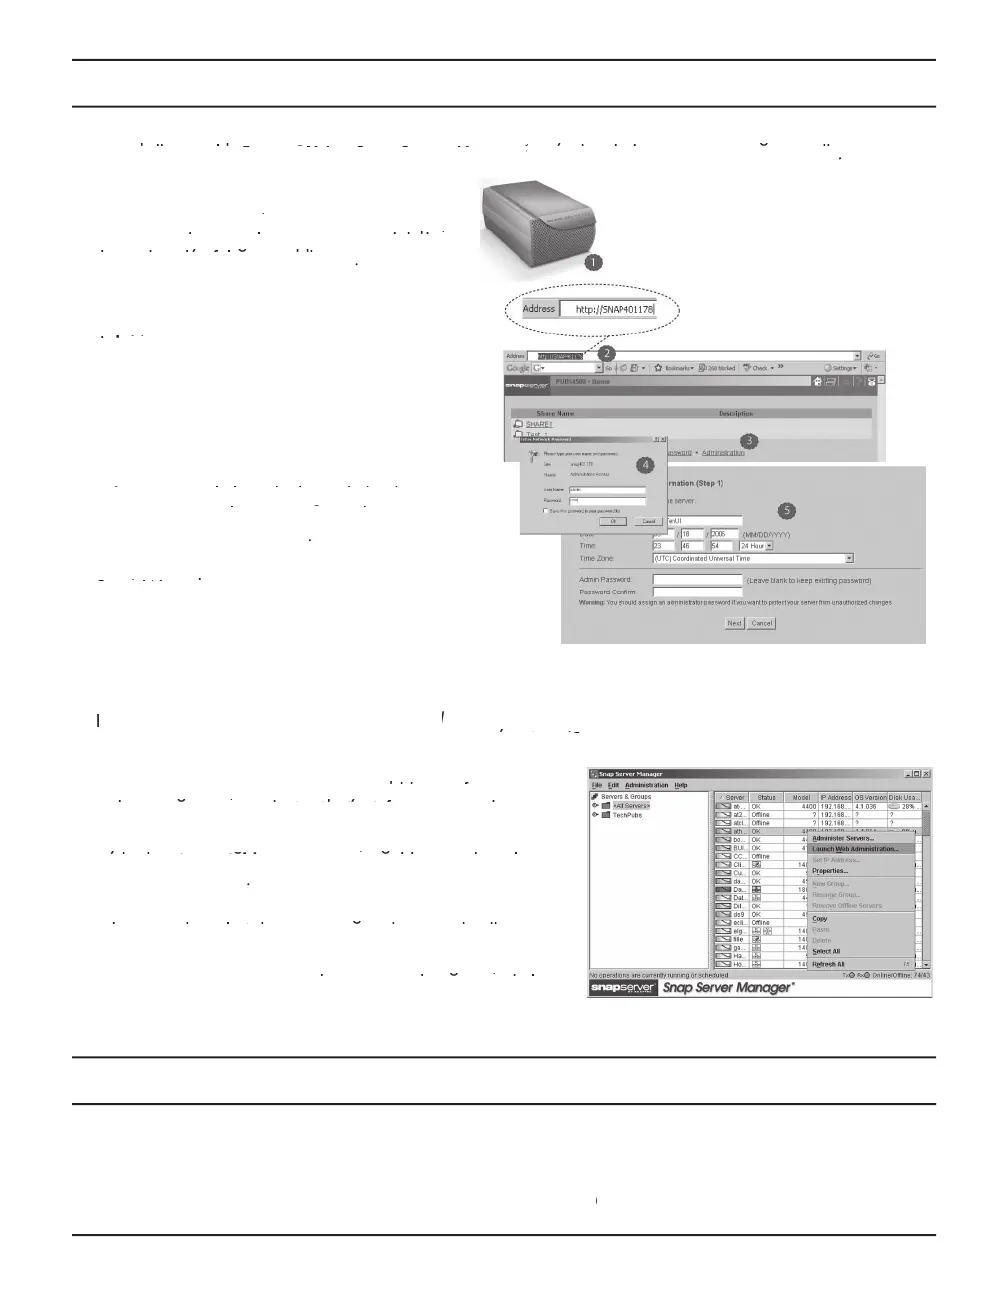
In a Web browser, enter the following URL:
http://SNAP
the server name)
http://SNAP
. The Web View screen opens.
If the Web View screen does not open,
Log into the Administration Tool. Click the
Log into the Administration Tool. Click the
dministration
Log into the Administration Tool. Click the
link. In the login dialog box,
Log into the Administration Tool. Click the
link. In the login dialog box,
Log into the Administration Tool. Click the
link. In the login dialog box,
as the user name and
link. In the login dialog box,
Complete the setup procedure using the Initial
Complete the setup procedure using the Initial
Setup
Complete the setup procedure using the Initial
Complete the setup procedure using the Initial
W
Complete the setup procedure using the Initial
Complete the setup procedure using the Initial
izard.
Complete the setup procedure using the Initial
Connect Using Snap Server Manager (SSM)
Use this procedure if your network does not assign
IP addresses automatically or cannot resolve the server name to an IP address.
Install_SSM.html fi le on Install_SSM.html
CD. Be sure to install SSM on a
ing on the same network segment as your S
your Snap Server User
ing on the same network segment as your S
your Snap Server User
your Snap Server User
nap Server.
your Snap Server User
Launch SSM. SSM will discover all S
network segments, and will display IP addresses for servers
nap Servers on the local
network segments, and will display IP addresses for servers
nap Servers on the local
with IP assignments and 10.10.10.10 for servers with no IP.
network segments, and will display IP addresses for servers
with IP assignments and 10.10.10.10 for servers with no IP.
network segments, and will display IP addresses for servers
If you need to assign an IP address, right-click the server name
If you need to assign an IP address, right-click the server name
and select
If you need to assign an IP address, right-click the server name
If you need to assign an IP address, right-click the server name
Set IP Address
If you need to assign an IP address, right-click the server name
. Enter an IP address and a subnet
If you need to assign an IP address, right-click the server name
. Enter an IP address and a subnet
If you need to assign an IP address, right-click the server name
Launch the Administration Tool. Right-click the server name and
Launch the Administration Tool. Right-click the server name and
select L
Launch the Administration Tool. Right-click the server name and
Launch the Administration Tool. Right-click the server name and
aunch Web Administration
Launch the Administration Tool. Right-click the server name and
, as shown in the illustration.
Launch the Administration Tool. Right-click the server name and
, as shown in the illustration.
Launch the Administration Tool. Right-click the server name and
link. In the login dialog box, enter
link. In the login dialog box, enter
as the user name and
link. In the login dialog box, enter
link. In the login dialog box, enter
as the password, then
link. In the login dialog box, enter
Complete the setup procedure using the Initial Setup Wizard.
Step 5: Use your Snap Server
Once installed on your network, the Snap Server appears as a server with shared folders. You can use it to
organize and store fi les in the same way you use the folders on your local hard disk. By default, there are no
security restrictions when accessing the server, but you can confi gure your access and security settings through the
User’s Guide for the Snap Server 110 and 210
User’s Guide for the Snap Server 110 and 210 for more information.User’s Guide for the Snap Server 110 and 210
 Loading...