ASSEMBLY INSTRUCTIONS
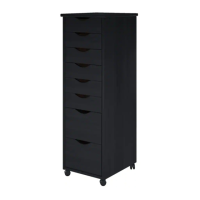
6+2 Drawer Roll Cart
#76156 - Medium Pine Finish
CUSTOMER SERVICE AND REPLACEMENT PARTS:
FOR FASTER SERVICE ON PARTS OR HELP, PLEASE GO TO OUR WEBSITE AT WWW.ADEPTUS.COM;
OR CALL TOLL FREE 1.888.ADEPTUS (1.888.233.7887) FOR ASSEMBLY QUESTIONS.
MON-FRI 10 A.M. TO 4 P.M. E.S.T., CLOSED HOLIDAYS
IF YOU CALL, PLEASE HAVE ON HAND:
• PRODUCT NAME AND STOCK NUMBER
• WHEN AND WHERE THE UNIT WAS PURCHASED
• P.O. NUMBER FROM THE BOTTOM OF THIS PAGE
IF WE ARE BUSY HELPING OTHER CUSTOMERS, PLEASE LEAVE YOU NAME AND NUMBER
TO RECEIVE A RETURN CALL.
YOUR RETAILER MAY ALSO PROVIDE SERVICE OR PARTS.
HELPFUL OVERALL:
• SAVE THESE INSTRUCTION SHEETS AND THE BOX UNTIL YOU ARE SATISFIED WITH THE ASSEMBLY.
• DO NOT GLUE THE PARTS OF THE UNIT TOGETHER UNLESS YOU HAVE TESTED THE ASSEMBLY FIRST.
• PERFORM THE ASSEMBLY ON A CLEAN HARD SURFACE USING THE FLATTENED CARTON OR A TOWEL
TO PROTECT THE SURFACE AND THE FINISH OF THE UNIT. DO NOT ASSEMBLE ON CARPET.
VISIT WWW.ADEPTUS.COM TO REGISTER YOUR PRODUCT AND SEE THE
COMPLETE ADEPTUS LINE. REGISTRATION IS REQUIRED FOR PARTS REQUESTS.
THANK YOU FOR YOUR PURCHASE AND WELCOM TO ADEPTUS!
NOTICE: THE WRITTEN INSTRUCTIONS CONTAINED HEREIN ARE COPYRIGHTED.
1-9