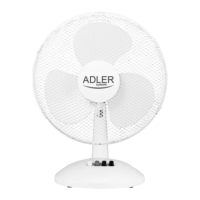
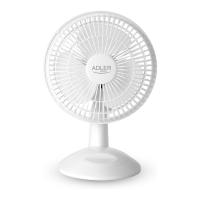
device
DETAILED SAFETY INSTRUCTIONS
1. Use only original assembly parts, which were supplied with the fan set.
2. The device may be turned on only after it is fully assembled. A partially assembled and started-up device does not guarantee safe
use and proper operation.
CAUTION: DO NOT TURN THE FAN ON WITHOUT ATTACHING THE FRONT AND REAR GUARDS.
3. Place the fan away from curtains, sheer curtains and other items, which can be sucked in by the running fan.
4. Do not insert any objects into the fan guard. This could hurt your body or damage the device.
DESCRIPTION OF THE DEVICE (IMAGE 1 – models Ad7301, Ad7302, Ad7303, Ad7304, IMAGE 2 – AD7305)
1. Front guard 2. Blade nut 3. Blade
4. Rear guard nut 5. Rear guard 6. Motor unit
7. Motor head lock 8. Power cord 9. Control panel
10. Control panel housing 11. Mounting screw 12. Interior barrel
13. Height adjustment 14. Exterior barrel 15. Base guard
16. Cross base
FAN ASSEMBLY
1. Make sure that the power cord is disconnected from the electrical socket.
Ad7305 model:
– Assemble the fan base (15, 16) and attach the exterior barrel (14).
– Attach the exterior barrel to the control panel housing (10) using the mounting screw (11).
2. Attach the rear guard (5) to the motor unit (6) using the nut (4).
3. Place the fan blade (3) on rotor axis. Fasten with the blade nut (2). Check to make sure that the blade rotates without resistance.
4. Attach the front guard (1) to the rear guard (5) using the hinge clamps on the outside of the front guard.
USING THE DEVICE
1. Press the '0' button on the control panel (9), then plug the power cord into an electrical socket.
2. Turn the fan on by pressing button '1' or '2' (Ad7301, AD7302) or '1', '2' or '3' (AD7303, Ad7304, Ad7305). After a few seconds the
fan blades will begin to rotate at the maximum speed of the selected gear
3. To turn on the oscillating motion of the fan unit (horizontal) press the motor head lock button (7). Pulling the button upwards will turn
the oscillation off (horizontal).
4. You can adjust the fan's vertical angle by tilting the fan unit.
CLEANING AND MAINTENANCE
CAUTION: Do not allow the fan's motor part or any buttons to get wet.
1. Before cleaning remove the plug from the electrical socket.
2. To clean dust from the fan blades, remove the front guard. Remove the fan blade from the rotor axis, wipe with a damp cloth, then
wipe dry.
3. To clean the motor unit gently wipe it with a damp cloth, without detergents. Wipe dry.
4. Store the fan in a dry place.
TECHNICAL INFORMATION:
diameter power: voltage
AD7301 15 cm 15/30W 220-240V~50/60Hz
AD7302 23 cm 30/60W 220-240V~50/60Hz
AD7303 30 cm 40/80W 220-240V~50/60Hz
AD7304 40 cm 45/90W 220-240V~50/60Hz
AD7305 40 cm 45/90W 220-240V~50/60Hz
AD7317 15 cm 15/30W 220-240V~50/60Hz
4
Device is made in class II of insulation. Device is compliant with EU directives:
- Low voltage directive (LVD)
- Electromagnetic compatibility (EMC)
Device marked CE mark on rating label
To protect your environment: please separate carton boxes and plastic bags and dispose them in corresponding waste
bins. Used appliance should be delivered to the dedicated collecting points due to hazarsous components, which may
effect the environment. Do not dispose this appliance in the common waste bin.
DEUTSCH
ALLGEMEINE SICHERHEITSVORSCHRIFTEN LESEN SIE AUFMERKSAM WICHTIGE
ANWEISUNGEN BEZÜGLICH DER SICHERHEIT DER BENUTZUNG BEWAHREN SIE
DIESE FÜR DIE ZUKUNFT AUF
Bei Verwendung des Gerätes zu gewerblichen Zwecken werden die Garantiebedingungen
geändert.
1.Vor dem ersten Gebrauch, die Bedienungsanleitung lesen und die dort angegebenen
Hinweise beachten. Der Produzent trägt keine Verantwortung für Schäden, die aufgrund
von bestimmungswidriger Nutzung oder unsachgemäßer Bedienung entstanden sind.
2.Das Gerät ist nur für den Hausgebrauch verwendet. Verwenden Sie es nicht für andere
Zwecke als den bestimmungsgemäßen Gebrauch.
3.Das Gerät ausschließlich an die Steckdose 220-240 V ~ 50/60 Hz anschließen. Es darf
nicht zu anderen, bestimmungswidrigen Zwecken benutzt werden. Wegen


 To Next Page
 Loading...