Do you have a question about the AEG FAVORIT 99020 I and is the answer not in the manual?
Read this user manual carefully, including its hints and warnings to avoid mistakes and accidents.
Dishwasher intended for household utensils, avoid solvents, open door during operation, use correct products.
Guidelines for persons with reduced capabilities, chemical burns from detergent, water is not for drinking.
Appliance for adults, keep packaging and detergents away from children.
Check for transport damage, remove packaging, qualified personnel for electrical/plumbing work, avoid altering specifications.
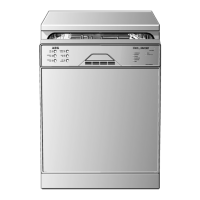
Diagram and list of components: Upper basket, Water hardness dial, Salt container, Detergent dispenser.
Diagram and list of controls: ON/OFF button, Display, Scrolling buttons, OPTION, CANCEL, OK/START buttons.
These buttons have a double function: selecting within programme menu.
Row of lamps for Program and Options menu; displays programme phase, duration, and symbols for options.
Meaning of symbols: DELAY START, CARE PLUS, MULTITAB, SOUND VOLUME.
Press to enter or exit the options menu. How to set options.
Explanation of options: DELAY START, MULTITAB, SETTINGS (LANGUAGE, WATER HARDNESS, RINSE AID, SOUND VOLUME, BRIGHTNESS, CONTRAST).
Press to cancel a washing programme or option setting.
Press to confirm/memorize options or start a washing programme.
Press ON/OFF button, confirm default language or select a new language using scrolling buttons.
Ensure connections are compliant, remove packaging, set water softener, fill salt container, fill rinse aid dispenser.
Adjust water softener manually via dial and electronically based on water hardness.
Dishwasher factory set at position 2. Adjust water hardness dial on the lower basket.
Enter Option menu, SETTINGS, WATER HARDNESS to set level based on water hardness.
Warning about using only specific dishwasher salt. How to fill the salt container.
Warning about using only branded rinse aid. Rinse aid ensures thorough rinsing and streak-free drying.
How to open the container, add rinse aid to the max level, and close the lid securely.
Adjust rinse aid dosage using the 6-position selector based on drying results.
Check salt/rinse aid, load dishes, add detergent, select programme, start wash.
General rules for loading dishes, avoid blocking spray arms, load hollow items downwards.
Items not suitable for dishwasher and items of limited suitability (e.g., plastic, wood, lead crystal, stoneware).
Load larger and heavily soiled dishes and pans in the lower basket.
Warning about sharp items. How to place cutlery in the tray and basket for proper cleaning.
How to place forks and spoons, and how to open the cutlery basket.
Glass holders in the lower basket for up to 4 beer glasses. Foldable holders.
Replacing beer glass holders with cup racks. Removing beer glass holders or cup racks.
Load smaller, fragile crockery and cutlery. Arrange items and use folding cup racks.
How to fold glass racks. How to fold spikes for more room.
Table showing maximum dish height with upper basket raised or lowered.
How to pull out, raise, and lower the upper basket to latch into position.
Only use dishwasher-specific detergents. Observe manufacturer's recommendations for dosing.
How to open the detergent dispenser lid.
How to fill the detergent dispenser (1) and prewash chamber (2) with detergent.
Advice on using detergent tablets, especially regarding short washing programmes.
How to use combi detergent tablets, auto deactivation of rinse aid/salt, cycle duration changes.
Cannot change Multitab function once programme is running. How to exclude it.
Recommendations for improving drying results: fill rinse aid, activate dispenser, set dosage.
Chart detailing programmes: AUTOMATIC, 30 MINUTES, 70° INTENSIVE, 65° NORMAL.
Chart detailing programmes: ENERGY, 55° 1 HOUR, 45° GLASS, PREWASH, NIGHT CYCLE.
Description of the silent washing programme, its benefits and characteristics.
Steps to select and start a programme: check loading, water tap, press ON/OFF, select programme, set options, press OK/START.
Warning about interrupting programmes. How to cancel a delay start or programme.
How opening the door stops the programme. How to continue after closing the door.
Automatic stop and acoustic signal. Display messages.
Drying system operation. Steps to unload: press ON/OFF, open door, wait. Empty lower basket first.
Importance of cleaning filters for washing results. Reminder message for cleaning.
Warning to ensure machine is switched off. How to open the door and remove the lower basket.
Description of filter system (coarse, micro, flat). Steps to remove and clean filters.
Never try to remove the spray arms. Remove residues with a cocktail stick if holes are clogged.
Clean exterior with damp cloth, interior seals and dispensers regularly. Run empty wash cycle quarterly.
Advice for non-use, frost protection, and safe machine relocation.
General advice for problems like not starting or stopping. Switch off and follow corrective actions.
Troubleshooting table for messages like 'OPEN THE TAP', 'DRAIN BLOCKED', 'Anti-flood device activated'.
Possible causes for programme not starting: door not closed, no plug, blown fuse, delay start.
Addresses issues like unclean, wet, dull, or water-spotted dishes due to various factors.
Details dimensions, connections, capacity, and procedures for test institutes.
Rinse aid setting for test institutes: position 4 (Type III).
Diagrams showing example loading arrangements for upper and lower baskets for testing.
Warning: Electrical/plumbing work by qualified personnel. Remove packaging, position machine near tap/drain.
Ensure unit is secured against tilting and properly leveled for door seal.
Can connect to hot (max 60°) or cold water. Use 3/4" thread spout or quick-coupling tap.
Hoses can be turned, ensure locknut fitted. Do not use old hoses. Safety features prevent backflow.
Safety valve cuts off water if hose leaks. Take care when installing, do not immerse in water.
Connect to sink outlet spigot or a stand pipe with vent-hole.
Warning: Appliance must be earthed. Match supply voltage/type. Use shockproof socket, no multi-way plugs.
Product is not household waste. Take to collection point for recycling electrical/electronic equipment.
Packaging is environmentally friendly and recyclable. Dispose of plastic components in appropriate containers.
Pull plug, cut cable, dispose of door catch to prevent child entrapment.
| Brand | AEG |
|---|---|
| Model | FAVORIT 99020 I |
| Category | Dishwasher |
| Language | English |