43
ENGLISH
Manual
NOTE:
The manually set time is automatically overridden as
soon as an iPod/iPhone is plugged onto the docking
port.
1. Press the TIME SET button (15). The hours start ash-
ing.
2. Press the
/ buttons (2 on the RC), to set the hours.
Press the TIME SET button to conrm.
3. Press the / buttons to set the minutes.
4. Press the TIME SET button again to save the current
time setting.
NOTE:
• You can also set the time with the SET frequency
control (11 on the device).
• While the time is displayed, you can select between
12 hour and 24 hour display by holding down the
TIME SET button.
• 12 hour display shows:
AM = morning, PM = afternoon
iPod/iPhone Compatibility
Due to the large variety of iPod and iPhone models and
generations on the market, full compatibility cannot be
guaranteed. Before connecting your iPod/iPhone, ensure
that it has a compatible interface.
Full compatibility of the remote functions also cannot be
guaranteed. Operate your iPod/iPhone as normal, while it
sits in the docking station.
NOTE:
Depending on the software version of your iPhone the
following error message may be displayed:
“This accessory was not developed for iPhone use. It
is possible that noise occurs and signal strength is
reduced.”
In this case press “OK”
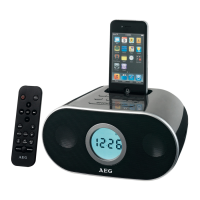
General Operation
NOTE:
Some buttons you can nd as well on the device as on
the remote control.
Identical buttons efect the same function.
Switch device on/o (8/13)
By pressing the
button, you can put the device into
standby mode. Pressing the button again will switch the
device on.
Display brightness
You can select or switch o the display brightness with
the DIMMER (SNOOZE/DIMMER) button (13/7).
NOTE:
The display brightness is automatically switched o
when you switch the device to Standby mode.
Volume
There are two options:
• Use the VOLUME control (6 on the device) to set the
desired volume.
• By pressing the +/- buttons (12 on RC) you can adjust
the desired volume.
Infrared Remote Control
For wireless control within a distance of 5m. If the
distance decreases you should change the batteries. For
proper operation mind a clear view between the remote
control and the sensor on the device.
MUTE (5)
For immediate muting of the volume. Press the MUTE
button again to cancel this function.
NOTE:
Due to technical reasons, the activated function is not
displayed.
Radio Tuning
• Press the button (8/13) to switch the device on.
• Repeatedly press AUDIO button (12/4) until the display
shows “FM”.
• Use the SET control (11) or the / buttons (12) to
tune in the desired station.
• If the reception is too weak and there is interference
on the channel, try to improve the reception by chang-
ing the position of the aerial and /or coil/uncoil it.
Save Radio Station
1. To save the station you have found, hold down the
PRESET button (10 on RC) for about 3 seconds. A
preset ashes on the display (e.g. 01).
2. Press the
/ buttons (3/5 on RC) to select a station
preset between 01and 20.
3. Briely press the PRESET button to save the radio sta-
tion.
Recall Saved Radio Stations
To select the saved radio station, rst press the PRESET
button. Now use the
/ buttons to the select the stor-
age location.
 Loading...