Do you have a question about the ageLOC LumiSpa iO and is the answer not in the manual?
Introduces key new features of the LumiSpa iO device.
Provides real-time feedback on pressure and movement during treatments.
Enables users to create and save personalized treatment routines.
Details how to monitor usage and earn achievement awards.
Explains how to track skin journey and progress using selfies.
Provides personalized product suggestions based on usage.
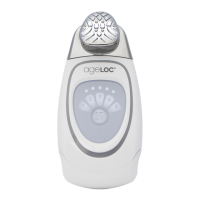
Details the physical parts and features of the LumiSpa iO.
Steps to download the Nu Town mobile application.
Instructions to find and select the VERA function in the app.
Initiate the VERA function on your mobile device.
Select the 'My Products' section within the VERA interface.
Begin the device pairing process by selecting the appropriate option.
Confirm and start the device pairing sequence.
Power on the LumiSpa iO device to enable pairing.
Tap 'Connect' in the app to establish connection.
Choose the LumiSpa iO from the list of detected devices.
The device begins the pairing process with the app.
Confirmation screen indicating successful device pairing.
Troubleshooting steps for resolving pairing errors.
Tap your LumiSpa iO in the app after successful pairing.
Discover and browse through available treatment options.
Access your saved and default treatment routines.
Browse and select from a library of available treatments.
Choose a specific treatment from the list to begin.
Initiate the selected treatment and follow the guided tutorial.
Follow real-time guidance for optimal treatment application.
Review post-treatment results and performance metrics.
Access your paired device in the app to start customization.
Navigate to treatment options to begin the customization process.
Initiate the process of creating a new custom treatment.
Define the treatment name and select the appropriate device head.
Choose from the available LumiSpa iO treatment head options.
Define specific areas of the face for targeted treatment.
Customize area name and adjust desired treatment duration.
Save the newly created custom treatment to the app.
Choose a saved treatment from 'My Treatments' to transfer.
Initiate the process of saving the selected treatment to the device.
Choose a color indicator for the treatment and update presets.
Locate your saved treatments within the 'Device Treatments' section.
Start a saved treatment by double-pressing the device's power button.
Access usage data and earned awards within the app.
Follow steps to reset the device via charging and power button interaction.
Navigate to and begin using the Selfie Timeline feature.
Take photos and compare them using analysis tools.
Share your selfie comparisons and progress with friends.
| Category | Personal Care Products |
|---|---|
| Skin Type Compatibility | All skin types |
| Connectivity | Bluetooth |
| Device Type | Facial Cleansing Device |
| Usage Time | 2 minutes |
| Water Resistance | IPX7 (Fully submersible up to 1 meter for 30 minutes) |
| App Connectivity | Yes, via Nu Skin Vera app |
| Benefits | Deep cleansing |
| Battery Type | Rechargeable lithium-ion battery |
| Charging Method | Magnetic charging |
| Included Accessories | Charging dock, travel case, ageLOC LumiSpa treatment head |