INSTALLATION INSTRUCTIONS
CAUTION: MAKE SURE POWER IS SWITCHED OFF AT
SERVICE PANEL BEFORE STARTING INSTALLATION.
SECTION 1
Preparing the Insert
1. Unpack hood from the carton and confirm that all pieces are present. In addition to the
range hood you should have:
1 - Duct collar
1 - Wire compartment
3 - Aluminum Grease Filters (shipped installed)
2 - Lamps
1 - Instruction/Safety Sheet
NOTE: Some hoods may be shipped with a protective plastic adhered to the underside of the
unit. It is recommended to leave this in place during installation to protect it from scratching.
Remove when the installation is complete.
SECTION 2
Preparing the Area
CAUTION: MAKE SURE POWER IS SWITCHED OFF AT
SERVICE PANEL BEFORE STARTING INSTALLATION.
CAUTION: WHEN CUTTING OR DRILLING INTO WALL DO NOT
DAMAGE ELECTRICAL WIRING AND OTHER HIDDEN UTILITIES.
1. Most building codes require noncombustible material above the cooking surface. If
you you have wood or some other combustible material on the bottom of your cabinets
it is recommended that you use the optional hood liner (See Section 3) If you have
noncombustible material cut a 26-7/8" x 10" hole into the cabinet or canopy the power
unit will be mounted into (Figure 1).
NOTE: The hood must be mounted a minimum of 24” and a maximum of 36” from the
cooking surface.
SECTION 3
Optional Hood Liner
CAUTION: MAKE SURE THE SURFACE YOU ARE MOUNTING THE
INSERT AND LINER TO IS CAPABLE OF SUPPORTING THE WEIGHT OF THE UNIT.
OTHERWISE YOU WILL NEED TO REINFORCE THE AREA.
1. Secure the liner to the cabinet frame or custom canopy using three screws on each end
of the liner and 3 screws on each side of the top of the liner (Figure 2).
SECTION 4
Installing the Insert
2. Insert the power unit into the hole and secure to liner using the screws provided with the
Liner (Figure 3).
www.airkinglimited.com
6727921 Rev. C 11-17 2 of 12
NOTE: If an optional Air King Liner is not being used; use appropriate hardware to install the
unit in place, making sure to comply with all Local and National Building Codes.
CAUTION: MAKE SURE THE SURFACE YOU ARE MOUNTING THE
POWER UNIT TO IS CAPABLE OF SUPPORTING THE WEIGHT OF THE UNIT.
OTHERWISE YOU WILL NEED TO REINFORCE THE AREA.
SECTION 5
Ducting
CAUTION: ALL DUCTING MUST COMPLY WITH LOCAL AND NATIONAL
BUILDING CODES.
NOTE: The ducting from this fan to the outside of the building has a strong effect on the air
flow, noise and energy use of the fan. Use the shortest, straightest duct routing possible
for best performance, and avoid installing the fan with smaller ducts than recommended.
Insulation around the ducts can reduce energy loss and inhibit mold growth. Fans installed
with existing ducts may not achieve their rated air flow.
WARNING: TO REDUCE THE RISK OF FIRE, USE ONLY
METAL DUCTWORK.
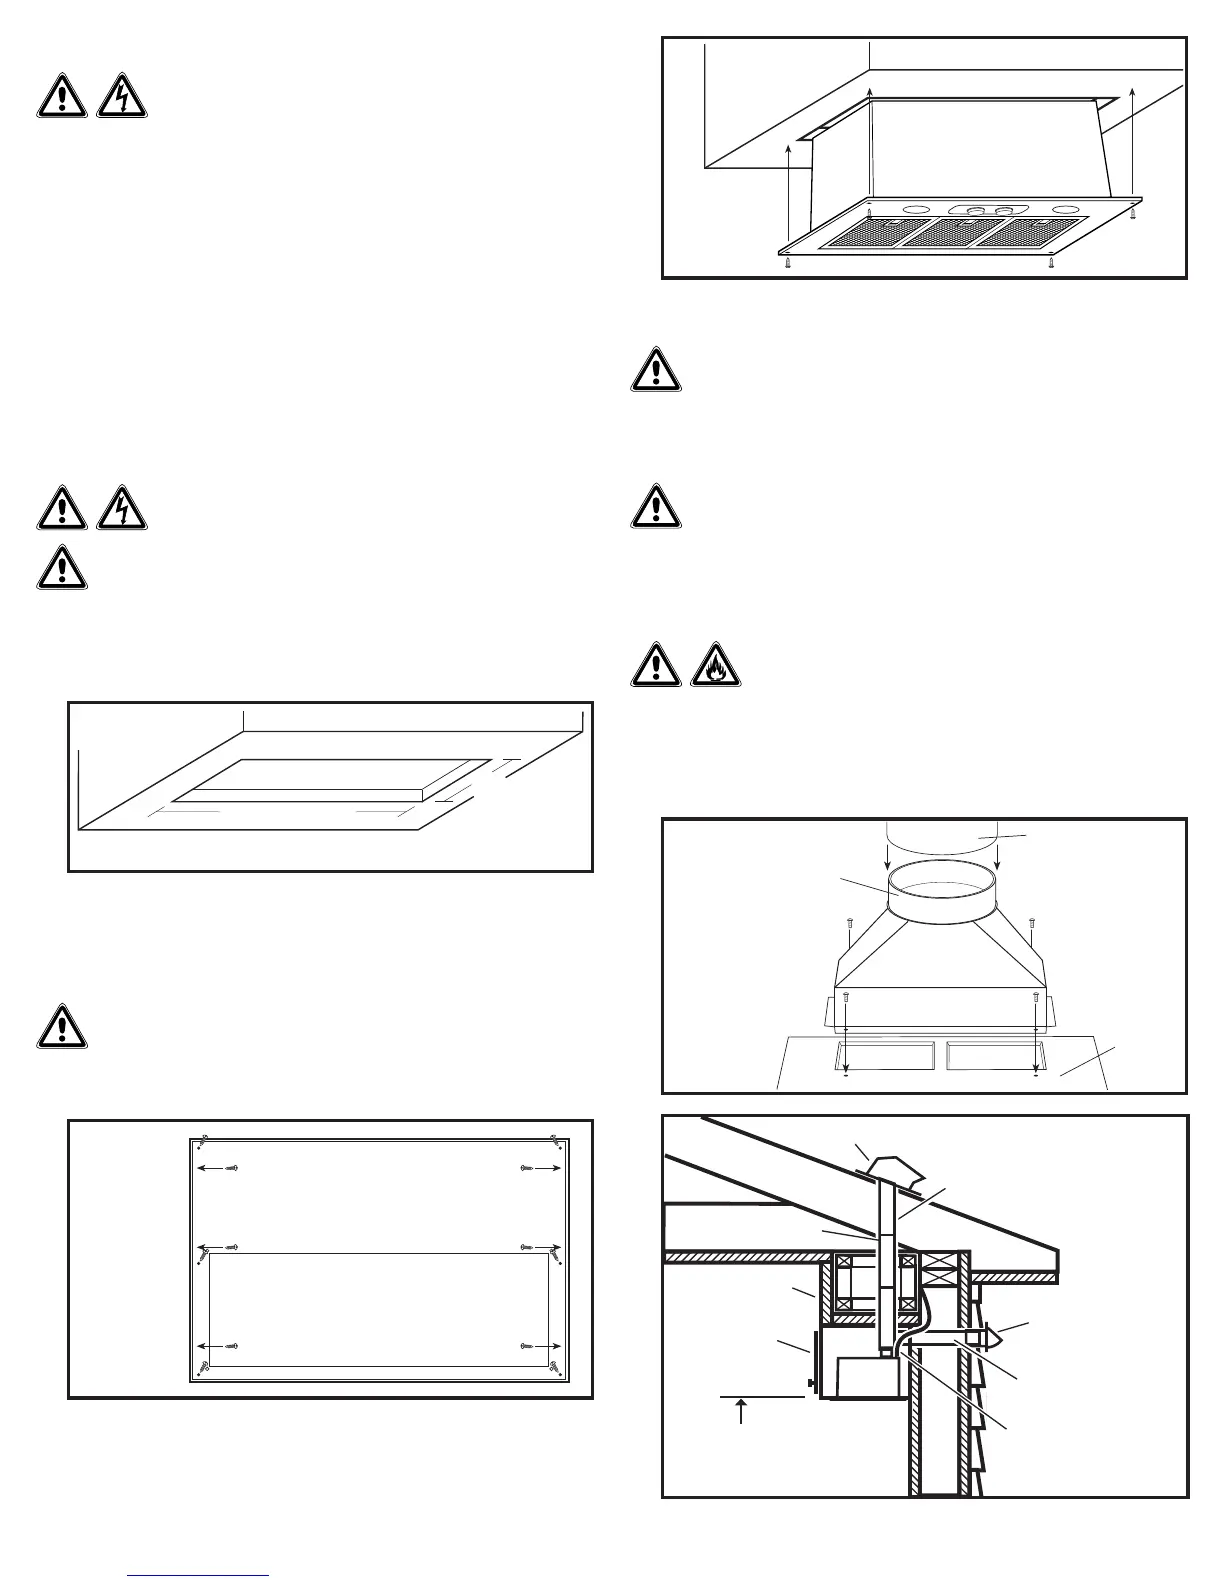
1. Install the included duct collar to the hood with four of the provided #6 blunt tip screws
(Figure 4). Ensure duct joints and exterior penetrations are sealed with caulk or other
similar material to create an air-tight path to minimize building heat loss or gain and to
reduce the potential for condensation. Place/wrap insulation around duct and/or fan in
order to minimize possible condensation buildup within the duct, as well as building heat
loss or gain (Figure 5).
Figure 1
26-7/8"
10"
Figure 2
Figure 3
Figure 5
Power Cable*
10" Round Duct
(Horizontal Discharge)*
Wall Cap*
Roof Cap*
*Purchase separately
10" Round Duct
(Vertical Discharge)*
Soffit
Cabinet
Hood
Seal duct
joints with tape
24" - 30" above
cooking surface
Figure 4
Duct Collar
Ducting
Power
Unit
 Loading...