Do you have a question about the Airtec ROTO-MASTER SM-320-EL and is the answer not in the manual?
Details about the motor and connected electrical system.
Physical dimensions (length, width, height) and weight of the machine.
Specifies the noise level of the machine at 1 meter.
Guidelines for connecting the machine to a generator.
Explains the meaning of the machine model designation.
Important information regarding machine operation and safety for owners.
Symbol for critical safety instructions related to life and limb.
Warning about dangerous electrical voltages.
Warnings and prohibitions to prevent personal injury or extensive damage.
Information on safety devices for electrical installations.
Indicates when advice from the manufacturer is required.
Information related to the economical use of the machine.
Guidelines for performing regular checks on the machine.
Highlights crucial information found within the instruction manual.
Fundamental responsibilities for personnel working with the machine.
Defines operator responsibility and their right to refuse unsafe instructions.
Requirement for experienced personnel to supervise trainees.
Prohibition of any work practices that could compromise safety.
Mandates operation only with functional safety equipment.
Requirement for daily visual inspection for damage and defects.
Instruction to immediately stop and secure the machine if faults occur.
Specifies that electrical work must be performed by qualified electricians.
Instruction to disconnect the machine from power by pulling the plug.
Safety requirement for maintaining clearance when working in public areas.
Specific steps for performing mechanical maintenance tasks.
Explains what the safe state (zero position) of the machine means.
Step-by-step instructions to put the machine in the Safety OFF position.
Instruction to disconnect the machine from power by pulling the plug.
Identifies specific hazardous points on the machine.
Detailed steps for putting the machine into the Safety OFF state.
Mandatory instruction to disconnect the power supply by pulling the mains plug.
Highlights specific points on the machine that pose a danger.
Specifies that electrical work must be performed by qualified electricians.
Warns about hazardous dust and mandates industrial vacuum and masks.
Explains the negative impact of too deep milling on machine performance.
Describes how to work the surface easily by pushing the machine.
Emphasizes the importance of proper care and regular maintenance for function and safety.
Lists the items included with the machine upon delivery.
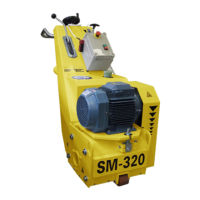
Provides a visual description of the machine's components with a diagram.
Lists the switches included in the switchbox (ON, Emergency Stop, Safety).
Explains the function of the quick lifter for the milling drum.
Describes how to adjust the working depth for optimal surface finish.
Guidelines for setting the milling depth to ensure proper machine operation.
Procedures for securing the machine during transport via vehicles.
How to move the machine manually using the quick lifter.
Precautions and requirements when using lifting equipment for transport.
Steps for maneuvering the machine during the milling process.
Technical specifications for machine dimensions and weight.
Detailed checklist of tasks to perform before initial machine startup.
Stresses the importance of regular inspections to prevent breakdowns.
Guidelines for safely handling electrical connections, hoses, and controls.
Inspect electrical connections for dirt and foreign bodies.
Inspect electric motors for cleanliness and impurities.
Operators must familiarize themselves with safety instructions before operation.
Instructions for positioning the machine and moving it manually.
Verify the machine is in proper condition for operation, consulting an electrician if needed.
Connect the milling machine and industrial extractor using the dust hose.
Connect the industrial extractor's power cable to the site terminal.
Ensure the dust collector's collection container is empty.
Mandates protective gear (goggles, ear protection, safety shoes) for all personnel near operating machine.
Correct installation and tensioning of the gear belt is crucial.
Instructions for filling oil for gasoline engines before startup.
Verify the hydraulic oil reservoir is filled to the marking.
Ensure emergency stop and safety switches are not activated.
Verify the correct direction of rotation for the drive motor.
Rotate the depth adjustment wheel fully back before starting.
Activate the machine by pressing the green start button.
Slowly lower the milling drum using the quick-lift handle.
Adjust milling depth based on surface requirements for optimal profile.
Warns about hazardous dust and mandates industrial vacuum and masks.
Explains the negative impact of too deep milling on machine performance.
Describes how to work the surface easily by pushing the machine.
General guidelines for operating the SM-320 surfacer.
Recommended milling technique and handling of dust hose and power cable.
Illustrates the recommended direction for milling relative to the dust extractor.
Warning to prevent vehicles from driving over electrical cables and dust hoses.
Explains the significance of feed rate for achieving good milling results.
Instructions for positioning the machine and unrolling the dust hose.
How to work with the hose unrolled in the opposite direction of the extractor.
Advancing into the work area step-by-step, considering hose length.
How to finish the work area by milling the spot where the extractor was located.
Recommendation to repeat milling for very uneven surfaces.
Lift the milling drum from the surface using the quick-lift handle.
Activate the emergency stop button to halt the machine immediately.
Switch off the main switch of the industrial extractor.
Steps for long-term shutdown, including unplugging and covering the machine.
Confirm all rotating parts have stopped before inspection or maintenance.
Instruction to disconnect the machine from power by pulling the plug.
First step in troubleshooting is to put the machine in the emergency off position.
Safety measures required before performing any repair work on the machine.
How to prevent accidental starting of gasoline engines during service.
Steps to take before putting the machine into long-term storage.
Instruction to switch off the machine as the first step for long-term standstill.
How to protect electric motors from environmental factors during storage.
Refers to manufacturer's instructions for gasoline engine models.
Instructions for cleaning and covering the machine for storage.
General information and safety precautions regarding maintenance procedures.
Crucial safety step: secure the machine against accidental startup before repairs.
Explains how proper maintenance reduces repair costs and downtime.
Links machine safety and lifespan to proper maintenance practices.
Refers to a table containing time-based and control maintenance guidelines.
Specifies that time indications are based on daily machine use.
Acknowledges that inspection frequency varies with operating conditions.
Offers assistance from specialists for further advice.
Tasks to perform 12 hours after completing repair work.
Routine checks to be performed daily before starting machine operations.
Inspect working tools and housing for signs of wear.
Verify and adjust the tension of the gear belt if necessary.
Refers to manufacturer's notes for gasoline engine models.
Comprehensive overhaul and cleaning of the entire machine annually.
Opportunity for maintenance staff to gain intensive training.
Guidelines for replacing parts yourself, following specific instructions.
Importance of stocking readily available spare parts to avoid production losses.
Ensures removed screws are replaced with identical quality parts.
Crucial safety step to secure the machine before starting any repair work.
Steps to remove the side panel for access to internal components.
How to detach and remove the working tools from the drive shaft.
Consequences of improper tool arrangement, such as increased wear and reduced performance.
Ensure the drive shaft is clean before installing tools.
Slide the working tools onto the drive shaft until they stop.
Ensure correct fitting of the bearing unit when mounting the side panel.
Strict warning against operating the machine without the side panel or if improperly fitted.
Crucial safety step to secure the machine before starting any repair work.
Remove screws securing the gear belt guard.
Slacken the belt tension if necessary and remove the belt.
Install the gear belt onto the pulley and tension it correctly.
Verify belt parallelism and correct initial stress for proper function.
The motor is designed for long service life with indicators of potential issues.
Guidance for addressing motor malfunctions and contacting customer service.
Ensures electrical work is performed only by qualified electricians.
Instructions on how to order electrical components using circuit diagrams or customer service.
Provides electrical circuit diagrams for the machine's motor.
Troubleshooting table for diagnosing common issues like vibration, noise, and performance loss.
Ensures machine safety before starting diagnosis or operation.
Identifies excessive vibration as a fault and its potential causes and remedies.
Addresses unusual noises, suggesting checks for bearings or gear belts.
Diagnoses reduced milling performance, checking tools and motor.
Troubleshooting steps for when the controller fails to power on.
Diagnoses for when the motor fails to start, checking fuses and switches.
Comprehensive list of part numbers, descriptions, and quantities for machine components.
Information regarding the proper disposal and recycling of the machine according to regulations.
Recycling instructions for the machine in compliance with WEEE directives.
Section for adding specific information or notes related to the warranty.
Crucial instructions for the dealer and customer regarding warranty claims.
Identifies the specific machine model and its technical specifications.
Lists the EU directives and standards the machine complies with.
Details of the person issuing the declaration of conformity.
Conditions under which the guarantee is valid or invalidated.
Lists specific circumstances that will void the guarantee claim.
Excludes additional costs like transport, liability, and lost earnings from the guarantee.
States that manufacturer's guarantee applies to motors, pumps, and other parts.