1. ASSEMBLY INSTRUCTIONS
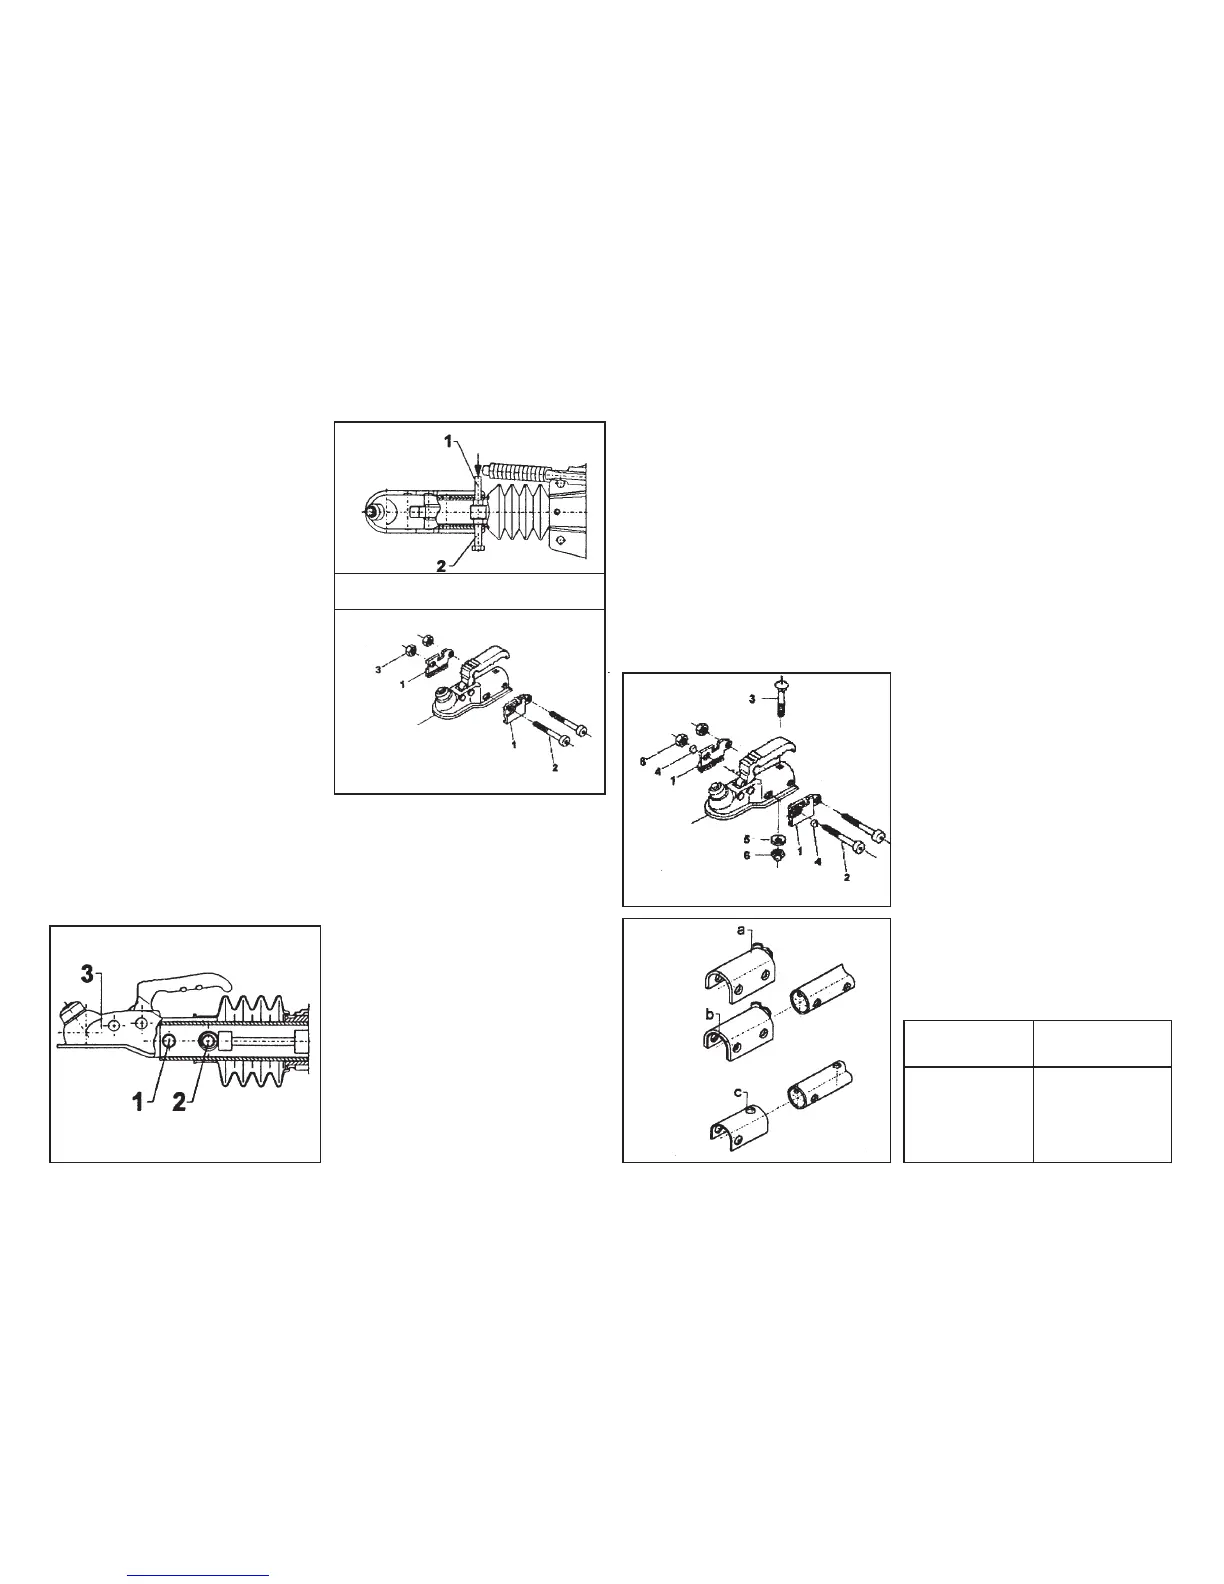
Removal of existing xing bolts:
Before you start to remove the existing xing
bolts, please note the following: On most
overrun assemblies, the shock absorber is
secured by the xing bolt (Fig. 2/Item 2).
Warning:
The shock absorber (damper) extends
independently. Enclosed with this box is a
retaining pin (Fig. 3/Item 1) to aid assembly.
a) Remove gaiter
b)
Loosen self-locking nut from hexagon
cap bolt (Figs. 2/3, Items 1/2)
c) Push or knock out hex. cap bolt
(Fig. 2/Item 1)
d) Knock through retaining pin (Fig. 3/2)
with (Fig. 3/Item 1) and leave the pin
in the shaft for centring the shock
absorber (damper).
e) Any spacers originally tted must be
re-used.
Fitting of AL-KO Security Device
Horizontal Bolt Fitting: (for AL-KO Overruns)
Parts conguration as Fig. 4
Item
1 Locking plates left/right
2 Inner Hex. Bolt M12 8.8 with at head
to DIN 7984
3 Self locking nut M12
2
Fig. 2
Fig. 3
Fig. 4
Fig. 5
Fig. 6
With cross-type bolt xing, do not forget to
insert half moon shaped plates (Fig. 5/Item 4)
and section washer (Fig. 5/Item 5).
For horizontal bolts, tighten with Allen Key
(size 8), as the nuts are xed and cannot be
moved.
For vertical bolt: tighten nut and torque as
follows:
Overrun Torque
Type Setting
AL-KO 30S 60 Nm
AL-KO 60S-60S/2 60 Nm
AL-KO 90S-90S/3 70 Nm
Other overruns 86 Nm
with M12 (8.8) Bolts
Procedure:
Push Gaiter onto the drawshaft followed by the
AK160/300 coupling or AKS 1300 stabiliser
with spacers (Fig. 6) if necessary, so that the
xing holes line up. If present, position the
spacer sleeve in the draw shaft.
Fit parts as shown on gs. 4 or 5. If a spacer
sleeve is in the draw shaft, thread this on as
well. Push retaining pin (Fig. 3/Item 1) through
(with the bolt behind - horizontal or vertical).
Shock absorber (damper), is threaded on.
For your own safety, please check:
To make sure the shock absorber (damper) is
threaded on, push the draw shaft in and out.
If you can feel resistance, then it is correctly
positioned.
Always insert horizontal bolts as shown in
Figs. 4/5 ie from right to left (when facing
caravan) as this allows correct clearances.
Always insert vertical bolt from top to bottom
and re-use original shim used on the overrun
3
Cross-type Bolt Fitting: (for other overruns)
Parts conguration as Fig. 5
Item
1 Locking plates left/right
2 Inner Hex. Bolt M12 8.8 with at head
to DIN 7984
3 Dome Head Bolt M12 8.8
4 Half moon shaped xing lugs
5 Section washer (not included in this
kit)
- please use original washer from
coupling head you are removing
6 Self locking nut M12
 Loading...