VEUILLEZ LIRE CE MODE D’EMPLOI AVANT
D’UTILISER VOTRE TÉLÉPHONE
FRANÇAIS
INSTALLATION ET CONFIGURATION
INSTALLATION ET REPLACEMENT DES PILES
Votre téléphone utilise 3 piles alcalines AA (non fournies) qui sont
nécessaires
pour visualiser l'afficheur en mode veille, effectuer la
programmation et sauvegarder les mémoires (numéros).
Par contre, vous pouvez toujours recevoir et émettre des appels sans les
piles ou si elles sont déchargées.
IMPORTANT: Si vous prévoyez de ne pas utiliser le
téléphone pendant plus de 30 jours, retirez les piles pour
éviter toute fuite et tout dégât de l’appareil
GUIDE D'UTILISATION
USER'S GUIDE
GUÍA DEL USUARIO
MANUAL DO UTILIZADOR
BEDIENUNGSANLEITUNG
HANDLEIDING
,16758.&-$2%6à8*,
ƳƩƬīƭƪƶƹƵƬƶƪƻƶ
MANUALE D'USO
MANUAL DE UTILIZARE
www.alcatel-home.com
Fig 1
Fig 2
RÉGLAGE DU CONTRASTE DE L'ÉCRAN LCD :
Alors que le combiné est raccroché, appuyez sur la touche / pour
PRGL¿HUOHFRQWUDVWHGHOpFUDQQLYHDX[
CHANGER LE TEMPS DE FLASHING (si nécessaire):
- Appui sur la touche MENU / S ou T sélectionner SET 6 FLASH /
MENU / S ou TVpOHFWLRQQHUOHWHPSVGHÀDVKLQJ110 / 300 / 600 /
1000 / MENU / / (300Ms pour une utilisation en France).
16
14
15
TMAX 20
3
12
13
11
10
1
4
5
6
7
8
9
2
Fig 3
17 18 20
28
26
19 21 252422 23
27
ICÔNES D’AFFICHAGE :
23: Appel sortant
24: Appel entrant
1XPpURGXMRXUQDOGHVDSSHOV
26: Jour de la semaine
eFUDQGDI¿FKDJHGHVQXPpURV
de téléphone
28: Répéter
17: Mois
18: Nouvelle entrée dans
le journal des appels
19: Jour
20: Messagerie ocale
21: Heure
22: Minutes
PILES
1. Si le cordon téléphonique est branché, débranchez-le de la base.
2. Retournez délicatement le téléphone, puis utilisez un crayon ou un
trombone pour déverrouiller le couvercle du compartiment des piles.
Ouvrez-le en appuyant sur le couvercle et en le faisant glisser.
3. Insérez 3 piles alcalines AA (non fournies) dans le compartiment
comme l’indique l’illustration.
4. Refermez le couvercle du
compartiment des piles.
6LOHFRUGRQWpOpSKRQLTXH
avait déjà été branché,
débranchez-le, puis
rebranchez-le.
- / /
- /
- / / /
-
Pour augmenter le volume d'écoute en cours de communication,
appuyer sur .
UTILISATION DE VOTRE TÉLÉPHONE
REPONDRE ET METTRE FIN À UN APPEL
- $SSX\HUVXUSRXUpPHWWUHXQDSSHOHWVXUSRXUPHWWUH¿Qj
votre appel. OU
PARCOURIR LA LISTE DES DERNIERS NUMÉROS COMPOSÉS
ET RAPPELER UN CORRESPONDANT:
- Parcourir la liste des derniers numéros composes: ... .
- Rappeler un des derniers numéros composés:
... / ou .
EFFACER UN NUMÉRO COMPOSÉ:
- Effacer un des derniers numéros composés:
... /
.
- Effacer tous les numéros composés: Appuyez sur la touche
...
/
Appuyez sur la touche
pendant 3 secondes pour supprimer
les numéros de tous les appels sortants.
AUTRES RÉGLAGES
RÉGLAGE DE LA DATE ET DE L'HEURE:
* Sous réserve d’abonnement au service auprès l’opérateur de tpOpSKRQLH¿[e.
- Appuyez sur la touche MENU / S ou T jusqu'à sélectionner
SET 1 DATE / MENU / S ou T SRXUDFFpGHUDX[pOpPHQWVDQQpH
mois, jour, heure et minute / MENU / .
- Appuyer autant de fois que nécessaire sur S pour faire défiler le
chiffre souhaité. Appuyer sur MENU pour sauvegarder. Pour passer
à la programmation suivante, appuyer sur MENU.
INSTALLATION DU TELEPHONE ET DU SOCLE
1. Brancher le combiné.
2. Brancher le cordon de
ligne téléphonique en
l'orientant vers la
partie haute du
téléphone.
)L[HUOHVRFOHGXWpOpSKRQH
sa partie la plus courbe
étant dirigée vers le bas,
OHFOLSVHUGDERUGGDQVOHVGHX[HQFRFKHV$)LJIDLUHSDVVHUOH
cordon téléphonique par la fente du haut du socle. Puis, appuyer pour
clipser le socle dans les encoches B.
3
GENERAL SETTINGS
SETTING DATE AND TIME:
- Press MENU key / S or T select SET 1 DATE / MENU / S or T
to enter Year, Month, Day, Hour and Minute / MENU /.
- Press as many times as needed on S to reach the number desired.
Press MENU to save. Press again MENUWRUHDFKWKHQH[WVWHS
DELETE AN OUTGOING NUMBER:
- Delete an outgoing number: Press ... / .
- Delete all outgoing number: Press ... / Press key for 3
seconds to delete all outgoing number.
DELETE CALLER ID NUMBER:
- Delete a Caller ID number: S or T to select the number /
- Delete all Caller ID number: S or T to select the number / Press
key for 3 seconds to delete all Caller ID number.
REVIEW AND DIAL BACK AN OUTGOING NUMBER:
- Review an outgoing number: Press ... .
- Dial back an outgoing number: Press ... / or .
PROGRAMMATION FREQUENCES VOCALES/DECIMALES (par
défaut, numérotation en fréquences vocales)
- Pour passer en mode décimal, faire un appui long (>3s) sur la
touche *.
PLEASE READ THIS USER’S GUIDE BEFORE USING
YOUR PHONE
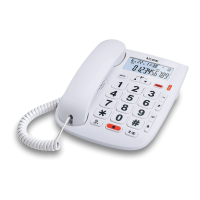
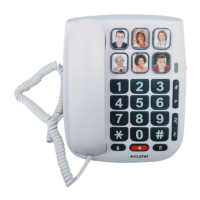
THE KEYS AND THE FEATURES :
Ringer Volume Switch
16: Battery Cover
A and B (Fig.2): Holes for the base
11: Vol Key
12: Menu Key
13: Up Key
14: Line Jack
1: LCD Display
2: Down Key
3: Mem Key
4: Mute/New/Ringer Indicator
'HOHWH([LW.H\
THE KEYS AND THE FEATURES :
6: Microphone Mute Key
7: Phonebook Key
8: Redial Key
9: Flash/Contrast Key
10: Handsfree Key
ENGLISH
3
INSTALLATION AND SETUP AND ITS BASE
1. Connecting the handset.
2. Connecting the
telephone line and
turns it towards the
top part of the telephone.
3. Install the telephone foot:
its curve part towards the
bottom side, insert it in the
2 A recess (Fig.2), place the
line cord through small hole. Then, press to place the foot inside recess B.
DISPLAY ICONS:
23: Outgoing Call
24: Incoming Call
&DOOORJ1XPEHU
26: Day Of The Week
27: Phone Number Display
28: Repeat
17: Month
18: New CID
19: Day
20: Voice mail
21: Hour
22: Minute
BATTERY
1. If the telephone line cord is connected, disconnect it from the base unit.
2. Carefully turn over the phone, use a pen or paper clip to loose the
battery cover. Open the battery compartment by pushing on the
battery cover and sliding it away from the unit.
3. Insert 3 AA-size alkaline batteries
(not included) as shown on the
diagram in the battery compartment.
4. Snap the battery compartment door
back into place.
,IWKHOLQHFRUGZDVSUHYLRXVO\
connected, reattach it to the unit.
INSTALLING AND REPLACING THE BATTERIES
Your phone uses 3 AA-size alkaline batteries (not supplied) which are
necessary to see menu in idle mode, to program, to save memories. But, it
is still possible to receive and place calls without batteries or when out of use.
IMPORTANT: If you are not going to use the telephone for
more than 30 days, remove the batteries because they may
leak and damage the unit.
SET FLASH TIME TO OPERATE CORRECTLY ON YOUR NETWORK:
- Press MENU key / S or T select SET 6 FLASH / MENU / S or T
WRVHOHFWÀDVKWLPH110 / 300 / 600 or 1000 / MENU/ .
USING THE PHONE
RECEIVE AND END A CALL
- /
- / /
- /
- / / /
- To increase hearing volume during conversation, press .
LCD CONTRAST ADJUSTMENT:
In on-hook state, user can press the / button to select the LCD
ContrDVWaFKRLFH
REVIEW CALLER ID NUMBER
* Subject to subscription and availability of the service froPWKH¿[ed line operator.
- S or T
CONSULTER LE JOURNAL DES APPELS
- S ou T.
1: Écran LCD
2: Navigation vers le bas
3: Touche Mémoire
4: Voyant Secret/ Nouvel appel/
Sonnerie
7RXFKH(IIDFHU6RUWLH
6: Touche Secret
7: Touche répertoire
8: Touche Bis
9: Touche Flash/Contraste
10: Touche mains libres
11: Augmentation du volume
sonore dans l'écouteur
12: Touche Menu
13: Navigation vers le haut
14: Connecteur cordon de ligne
5pJODJHYROXPHVRQQHULH
16: Compartiment à piles
A et B (Fig. 2): Encoches du socle
LES TOUCHES ET LES FONCTIONS :
RÉGLAGE DE LA FONCTION RÉVEIL :
- Appuyez sur la touche MENU / S ou T jusqu'à sélectionner
SET 5 ALERT / MENU / utilisez les touches S et T pour régler
l'heure de réveil et sélectionner ON ou OFF / MENU / .
SECURITE
Votre poste téléphonique doit être installé dans un endroit sec, à l'abri de
la chaleur, de l'humidité et des rayons directs du soleil. Pour éviter les
interférences radio, éloignez le poste téléphonique d'au-moins 1 mètre de
tout appareil électrique et autre téléphone.
CONFORMITE
/HORJRLPSULPpVXUODSSDUHLODWWHVWHTXHFHGHUQLHUHVWFRQIRUPHDX[
H[LJHQFHVHVVHQWLHOOHVHWjWRXWHVOHVGLUHFWLYHVSHUWLQHQWHV9RXVSRXYH]
consulter cette déclaration de conformité sur notre site Web:
www.alcatel-home.com
ENVIRONNEMENT
&HV\PEROHVLJQL¿HTXHYRWUHDSSDUHLOpOHFWURQLTXHKRUV
d'usage doit être collecté séparément et non jeté avec les
déchets ménagers.
Aidez-nous à préserver l'environnement dans lequel
nous vivons !
INSTALACIÓN EN SOBREMESA
1. Conecte el auricular.
2. Conecte el cable de la línea telefónica orientándolo hacia la parte arriba
del teléfono.
SAFETY
'RQRWXVH\RXUWHOHSKRQHWRQRWLI\DJDVOHDNRURWKHUSRWHQWLDOH[SORVLRQ
hazard. Do not open your device to avoid risk of electrical shock. Your
telephone must be located in a dry place away from hot, humide and direct
sunlight condition.
CONFORMITY
The logo printed on the products indicates the conformity with all essential
requirements and all applicable directives. You can download the
Declaration of Conformity from our website www.alcatel-home.com
ENVIRONMENT
This symbol means that your inoperative electronic appliance
PXVWEHFROOHFWHGVHSDUDWHO\DQGQRWPL[HGZLWKWKHKRXVHKROG
waste.
Help us to protect the environment in which we live!
SETTING ALARM:
- Press MENU key / S or T select SET 5 ALERT / MENU / use
S or T key to set time and select ON or OFF / MENU / .
SETTING TONE/PULSE
- Long press * button ( >3s ).
1: Pantalla LCD
2: Tecla Abajo
3: Tecla de memorización
4: Indicador Mute/ Nueva
llamada/ Timbre
7HFOD%RUUDU6DOLU
6:
Tecla desactivación del micrófono
7: Tecla agenda
8: Tecla de rellamada
9: Tecla Flash/Contraste
10: Tecla Manos libres
11: Tecla Volumen
12: Tecla Menú
13: Tecla Arriba
14: Entrada de línea
,QWHUUXSWRUYROGHWLPEUH
16: Cubierta de la batería
A y B (Fig.2): Agujeros para la base
ASEGÚRESE DE LEER ESTA GUÍA DEL
USUARIO ANTES DE UTILIZAR SU TELÉFONO
TECLAS Y CARACTERÍSTICAS:
ESPAÑOL
23: Llamada saliente
24: Llamada entrante
1~PHURGHUHJLVWURGHOODPDGDV
26: Día de la semana
27: Pantalla de número de teléfono
28: Repetir
17: Mes
18: Nuevo registro del Id de
llamadas
19: Día
20: Correo de voz
21: Hora
22: Minuto
SÍMBOLOS E ICONOS MOSTRADOS EN LA PANTALLA:
PILAS
1. Si el cable de línea telefónica está conectado, desconéctelo de la unidad
base.
2. Voltee el teléfono, utilice un bolígrafo o un clip para abrir la tapa del
compartimiento de las pilas. Retire la tapa del compartimiento
pulsándola hacia abajo y deslizándola hacia fuera de la unidad.
3. Inserte 3 pilas alcalinas AA en el compartimiento según se muestra en la
imagen.
4. Vuelva a colocar la tapa del
compartimiento de las pilas hasta
que trabe.
6LKDEtDGHVFRQHFWDGRSUHYLDPHQWH
el cable de línea, vuelva a conectarlo
a la unidad.
INSTALACIÓN Y CONFIGURACIÓN
INSTALAR Y REEMPLAZAR LAS PILAS
El teléfono utiliza 3 pilas alcalinas AA (no suministradas) necesarias para
ver el menú en modo inactivo, para programar y para guardar memorias.
Sin embargo, es posible recibir y realizar llamadas sin baterías o si están
fuera de uso.
IMPORTANTE: Si no utilizará el teléfono por más de 30
días, retire las pilas ya que podrían provocar daños en la
unidad.
EFFACER UN NUMÉRO DU JOURNAL DES APPELS:
- Effacer un numéro du journal des appels: S ou T pour sélectionner
le numéro /
.
- Effacer tous les numéros du journal des appels: S ou T sélectionner
un des numéros / Appuyez sur pendant trois secondes pour
supprimer tous les numéros composés.
EMETTRE UN APPEL
- ou avant ou après la composition du numéro
- Depuis la liste Bis:
... / ou
- Depuis le journal des appels*:
S ou T sélectionner le correspondant à appeler / ou
- Depuis les mémoires directes:
1. MEM ou + / ou
2. ou / MEM ou +
ENREGISTRER UN NUMÉRO:
- Enregistrer un numéro: composer le numéro à enregistrer /
MENU/sélectionner l'emplacement mémoire ou MEM.
- Enregistrer un numéro du journal des appels: S ou T pour
sélectionner le numéro / MENU / pour sélectionner
l'emplacement mémoire, ou sélectionner MEM.
- Enregistrer un des derniers numéros composés: ... pour
sélectionner le numéro / MENU / pour sélectionner
l'emplacement mémoire, ou sélectionner MEM.
MAKE A CALL
- From call log list*:
S or T to select the caller number / or
- From direct memories:
1. MEM or + / or
2. or / MEM or +
- or either before or after dialing your number
- From redial list:
... / or
STORE NUMBER:
- Store a telephone number: to input number / MENU /
to select memory location, or MEM.
- Store an incoming call number: S or T to select the number /
MENU / to select memory location, or MEM.
- Store an outgoing number: Press ... to select the number / MENU /
to select memory location, or MEM.
AA
BB
Avant d'utiliser le telephone, lire attentivement le manuel d'utilisation
Please read this user's guide before using your phone
Recomendamos leer este manual antes de utilizar el teléfono
Por favor, leia este manual antes de utilizar seu aparelho de telefono
Bitte lesen Sie die Bedienungsanleitung vor der Verwendung Ihres Telefons
Lees deze handleiding zorgvuldig door voordat u uw telefoon
3U]HGSLHUZV]\PXĪ\FLHPWHOHIRQXSURV]ĊXZDĪQLHSU]HF]\WDüQLQLHMV]ą,QVWUXNFMĊREVáXJL
ƴǏLjnjǒǏdžıLjǎȺǎLjǀıİIJİIJdžıǑıljİǑǀįLjĮǃƾıIJİIJLjǐǎįdžDŽǁİǐǒǏǀıdžǐ
Si prega di leggere questa guida all'uso prima di utilizzare il telefono
vQDLQWHGHDXWLOL]DWHOHIRQXOSHQWUXSULPDGDWăFLWLĠLFXDWHQĠLH*KLGXOXWLOL]DWRUXOXL