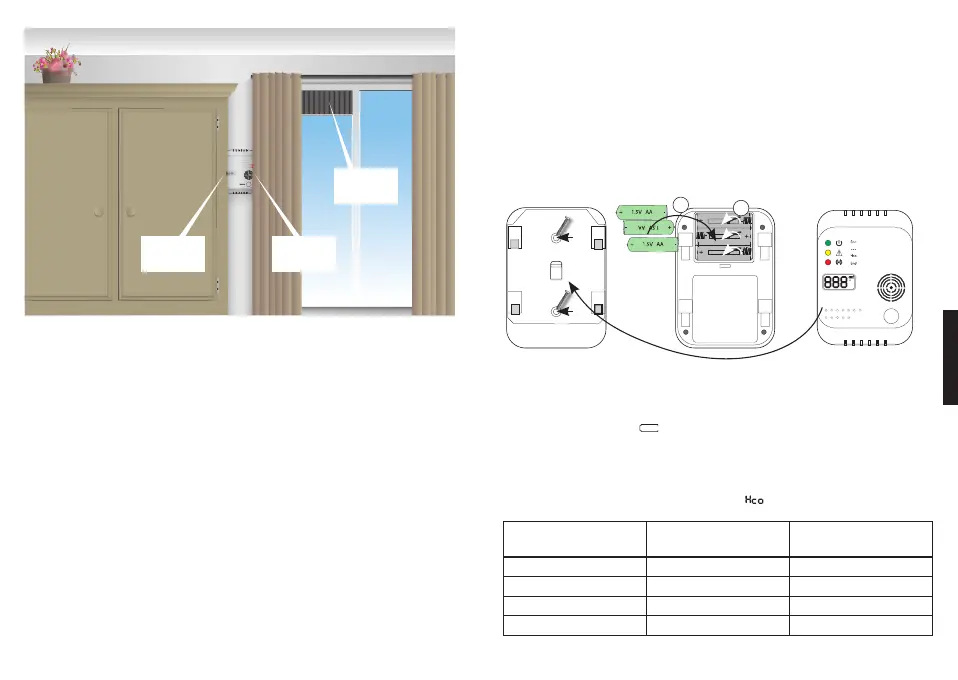
Niet achter
een kast
Niet achter
een gordijn
Niet bij een
luchtinlaat
AVOID THE FOLLOWING PLACES FOR INSTALLATION:
• Do not install the CO-detector in the turbulent air created by ceiling fans.
• Do not install the CO-detector near vents with fresh air.
• Do not install the CO-detector near doors and windows leading outdoors.
• Do not install the CO-detector near extremely dusty, dirty or greasy spaces such as heating spaces
<4m
³
or pantries. Dust, grease and household chemicals can affect the sensor.
• Install the CO detector at least 0.5 meters away from gas discharge lamps (halogen) because of
electronic interferences that can lead to false alarms.
• Do not install the CO detector in humid and wet spaces, such as the bathroom.
• Never install the CO detector in spaces with temperatures lower than 0°C or higher than 45°C.
• Never install the CO detector in spaces with humidity higher than 90%RH.
• Never install the CO detector behind curtains or furniture. Carbon monoxide must be able to reach
the sensor to ensure the sensor can properly detect carbon monoxide levels.
• Never install the CO detector flat on a table or similar surface.
• Never install the CO detector in spaces where spray cans may be used (hair spray, deodorant)
INSTALLATION:
1. Install the mounting plate on a suitable spot
2. Use the included plugs and screws.
3. Insert the included batteries into the detector.
A. Turn the securing pins inward
B. Insert the three AA batteries. (High Energy Alkaline batteries 1.5V AA - LR6)
C. All three LEDs will briefly illuminate, the detector will emit a short audiosignal.
D. The display briefly lights up.
4. Now install the detector onto the mounting place and press the detector down until correctly
fastened. The CO detector can only be placed onto the mounting plate with the batteries in
place.
5. You can perform the first test by briefly pressing the test button, see also paragraph
“Testing”.
6. The CO detector is now functional.
c
PPM
TEST/MENU
= fout/faute/Fehler/fault
= test/test/Test/test
= gevaar/danger/Gefahr/danger
=
vervang/remplace/Ersetz/replace
1
2
USE:
1. Every 45 seconds , the green “POWER” LED will flash to indicate the detector is working.
2. Every 45 seconds, the display will show the the indicative temperature in ˚Celsius and the CO
level. The temperature will only be shown if the CO levels are lower than 25PPM.
3. The battery capacity monitor indicates the battery capacity. When this battery capacity monitor
indicates an empty battery
or the detector emits a short beep tone every minute, you
should replace the batteries as soon as possible. When these warnings start, the detector will
continue to function correctly for at least 7 days.
4. The display shows the measured CO value in PPM.
- The detector will indicate 0PPM for levels between 0PPM and 25PPM.
- When between 25PPM and 550PPM ±10%, the measured CO value will be indicated.
- When higher than 550PPM, the display will show
.
- The table below shows when the detector will sound the alarm.
CO concentration
NO ALARM
for
ALARM
for
33PPM 120 min. -
55PPM 60 min. 90 min.
110PPM 10 min. 40 min.
330PPM - 3 min.
In accordance to the EN50291 standard.
Not near an
air vent
Not behind
a curtain
Not behind
a closet
USER MANUAL
 Loading...