Do you have a question about the All Pet Solutions 6 Meal Automatic Pet Feeder and is the answer not in the manual?
Essential safety guidelines and warnings for operating the pet feeder safely and preventing hazards.
Important cautionary advice regarding pet interaction, repairs, environmental conditions, and proper handling of the feeder.
Step-by-step guide for powering, opening the lid, removing the tray, reassembling, and preparing the feeder for use.
Instructions on unlocking the screen, setting the current time, and navigating the interface.
Steps to program multiple meal times for the automatic pet feeder, including saving settings.
How to manually dispense food, perform a factory reset, and understand error codes.
Detailed steps for safely cleaning the pet feeder, including removable parts and base unit.
The All Pet Solutions 6 Meal Automatic Pet Feeder is a device designed to provide scheduled meals for pets, primarily dogs and cats, in a household setting. This user guide outlines the safe operation, setup, programming, and maintenance of the feeder.
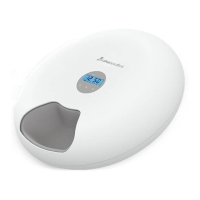
The primary function of the 6 Meal Automatic Pet Feeder is to automatically dispense up to six pre-programmed meals for your pet throughout the day. This allows pet owners to maintain a consistent feeding schedule, even when they are away from home. The feeder consists of a top lid, a storage tray with multiple compartments for food, a control panel for programming, and a base that houses the electronic components and battery compartment. It can be powered either by a Micro-USB cable or by three C-size batteries, offering flexibility in placement. A low battery indicator is present on the display to alert users when batteries need replacement.
The device is intended for indoor household use only and is suitable for dogs and cats. However, it is explicitly stated that it should not be used for puppies and kittens under 7 months of age. The feeder is designed to be placed on a level surface.
Setting up the feeder involves either plugging in the Micro-USB cable or inserting the batteries. To access the food tray and battery compartment, the lid needs to be pressed down and turned in the direction of an arrow until the arrows on the lid and base align, allowing the lid to be lifted off. The food tray can then be removed by aligning its arrows and lifting it. After filling the desired number of portions in the tray, the unit is reassembled, and the lid is locked by turning it again. A main switch at the bottom of the unit needs to be turned on. To check if the food tray rotates properly, the "up" button can be pressed and held for 1 second.
The control panel features a digital display that shows the time and indicates the feeding schedules. There are "up" and "down" arrow buttons for increasing or decreasing values, and a "set" button for confirming selections.
To unlock the screen for programming, both the "up" and "down" buttons must be pressed and held simultaneously for 1 second. The screen will enter standby mode after 30 seconds of inactivity.
Setting the current time involves pressing the "set" button, which will cause the hour digit to flash. The "up" and "down" arrow keys are then used to adjust the hour, followed by pressing "set" to save. The minutes will then flash, allowing for adjustment with the arrow keys and saving with "set."
Programming feeding times follows a similar process. Once the current time is set, the hour digits and "1" (indicating the first meal) will flash. The "up" and "down" arrows are used to set the time for the first meal, and "set" is pressed to save. After saving the first meal, "2" will flash, prompting the user to set the second meal time. This process is repeated for up to five scheduled meal times. If fewer than five meals are desired, the "set" button can be pressed and held to save the programmed times and return to the time display. A minimum of one scheduled meal is required.
For manual feeding, pressing the upward arrow for 1 second will dispense a single portion. If the food tray does not rotate, the "up" and "down" arrows should be pressed simultaneously to unlock the control panel.
The feeder also includes a safety feature: it will not rotate if a pet's paws are detected inside the food tray, preventing injuries. In such cases, the screen will display an "[E1:30]" error and return to normal after a 30-second countdown.
A factory reset function is available to clear all programmed meal times and settings. This is achieved by first pressing "set" until the hour digits flash, and then holding both the "up" and "set" buttons simultaneously for 3 seconds.
Proper cleaning and maintenance are crucial for the longevity and hygiene of the pet feeder. Before any cleaning, the unit must be turned off, and the power disconnected.
The lid and feed container can be removed as described in the setup instructions. The base of the unit, which contains vital electronics, should never be submerged in water, as this could cause a short circuit and damage the components. Instead, the base should be wiped with a soft cloth lightly dipped in soapy water; a fully soaked cloth should not be used.
The food tray is designed to be easily removed for cleaning and is dishwasher safe, offering convenience for thorough sanitation.
After cleaning, it is essential to ensure that all parts are completely clean and fully dry before attempting to operate or refill the food compartment. This prevents moisture from affecting the electronic components or contaminating the pet's food.
The user guide also provides several important safety precautions related to maintenance. Users are advised not to attempt repairs on the pet feeder themselves. The feeder should not be installed or stored in locations exposed to weather or temperatures below 5°C. When moving the feeder, it should be lifted and carried using both hands and the hopper base, keeping the unit in an upright position, rather than lifting it by the lid.
Regarding power cords, users should not unplug the device by pulling on the cord; instead, they should grasp the plug itself. The feeder should not be operated if the power cord or plug is damaged. It should also not be placed or stored where it could fall or be pulled into a tub or sink. Before plugging in the feeder, it should be examined to ensure there is no water on the power cord or plug. Finally, to prevent tripping hazards, the power cord should always be positioned out of the way.
| Capacity | 6 meals |
|---|---|
| Type | Automatic Pet Feeder |
| Timer | Yes |
| Programmable Meals | Yes |
| Portion Control | Yes |
| Material | Plastic |
| Dish Material | Plastic |
| LCD Display | Yes |
| Backup Battery | No |
| Suitable For | Cats and Dogs |
| Power Source | Batteries |
| Voice Recording | Yes |