14. Install the widest cross rib in the middle of the canoe. Start by holding it at
a slight angle to the vertical and attaching the c-clips between the o-rings on the
gunwale rods. Push the cross rib to vertical position while adjusting the chine
rod locking clips to mate up to the cross rib attach points. Use the mallet care-
fully to tap the cross rib into place in the chine rod locking clips. Repeat for
each cross rib working from the center of the canoe towards bow and stern.
15.Trapper seats are installed such that one side
rests on top of the horizontal cross rib.
16. Install the trapper seat by locking the
seat leg c-clips onto the outer chine rods.
Make sure the c-clips are positioned between
the o-rings to prevent the seat from sliding
(forwards or aft).
17.The seat angle can be adjusted by
raising/-lowering the c-clip position.
ALLY CANOE ASSEMBLY INSTRUCTIONS
1.The Ally folding canoe is delivered
disassembled in a cardboard box.
Unpack the box and check that all
parts are included according to the
parts list above.
2. Unroll the mat and sort the cross ribs by size.
Join the two-piece chine rods and sort them by
length.
3. Lay the skin down flat on its side and insert the gunwale
rods through the skin channels. Make sure that the black
O-rings show through the open slots of the channels. Both
rod ends should now show in the last slot toward both ends,
bow and stern.
4. Unfold the skin to its open position.
By grabbing the foam mat folded up at its
midpoint, place it inside the skin as shown.
10. Install the left and right
waterline chine rods (the longest
rods) by attaching them to the
upper most positioned hooks.
Again, grab hold of all the rods
and press them down into the
bottom centerline of the boat.
9. Insert the keel rod in the
straight stem ends for both
bow and stern. The keel rod
will likely bow upward.
11.The foam mat has yet to form to proper shape and wrinkles
most likely will appear around the bow and stern. Pull the skin
upward to smooth any wrinkles. Alternatively, repeat pressing all
rods down along the centerline making sure that the mat
compacts and folds nicely around the rods at the bow and stern.
The chine rods can now be spread to their respective left and
right side positions (see picture).
18.Tap all chine rod locking clips to their locked
position.
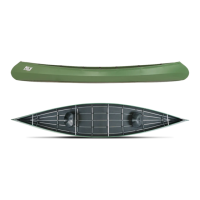
19. Your Ally canoe is now
completely assembled.
Your Ally canoe is now ready. Have a good trip!
5. Make sure the foam mat is centered
with the tips sticking up at both ends.
"Shaking" it in place, as shown in the
picture, may help position it right.
6. Insert the stems (bow and stern) by first
threading the short end pieces onto the gunwale
rod ends.
Apply silicone oil to bow and stern tubes before first
time mounting of the canoe.
7. Rotate the bow stem pushing it
down inside the skin until the straight
stem-end point upward at a 45º angle
(approximately).
Repeat for the stern stem.
8. Install both the left and right inner chine rods (the shortest rods) by
attaching them to the lower most positioned hook on each stem. Next,
install the outer chine (left and right) rods to the middle hook on the
stem. Then, grab hold of all four chine rods (inner and outer, left and
right) and push them down toward the bottom centerline of the boat to
help position the mat.
12.The chine rods should now all be
positioned as pictured. Next, turn all
the plastic connectors on the rods
facing up. Before moving on, inspect
the assembly to make sure that the
mat is positioned symmetrically
around the centerline and that all the
rods are in position.
13. It is time to install the first
cross rib. Start by locating the
second to widest cross rib and
positioning it loosely in place to
hold the partial canoe assembly
up and wide. Also, locate the
mallet for your next move.
20. If you have chosen standard bucket seats for your
Ally canoe select the appropriate width, height and seat
angle for the individual who will be sitting in it before
installing it.
21. Install the bucket seat by pressing the c-clips to lock
onto the inner chine rods.
 Loading...