You
can change the style
of
display by touching [Style)
in
nonnal mode
of
every source.
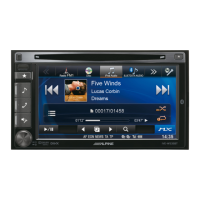
Style I (Initial)
H Style 2
Display example for IPod main screen
3
CD
Changes to the L .L
.C.
adjustment screen (Only for
visual source) directly, refer to
page
40.
@ Changes to the Bass*}, Treble*} and Subwoofer,.2 Level
adjustment screen directly.
When an optional external audio processor with the
MEDIA XPANDER function is connected to this unit and
Defeat is set to
OFF,
MEDIA XPANDER level may be also
adjusted directly.
•
If
the optional IMPRINT audio processor (PXA-Hl00) is
connected, MultEQ must also be set to
OFF
to adjust the
MEDIA XPANDER directly.
*1
Adjustment cannot be performed when DEFEAT is set to ON.
,.2
Adjustment cannot be performed when SUBWOOFER is set to
OFF
(page 26).
® Displays the next 5 songs' name (Only for the USB
AUDIO and iPod mode).
<Style 2>
@ Displays the image of the current source.
•
If
the playing song contains artwork, the artwork can be
displayed in @ (Only
for
USB AUDIO,.]
and
iPod..-l mode).
,.] USB memory is connected by using USB connector and only JPEG
or
BMP
(565formatted only) pictures that are smaller than
80
KB
can be displayed.
..-I
iPod is connected by using the USB connector.
14-EN
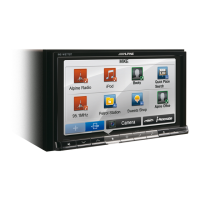
Radio
Displayexample
for
FM Radio
main
screen
5
CD
[SOURCE] button: Refer to
page
12
@ [VISUAL] button: Displays the VISUAL selection screen
® [SETUP] button: Displays the SETUP selection screen
@ [Style] button: Refer to
page
14
@ [DX SEEK]* button: Displays the tuning mode selection
list.
@ Displays the preset number/frequency
This unit cannot receive
HD
Radio signals (digital terrestrial radio).
In
order to activate the digital radio functions described below,
an
optional
HD
Radio Tuner module must be connected through the Ai-
NET
bus.
Listening
to
the
Radio
1 Touch
[SOURCE]
on
the main source screen.
The
SOURCE
selection screen
is
displayed.
Receiving Analog Radio:
2 Touch
[RADIO].
The
radio mode
is
activated and
the
display changes to the
Radio Mode screen.
Receiving
HD
Radio
(if
TUA-T500HD is connected):
2 Touch
[HD
RADIO].
The
digital radio mode
is
activated and the display changes
to
the
HD
Radio
Tuner
Mode screen.
3 Touch
[BAND]
to
select the desired radio band.
Each
press changes
the
bands
as
follows:
FM-1
~
FM-2
~
AM
~
FM-1
4 Touch
[DX
SEEK]*
to
choose the tuning mode.
DX
SEEK
Local
SEEK
MANUAL
1
....
1
I~I
1
....
1
I~I
I~I
'
..
I
• There are two modes you can select
for
auto tuning.
OX
and
Local:
- OX (Distance) mode;
Both strong and weak stations will be tuned in.
- Local mode;
Only strong stations will be tuned
in.
The initial setting is ox.
* The button displays the current tuning mode.
You
can change the style
of
display by touching [Style)
in
nonnal mode
of
every source.
Style I (Initial)
H Style 2
Display example for IPod main screen
3
CD
Changes to the L .L
.C.
adjustment screen (Only for
visual source) directly, refer to
page
40.
@ Changes to the Bass*}, Treble*} and Subwoofer,.2 Level
adjustment screen directly.
When an optional external audio processor with the
MEDIA XPANDER function is connected to this unit and
Defeat is set to
OFF,
MEDIA XPANDER level may be also
adjusted directly.
•
If
the optional IMPRINT audio processor (PXA-Hl00) is
connected, MultEQ must also be set to
OFF
to adjust the
MEDIA XPANDER directly.
*1
Adjustment cannot be performed when DEFEAT is set to ON.
,.2
Adjustment cannot be performed when SUBWOOFER is set to
OFF
(page 26).
® Displays the next 5 songs' name (Only for the USB
AUDIO and iPod mode).
<Style 2>
@ Displays the image of the current source.
•
If
the playing song contains artwork, the artwork can be
displayed in @ (Only
for
USB AUDIO,.]
and
iPod..-l mode).
,.] USB memory is connected by using USB connector and only JPEG
or
BMP
(565formatted only) pictures that are smaller than
80
KB
can be displayed.
..-I
iPod is connected by using the USB connector.
14-EN
Radio
Displayexample
for
FM Radio
main
screen
5
CD
[SOURCE] button: Refer to
page
12
@ [VISUAL] button: Displays the VISUAL selection screen
® [SETUP] button: Displays the SETUP selection screen
@ [Style] button: Refer to
page
14
@ [DX SEEK]* button: Displays the tuning mode selection
list.
@ Displays the preset number/frequency
This unit cannot receive
HD
Radio signals (digital terrestrial radio).
In
order to activate the digital radio functions described below,
an
optional
HD
Radio Tuner module must be connected through the Ai-
NET
bus.
Listening
to
the
Radio
1 Touch
[SOURCE]
on
the main source screen.
The
SOURCE
selection screen
is
displayed.
Receiving Analog Radio:
2 Touch
[RADIO].
The
radio mode
is
activated and
the
display changes to the
Radio Mode screen.
Receiving
HD
Radio
(if
TUA-T500HD is connected):
2 Touch
[HD
RADIO].
The
digital radio mode
is
activated and the display changes
to
the
HD
Radio
Tuner
Mode screen.
3 Touch
[BAND]
to
select the desired radio band.
Each
press changes
the
bands
as
follows:
FM-1
~
FM-2
~
AM
~
FM-1
4 Touch
[DX
SEEK]*
to
choose the tuning mode.
DX
SEEK
Local
SEEK
MANUAL
1
....
1
I~I
1
....
1
I~I
I~I
'
..
I
• There are two modes you can select
for
auto tuning.
OX
and
Local:
- OX (Distance) mode;
Both strong and weak stations will be tuned in.
- Local mode;
Only strong stations will be tuned
in.
The initial setting is ox.
* The button displays the current tuning mode.

 Loading...