EasyManua.ls Logo

Alvin PXB21 - User Manual

Alvin PXB21
2 pages
Print Icon
To Next Page IconTo Next Page
Loading...
PXB & PLB Parallel Straightedge Board
Operation and Maintenance Instructions
PXB Boards are available
in the following sizes:
PXB21 16" x 21"
PXB24 18" x 24"
PXB26 20" x 26"
PXB31 23" x 31"
PXB36 24" x 36"
PXB42 30" x 42"
PLB Boards are available
in the following sizes:
PLB24 18" x 24"
PLB26 20" x 26"
PLB36 24" x 36"
Follow this recommended sequence when making adjustments to the position of the straightedge blade.
To Set Brakes for Optimum Braking Strength (Diagram A)
Unscrew brake knobs as far as they will go.
Retighten brake knobs one full revolution only.
Loosen top adjustment knobs.
Push metal side brackets toward the center until
both brake pads rest against edges of board.
Retighten top adjustment knobs.
Brakes are now set and ready to use. Simply
tighten and loosen brake knobs as necessary.
Be sure to keep top adjustment knobs tightly
secured or the brakes will not function.
To Adjust Straightedge Blade Parallel
to Edge of Board (Diagram A)
Loosen only one wire capture screw on of the blade.
Pivot the blade until it is in the desired parallel position.
Retighten wire capture screw.
Keep all adjustment knobs tight to ensure straightedge stays parallel.
To Replace or Reset the Wire (Diagram B)
Blade should be positioned in center of board when rewiring
and spring should be centered.
Attach eyelet to one end of wire and connect eyelet to spring.
Thread wire around pulleys as shown.
Extend spring approximately 1" beyond unstretched length.
Secure wire to second eyelet and trim excess.
1
1
1
2
2
2
3
3
3
4
4
4
5
5
6
7
Side
Bracket
Brake
Knob
Brake
Pad
Wire
Capture
Screw
Wire
Diagram A
Top
Adjustment
Knob
Straightedge
Blade
Board
Spring rides
on top of wire
Diagram B
Lock
Unlock
Lock
Unlock
Snap Lock
Mechanism
Question and Answer IconNeed help?

Do you have a question about the Alvin PXB21 and is the answer not in the manual?

Overview

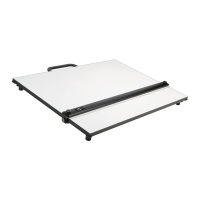
The Alvin PXB & PLB Parallel Straightedge Board is a drafting tool designed to provide a stable and precise surface for technical drawing. It features a parallel straightedge blade that glides smoothly across the board, ensuring accurate parallel lines. The board is available in various sizes to accommodate different drafting needs, with specific models for both PXB and PLB series.

Function Description:

The primary function of the Alvin Parallel Straightedge Board is to facilitate the creation of accurate parallel lines and precise technical drawings. The straightedge blade is guided by a wire and pulley system, allowing it to move smoothly up and down the board while maintaining its parallel alignment with the board's edges. This design eliminates the need for T-squares or separate rulers, streamlining the drafting process. The board also incorporates a braking system to hold the straightedge in a desired position, enhancing precision and control during drawing. Some models include dual snap-lock legs, enabling the board to be tilted for ergonomic use or folded flat for storage and transport.

Important Technical Specifications:

The Alvin Parallel Straightedge Board comes in two main series: PXB and PLB, each offering a range of sizes.

  • PXB Boards (with legs and handle):

    • PXB21: 16" x 21"
    • PXB24: 18" x 24"
    • PXB26: 20" x 26"
    • PXB31: 23" x 31"
    • PXB36: 24" x 36"
    • PXB42: 30" x 42"
  • PLB Boards (without legs, typically tabletop):

    • PLB24: 18" x 24"
    • PLB26: 20" x 26"
    • PLB36: 24" x 36"

The straightedge blade is operated by a wire and pulley system, which includes a spring to maintain tension. The braking mechanism consists of brake pads that press against the board's edges, controlled by brake knobs and top adjustment knobs. The dual snap-lock legs (for PXB models) allow for tilting the board into an elevated position for comfortable use.

Usage Features:

  • Braking System: The board features an "Optimum Braking Strength" system. To set the brakes, users first unscrew the brake knobs, then retighten them by one full revolution. Top adjustment knobs are loosened, and metal side brackets are pushed inward until both brake pads rest against the board's edges. Finally, the top adjustment knobs are retightened. Once set, the brakes can be engaged or disengaged by simply tightening or loosening the brake knobs. This system ensures the straightedge remains firmly in place during drawing.
  • Parallel Adjustment: The straightedge blade's parallelism to the board's edge can be precisely adjusted. This involves loosening one wire capture screw on the blade, pivoting the blade to the desired parallel position, and then retightening the screw. It is crucial to keep all adjustment knobs tight to maintain the straightedge's parallel alignment.
  • Dual Snap Lock Legs (PXB models): For PXB boards, the integrated legs offer two primary positions: tilted for use and flat for storage/transport. To position the legs for use, unlock them by pushing locks toward the board's edges, extend the legs (without over-extending), and then push the locks toward the center until they snap into position. To fold the legs flat, reverse this process. A handle is provided for easy transport, and users are advised to use it to avoid damage.
  • Smooth Operation: The design emphasizes smooth movement of the straightedge. Users are advised to ensure brakes are not dragging, wires pass properly through pulleys, pulleys spin freely, and the spring does not interfere with the pulleys to maintain optimal performance.

Maintenance Features:

  • Cleaning: The board surface and the underside of the blade should be cleaned with a mild detergent and a soft cloth, then wiped dry. This helps maintain a smooth drawing surface and prevents debris from affecting straightedge movement.
  • Environmental Protection: To prolong the life of the board, it should be protected from direct exposure to sunlight and extreme heat.
  • Storage and Transport: Storing and transporting the board in a protective case is recommended to prevent damage. When moving the straightedge, it is important to ensure the brakes are not tightened, allowing for a smooth, easy motion.
  • Wire Replacement/Reset: If the wire needs to be replaced or reset, the blade should first be positioned in the center of the board, and the spring centered. An eyelet is attached to one end of the wire and connected to the spring. The wire is then threaded around the pulleys as shown in the diagram. The spring should be extended approximately 1 inch beyond its unstretched length before securing the wire to a second eyelet and trimming any excess. This ensures proper tension and smooth operation of the straightedge.
  • Troubleshooting: The manual provides specific troubleshooting steps for common issues:
    • Brakes not holding firmly: Refer to the "To Set Brakes for Optimum Braking Strength" section.
    • Straightedge not parallel: Refer to the "To Adjust Straightedge Blade Parallel to Edge of Board" section.
    • Straightedge not sliding easily: Check for dragging brakes, proper wire routing through pulleys, free-spinning pulleys, and ensure the spring is not running into the pulleys.
  • Spare Parts Availability: Alvin provides a comprehensive list of spare parts that can be ordered from retailers. This includes:
    • PRP: Repair kit (wire, spring, 4 pulleys, 4 brackets)
    • BLX series: Various straightedge blades corresponding to board sizes (e.g., BLX21 for PXB21)
    • MSB2: Metal side brackets (set of 2)
    • TH2: Metal thumb screws (set of 2)
    • TF2: Rubber grip track cleats (set of 2)
    • PX-SM: Legs and handle for smaller PXB/PLB boards
    • PX-LG: Legs and handle for larger PXB/PLB boards

This extensive list of spare parts ensures that users can easily maintain and repair their Alvin Parallel Straightedge Board, extending its lifespan and usability.

Alvin PXB21 Specifications

General IconGeneral
BrandAlvin
ModelPXB21
CategoryPatio Furniture
LanguageEnglish