This document describes the AMEWI TK-7.0 (or TK-6.0/6.1) Tank Function Main Board and its associated remote control, detailing its functions, operational procedures, and maintenance aspects.
Device Description:
The AMEWI TK-7.0 (or TK-6.0/6.1) is a multifunctional motherboard control system designed for remote-controlled tanks. It integrates various functions to provide a realistic and interactive tank experience, including movement, firing, sound effects, and an infrared battle system. The system is controlled via a dedicated 2.4GHz remote controller.
Function Description (Main Board - TK-6.0/6.1):
The main board offers a comprehensive set of features:
- Turret Rotation: Allows for left/right turret rotation, with a possible 360° rotation if an optional electric slip ring is installed.
- Turret Pitching: Enables realistic up/down lifting of the cannon barrel.
- Cannon Launch (BB): Provides a realistic firing function using BB pellets.
- Body Recoiling: Simulates recoil when the cannon is launched.
- Firing Sound: Produces realistic cannon firing sound effects.
- Machine Gun Sound: Generates realistic machine gun sound effects.
- Engine Sound: Simulates engine start/stop sound effects.
- Smoking System: Creates an engine exhaust effect that synchronizes with the tank's speed.
- Sound Effects: Offers four switchable types of tank sound effects.
- Volume Adjustment: Allows for speaker volume adjustment in seven circulatory levels.
- Light Control: Controls front/rear lighting and machine gun light effects.
- Infrared Battle System: Simulates tank battle and destruction effects, compatible with Tamiya's IR Battle System.
- High/Low Speed Mode: Enables free switching between proficient and beginner modes.
- Correction Function: Provides deviation correction for forward/backward movement.
Optional Functions (Purchase Separately):
Additional features can be integrated:
- LED Lights Output Socket: Supports tank braking/steering flashing light functions.
- Laser Aiming: Allows for precise aiming at targets.
- Two-Way Servos: Enables realistic cannon up/down lifting and launch recoiling.
- WiFi Image Transmission System: Facilitates image transmission for location shooting.
- Firing Flashing Light: Adds realistic firing flashing light effects to the tank.
- Auto Cannon Lifting: Automatically lifts the cannon while the turret is spinning.
- Cannon Stabilization System: Keeps the target locked by the tank cannon.
Structural Function:
- Tracks Adjustment: Allows for adjustment of tank tracks tension.
Important Technical Specifications:
- Power Input: DC 7.4-12.6V.
- Remote Control Frequency: 2.4GHz.
- BB Launch System: Maximum shooting range of 25m, which may differ based on actual shooting conditions, vertical angle of the gun, and wind speed.
- Infrared Battle System: The tank automatically shuts down and front lights turn off after being hit six times. After 10 seconds, the front lights flash, and the tank restarts, ready to rejoin the battle.
Usage Features:
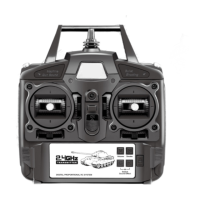
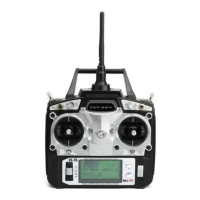
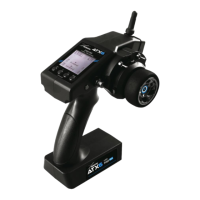
Remote Controller Operation:
- Battery Installation:
- Press down the "PUSH" on the battery cover and remove it. Ensure the switch is in the "OFF" position.
- Load batteries correctly, observing polarity.
- Replace the battery cover.
- Power-On Sequence (Crucial for Control):
- Turn on the remote control FIRST.
- Then, turn on the tank.
- Failure to follow this order may result in the tank going out of control.
- Frequency Pairing (First-Time Use):
- Install batteries in the remote control and turn it on. A beep will sound, and the indicator light will be constant, indicating normal operation.
- Press and hold the "Start-up" button on the remote control, then turn on the tank.
- If the tank emits an engine start sound and the headlights illuminate constantly, the remote control and receiver are successfully paired.
- Driving Controls:
- Forward/Backward: Push the right control stick forward/backward.
- Turning: Push the right control stick left/right.
- Spinning (Left/Right): Push the left control stick left/right.
- Forward + Turn Left/Right: Combine right control stick forward with left/right movement.
- Backward + Turn Left/Right: Combine right control stick backward with left/right movement.
- Turret and Cannon Control:
- Turret Left/Right: Move the left control stick left/right.
- Cannon Up/Down: Push the left control stick up/down.
- Combined Turret/Cannon Movement: Move the left control stick diagonally to rotate the turret and adjust the cannon simultaneously.
- Note: The clutch function prevents the turret from turning further once it reaches its limit. Do not force the turret to avoid damage.
- BB Shooting:
- Hold down button B, then press button A to shoot BBs with realistic recoil and firing sound.
- Warning: Always ensure no people or animals are in the shooting range. Wear protective goggles. Before storing, remove BBs, batteries, and the protective cap from the muzzle. Turn off the main switch of the tank.
- Target Setup:
- Firmly insert the target into the holding gaps on the support.
- Aim at the bull's eye from the back of the tank before shooting. Fire during the aiming movements of the cannon to shoot down the target.
- Smoke Function:
- The smoke function can only be activated when the tank is started.
- Press the smoke button (S on the remote control).
- Approximately one minute later, smoke will appear from the exhaust pipe and gradually increase.
- Infrared Battle System (Optional):
- Connect the infrared receiver's plug to the socket on the turret and place the receiver on the magnetic suction position.
- When the cannon is aimed at the infrared receiver, press and hold button A (machine gun will start) or press and hold button B first, then button A (BB bullet and infrared shot fired simultaneously).
- If the tank is hit, it will shake with an explosion sound, then restart and can rejoin the battle.
- After six hits, the tank will automatically shut down and its front lights will turn off. After 10 seconds, the front lights will flash, and the tank will restart, ready for battle.
- Control Stick 1 (Left):
- Up: Headlights on/off.
- Down: Rear lights on/off.
- Left: Backward links fine-tuning.
- Right: Forward links fine-tuning.
- Control Stick 2 (Right):
- Up: Forward right fine-tuning.
- Down: Backward right fine-tuning.
- Left: Reduce turning circle.
- Right: Increase turning circle.
- Buttons:
- G + Control Stick 1 (Up): High speed mode.
- G + Control Stick 2 (Down): Low speed mode.
- A: Machine gun sound & flashing light.
- B: Laser aiming light.
- A + B: BB launch + Tank recoil action + Infrared Sender.
- G + S: WiFi switch.
- G + K: Sound effects switch (4 types).
- V + Control Stick 1 (Up): Volume up.
- V + Control Stick 1 (Down): Volume down.
- K + Control Stick 1 (Up): Recoil level (3 levels).
- K + A: Tank turn on/off or frequency pairing.
- S: Smoke function switch.
- V: Braking strength adjustment (3 levels).
- K + Control Stick 1 (Left): Left hand control mode.
- K + Control Stick 1 (Right): Right hand control mode.
- K + Control Stick 2 (Up): Raise tank self-rotate speed.
- K + Control Stick 2 (Down): Slow down tank self-rotate speed.
- K + A: Machine gun sound effect switch (2nd sound).
- K + B: Super self-rotation switch.
- G + (No specific function): Not needed.
- + G + K: Factory settings.
Maintenance Features:
- Battery Handling: Always ensure correct polarity when inserting batteries.
- Storage: Store batteries in a cool, dry place. Do not expose to fire or high temperatures.
- Cleaning: If the battery gets wet, wipe it immediately with a soft, dry cloth.
- Component Replacement: Replace damaged components with original parts.
- Safety: Do not fire BBs at people or animals. Always wear protective eyewear. Remove BBs and batteries before storage.
- Troubleshooting: If the tank goes out of control, re-pair the remote control and tank by following the correct power-on sequence. If issues persist, check battery connections and ensure all components are properly connected.