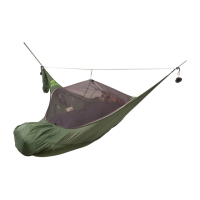
The Amok Draumr is a unique hammock system designed for comfortable and versatile outdoor sleeping, offering a flat and level sleeping experience akin to a bed, unlike traditional hammocks. It is intended for use in various outdoor environments, providing a secure and elevated sleeping platform between two trees. The system includes the hammock itself, suspension straps, and features for integrating a sleeping pad and bug net, making it suitable for different weather conditions and user preferences.
Function Description
The primary function of the Amok Draumr is to provide a comfortable and stable sleeping solution in the wilderness. It achieves this by allowing the user to lie flat, supported by an inflatable sleeping pad inserted into a dedicated pocket within the hammock. This design prevents the common "banana shape" found in traditional hammocks, promoting a more natural and restful sleep posture. The hammock system is suspended between two trees using adjustable straps, allowing for customization of height and tension. It also features a "chair mode" for daytime relaxation, transforming the sleeping platform into a comfortable seat. The integrated bug net offers protection from insects, ensuring an undisturbed night's sleep. The overall design emphasizes ease of setup, adjustability, and user comfort, making it a versatile option for camping, backpacking, and other outdoor activities.
Usage Features
Site Selection:
- Tree Spacing: The hammock requires a minimum of 2.5 meters and a maximum of 5 meters between trees.
- Tarp Spacing: If using a tarp, the trees should be 3-5 meters apart.
- Height: The hammock should be hung 1.5-2 meters from the ground.
- Ground Conditions: Users should consider the ground conditions and the trees chosen for hanging. It is crucial to avoid dead trees, dead branches, and spots with rocks or thorny bushes to prevent damage to the hammock or injury.
Strap and Hammock Direction:
- Strap Placement: Place the strap around the tree and pull the buckle through the loop to secure it.
- Color-Coded Corners: The hammock has color-coded corners for easy orientation: green to your right and red to your left when lying inside.
Inserting Buckles:
- Buckle Orientation: The small pointed steel buckle goes through the black square buckle from the bottom. The pointed tip of the buckle must always point towards the tree to ensure proper and secure attachment.
Adjusting Straps:
- Tightening: To tighten the straps, pull the strap towards the tree.
- Loosening: To loosen the straps, pull the loop towards the hammock.
Inserting Sleeping Pads:
- Pad Pocket: The sleeping pad is inserted into a dedicated pad pocket within the hammock.
- Sleeve and Zipper: After inserting the pad, pull the sleeve over it and close the zipper (note: Draumr UL models do not have a zipper).
- Inflation: If using an Amok pad, inflate it using the included pump bag.
Recommended Height and Angles:
- Ground Clearance: The hammock should not touch the ground upon entry. Users should look out for sharp objects that could damage the fabric.
- Optimal Height: Hang the hammock roughly 70-100 cm above the ground. The hammock will sag slightly upon entry.
- Ridgeline: The rope on top of the hammock (ridgeline) should be level.
- Strap Angle: The suspension straps should be at an angle of 20° to 40°.
- Strap Length: The straps do not need to be equal length or symmetrical; one side can be higher or longer if needed to achieve the correct angle and level.
Adjusting the Hammock:
- Initial Test: When first setting up, sit down "halfway" with your feet on the ground to test the height and suspension straps. Safety is paramount.
- Height Adjustment: Adjust the height by lowering or raising the tree straps or by adjusting the buckles.
- Strap Tension: Avoid tightening the straps too much. Strive for an angle between 20° and 40°.
- Sideways Movement: The hammock can be moved sideways to avoid unwanted terrain features.
Getting In (Alternative 1):
- Stand in front of the hammock and grab hold of the panels on each side.
- Push the hammock down and under you while attempting to sit in the middle.
- Move one hand to the ridgeline, sit/lean back, and lift your feet inside.
- Find your balance.
Getting In (Alternative 2):
- Stand in front of the hammock, grab the inside panels, and pull the hammock between your legs.
- Push the hammock down and under you while attempting to sit in the middle.
- Move one hand to the ridgeline, sit/lean back, and lift your feet inside.
- Find your balance.
Finding Your Balance:
- Adjustment: Hold onto the side panels and ridgeline. Lift your body slightly and push or pull on the side panel to adjust your position.
- Practice: Finding balance takes practice, similar to riding a bike for the first time.
- Leveling: Ensure you are flat and level before falling asleep. A common mistake is being too close to the foot end, which can cause sliding.
Chair Mode:
- Move slightly towards the head end.
- Raise your legs and pull the knee straps first, one side at a time.
- Grab the top of the panel and lift it while pulling down on the strap handle simultaneously.
- Avoid leaning back and tightening both upper straps at the same time.
- Take your weight off the back panels by sitting up straight, then tighten one strap at a time.
Inserting Amok's Pole Set or Sticks:
- Pockets: The pockets in the head and foot end are designed for sticks or the Amok pole set.
- Bug Net Lift: Using these poles will lift the bug net.
- Insertion: Insert the pole into the foot end while sitting up in the hammock. Pull the foot end towards you for easier access.
- Adjustment: If the pole doesn't fit perfectly, each end can be bent slightly. Do not bend at the middle joint.
The Bug Net:
- Zipping: Pull the foot end towards you to make zipping easier.
- Openings: Once mounted, openings can be created using the three sliders.
- Ridgeline Pocket: The ridgeline has a sliding pocket for small items, containing an elastic cord and cordlock.
- Attachment: The hook attaches to a loop in the head end. Adjust the cord lock on the ridgeline to lift the bug net.
Tips for Keeping Warm:
- Layering: A clean and dry wool baselayer and a bottle with hot water will help you stay warm.
- Warm-up: Warm up before bed. If you put cold coffee in a thermos, it will stay cold; the same applies to your body.
- Insulation: Bring a reindeer hide or sheepskin for extra warmth.
- Pad Boost: Adding a thin foam pad on top of the inflatable pad inside the pad pocket will boost the temperature.
Other Great Tips:
- Stuff Sack Storage: Attach the stuff sack to the buckle inside the hammock for extra storage.
- Slider Cord: Attach a longer cord to the slider to make it easier to reach.
- Sleeping Bag: Open the zipper of your sleeping bag and place it in the hammock before entering.
- Backpack Placement: Place your backpack near the head end to have it within reach from inside the hammock.
- Easier Entry: It is easier to enter the hammock if you tighten the knee straps halfway.
- Sleeping Position Adjustment: Use the back and knee straps to adjust your sleeping position, not just for chair mode.
- Drip Stoppers: On older Draumr models without drip stoppers, using plastic clips will prevent water from running down the suspension straps.
- Tarp Carabiners: In regular weather, the left image (simple attachment) is acceptable. In heavy weather, wrap the cord around itself first for a more secure hold.
Common Mistakes to Avoid:
- Stepping into Foot End: Tearing the fabric or breaking the pole stick by stepping into the foot end.
- Hanging Too High: Hanging the hammock too high can make entering and exiting difficult and increase the risk of injury if you fall out.
Maintenance Features
Repair Kit:
- Included Kit: Always bring the included repair kit for the sleeping pad.
- Spare Parts: Other spare parts might be useful as well.
Tarp Guyline Storage:
- Folding: Fold your tarp guylines to avoid knots and "rat nests."
- Attachment: Attach the folded guylines using the velcro strap.
The Amok Draumr is designed for durability and ease of use, with features that allow for minor repairs and organized storage, contributing to a longer product lifespan and a more enjoyable outdoor experience.