floor heating thermostats
amuheat
AT8V3-2ZPTM
Software Version A1.0
Operational Guide Programmable Thermostat
1. Getting Started
Amuheat’s AT8V3-2ZPTM touch screen thermostats are specifically
designed for dual zone control of underfloor heating and heated
towel rail appliance control.
When your thermostat is first connected to mains power, wait for
about 30 seconds until the touch pad has self-adjusted. Press the
POWER button to turn on/off the thermostat. When your thermostat
is turned off, the LCD will display OFF.
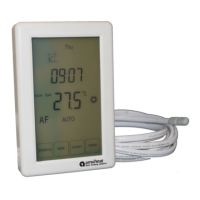
LCD Display & Button Legend
2. Setting Clock & Day
This thermostat is fitted with a real time clock. It is essential that the
clock time and day are set accurately if you require your
programmed events to start on time. To set follow the steps below:
1. Press TIME and the time will start flashing. Use the up and down
buttons to set the time. By holding the arrow button down the time
will change faster.
2. Press NEXT to move to the Day setting and use the up and down
buttons sto et to day.
3OK. Press to store and exit.
3. Alternating Between Zones
To alternate between ZONE 1 (floor heating) and ZONE 2 (towel rail),
press and hold TIME , and the LCD will display ZONE 1 or ZONE 2 on
the top right corner.
4.Customise Controller Settings
To enter into the setting menu follow the steps below:controller
1. Turn the thermostat off by pressing POWER .
2. Press MENU and you will then see menu 01.
3. Use the up and down to adjust menu settingarrows the selected
(refer to table below).
The buttons are lockedscreen &
Heating is turned on
Frost protection activated
Zone number
Program number
Manual mode
Automatic mode, executes the programmed schedules
Temporary temperature override
The floor sensor is not being read by the thermostat
Increase
Decrease
Menu Zone 1 sFeature
Page 1
© 20 Amuheat Pty Limited23
floor heating systems
amuheat
4. Press EX to move to the next Menu and repeat step 3 throughNT
all menu option sets (refer to table below).
5. Once you have all the options set press OK to accept and store.
Operation Mode Selector
00 = Auto (default)
01 = Permanent manual mode
Sensor Selector
F mode = control of floor temperature via installed
floor probe sensor (default)
A mode = control of air temperature via internal sensor
AF mode = control of air and floor temperature via internal
&floor sensor probe
Tip: Choose mode A for direct heating or where no floor
sensor is installed, mode F for background heating or floor
warming only, mode F for timber & vinyl floors heating
Maximum Floor Temperature Selector (F & AF mode only)
This is to protect the floor surface (default 28 ).°C
Floor Temperature Calibration
This is to re-calibrate the floor temperature if required
between -25 to +25 (default 0 ).°C °C °C
Air Temperature Calibration
This is to re-calibrate the air temperature if required
between -5 to +5 (default 0 ).°C °C °C
Temperature Screen Readout (AF mode only)
This gives you the option to display the Air Temperature (A),
Floor Temperature (F), or to show both Air & Floor
Temperatures (AF) in intervals (default AF).
Frost Protection
When turned on and the temperature falls below 5 , the°C
heating will automatically turn on to maintain minimum 5 .°C
On = activated
Off = deactivated (default)
Program Mode Selector
This allows you to program either 5 days at once, then the 2
days of the weekend separately, or a full 7 days at the same
time, or 7 days separately.
01 = 7 day programmable (default)
02 = 5+2 day programmable
01
02
03
04
05
06
07
08
ZONE 1, 2
PROGRAM 1,2,3,4
AUTO
OVERRIDE
Er