EasyManua.ls Logo

AOODOR 800-039 - User Manual

AOODOR 800-039
19 pages
Print Icon
To Next Page IconTo Next Page
Loading...
Assembly&Instruction Manual
SKU:800-039 steel roof 10x10ft
Save this manual for future reference
azebo
Installation
Guide
Version 211108
:
Question and Answer IconNeed help?

Do you have a question about the AOODOR 800-039 and is the answer not in the manual?

Summary

INTRODUCTION

SAFETY INFORMATION

Read manual before assembly, people required, max load, and estimated time.

PREPARTION

Ensure all parts are present and compare with the contents list before assembly.

CARE AND MAINTENANCE

Yearly application of water repellent and checking wood for damage.

IMPORTANT SAFETY NOTICE!

Assembly Guides

Lists required tools and symbols used throughout the manual for assembly.

Assembly Tips

PRE-ASSEMBLIES

Tips for smooth assembly of components like posts, beams, and rafters.

METAL PARTS

Advice on handling metal parts, including safety and installation of roofing.

Permanent Installation Examples

Parts Identification (Metal Parts)

Assembly Step 1

Step 1.1

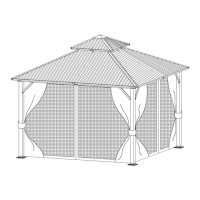
Insert hooks into the rail for mosquito netting and curtains.

Step 1.2

Connect rail components, ensuring proper alignment.

Step 1.3

Attach the rail to the beam using screws.

Assembly Step 2

Step 2.1

Attach bracket V2 (V3) to the beam using screws (10).

Step 2.2

Secure bracket V2 to the beam with screws (10).

Assembly Step 3

Step 3.1

Join rafter corners (K1) and rafters (K2) to the inside hub (N1) using bolts.

Assembly Step 4

Step 4.1

Attach rafter connector tubes (M) to rafters (K2) and brackets (T) using bolts.

Step 4.2

Attach rafter corner brackets (T1) to rafters (K1) using bolts.

Assembly Step 5

Step 5.1

Attach the rafter to the bracket using bolt (7).

Step 5.2

Attach the rafter to the bracket using bolt (7).

Assembly Step 6

Step 6.1

Attach roof panels (X2, X3) to the structure using screws (8).

Step 6.2

Connect roof panels (X2, X3) with rafters (K1) using screws (7).

Assembly Step 7

Step 7.1

Attach roof panels (X, X1, X3, X4, X5) to rafters (K1) using bolts (7).

Assembly Step 8

Step 8.1

Attach roof panels (X, X5) to support beams (K1) using screws (9).

Assembly Step 9

Step 9.1

Attach support beams (L, L1) and brackets (V, V1) using screws (7).

Step 9.2

Secure roof panels (X2, X3) to beams (L, L1) using screws (7).

Overview

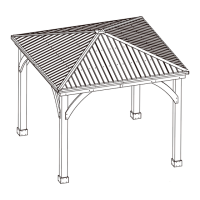
This document is an assembly and instruction manual for the AOODOR 10x10ft steel roof gazebo, SKU: 800-039. It provides comprehensive guidance for the installation, use, and maintenance of the product.

Function Description:

The AOODOR gazebo is designed as a patio wood gazebo, offering an outdoor covered space for relaxation and entertainment. It features a steel roof, providing shelter from the elements. The structure is intended for permanent installation and can be mounted on pre-existing or new wood or concrete surfaces. It is not intended as a safety barrier for pools or hot tubs, a load-bearing support for other structures, or for trapping wind, rain, or snow.

Important Technical Specifications:

  • SKU: 800-039
  • Roof Material: Steel
  • Dimensions: 10x10ft
  • Maximum Load for Roof Hook: 100 lbs.
  • Estimated Assembly Time: 6-8 hours
  • Required Assembly Personnel: 4-5 people

Usage Features:

  • Installation Flexibility: The gazebo comes with Post Mounts, allowing for permanent installation on various surfaces like wood or concrete. Hardware for attaching the Post Mounts to the structure is included, while mounting hardware for the ground surface needs to be purchased separately.
  • Mosquito Netting and Curtain Compatibility: The design includes rails (J) for inserting hooks (U) to accommodate mosquito netting and curtains (not included), enhancing usability and comfort.
  • Roof Structure: The roof assembly involves a central hub (N1) with rafter corners (K1) and rafters (K2), supporting multiple roof panels (X, X1, X2, X3, X4, X5) to form a pitched steel roof.
  • Beam and Post System: The main structure consists of beams (J) and posts, reinforced with brackets (V2, V3) for stability.
  • Drainage System: The design incorporates components like L and L1, which appear to be part of a gutter or drainage system to manage rainwater runoff from the roof.
  • Safety Considerations:
    • Accumulated Snow: Snow must be removed from the roof to prevent excessive load.
    • No Climbing: Users are explicitly warned not to climb or walk on the roof.
    • Building Permits: Permanent structures may require a building permit. Purchasers are advised to consult local planning, zoning, and building inspection departments for guidance on applicable codes.
    • Fire Hazard: Wood is not flame retardant. Grills, fire pits, and chimineas should be kept at safe distances from the structure.
    • Sharp Edges: Wear gloves during assembly to avoid injury from sharp edges of metal parts.
    • Tool Safety: Use safety glasses and follow all safety warnings provided with tools.
    • Underground Utilities: Check for underground utilities before digging or driving stakes into the ground for permanent installation.
    • Level Surface: Assembly should be completed on a solid, level surface, and the structure must be squared up, leveled, and anchored to reduce gaps at wood connections.

Maintenance Features:

  • Water Repellent/Stain Application: Applying a water repellent or stain (water-based) on a yearly basis is crucial for maintaining the maximum life and performance of the product.
  • Wood Inspection: Regularly check all wood members for deterioration, structural damage, and splintering. Splinters should be sanded down, and deteriorated wood members replaced.
  • Natural Wood Characteristics: Some checking and small cracks in the wood grain are normal, as is some gapping at wood connections.
  • Disposal: When disposing of the unit, it should be disassembled to prevent unreasonable hazards, and local waste ordinances should be followed.

Assembly Tips:

  • Pre-Assemblies: Work on a raised, solid, and flat surface (e.g., a table or sawhorse) for post and beam assemblies and roof rafter assemblies. Ensure all connections are flush, and keep parts flat, straight, and snug when connecting beams.
  • Metal Parts Handling:
    • Wear safety gloves due to sharp edges on roofing material.
    • Remove all plastic covering from both sides of metal panels directly before installation.
    • Place roofing material on a non-abrasive surface before and after assembly to prevent bending, denting, and scratching.
    • Hand-tighten roofing screws to avoid crushing roof panels and edges when using a power drill.

Tools Required for Assembly:

  • Tape Measure
  • Carpenter's Level
  • Standard or Cordless Drill
  • #2 Phillips Bit or Screwdriver
  • 6' Step Ladder x 2
  • 8' Step Ladder
  • Safety Glasses
  • Adult Helper
  • Safety Gloves
  • Hard Hat

AOODOR 800-039 Specifications

General IconGeneral
BrandAOODOR
Model800-039
CategoryOutdoor Furnishing
LanguageEnglish

Related product manuals