15English
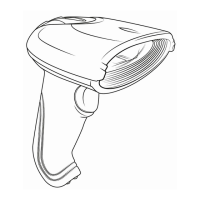
3. Product details
4. Inial use
Take the device and the accessories out of the package and remove all
packaging material. Connect the USB cable to a free USB port of your com-
puter. The driver is installed automacally. The device is now ready to be
used.
5. Scanning angle
To ensure correct scanning, make sure that the scanner is not held at
a 90° angle to the barcode. The scanner has to be pointed towards the
barcode and the laser should cover the enre barcode. If this is not the
case, errors might occur.
6. Advanced sengs
You can use the advanced sengs for addional sengs such as enabling
or disabling certain types of code. Scan the following barcodes to congure
the scanner.
Note: Scan the "Start setup" barcode before making any changes to the
sengs (Setup). To save the changes to the sengs (Setup), scan the
"Exit Setup" barcode.
Sensor unit
Trigger
To see all the supported 1D and 2D barcodes (such as MSI and Datalogic
2of5), scan the following codes in the setup mode.
CAUTION! The device may respond slowly during this process!
To cancel the sengs, reset the device to factory sengs
 Loading...