☎
US (866) 877-6637 |
☎
CAN (866) 766-3426 | aquascapeinc.com
2
Ex. 3
Warranty Information
For more information about our company or products, please visit our website at
aquascapeinc.com or call us at US (866) 877-6637 CAN (866) 766-3426
©2019 Aquascape, Inc. • All Worldwide Rights Reserved
1/19
• Lights won’t turn on
– Press the power button on the remote
– Make sure the outlet is receiving power
– Make sure the ground-fault circuit interrupter (GFCI) is not tripped
– Check to verify that the lights are receiving the correct voltage
– Verify that the photocell (not included) is functioning properly
• Lights won’t turn off
– Verify that the photocell (not included) is functioning properly
• Remote Control is not functioning
– Make sure the AAA batteries are not dead
– Re-synch the remote control to the light
Troubleshooting
• Periodically clean the fi xture with fresh water, removing any existing algae,
debris, or buildup.
General Maintenance
5 YEAR WARRANTY
Aquascape LED Color-Changing Fountain Lights are guaranteed for
fi ve years from date of purchase. Proof of purchase required. Warranty
does not cover damage resulting from negligent handling, misuse or
lack of care. Light failure as a result of improper wiring is not covered
under warranty. Lights should only be operated in fresh water without
corrosive chemicals like chlorine or bromine. Warranty is valid against
defects due to material and workmanship only. Products returned
must be cleaned, sanitized, or decontaminated, as necessary, prior
to shipment to ensure that employees will not be exposed to health
hazards in handling said material. All applicable laws and regulations
shall apply. The sole obligation shall be to replace the defective
unit with a suitable replacement unit. Units should be checked for
proper operation prior to returning as defective. No liability for loss
or damage of any nature or kind, whether arising out of or from the
use of the product, whether defective or not defective, is assumed by
Aquascape, Inc. or it’s affi liates.
Ex. 4
CONNECT TO TRANSFORMER
• Connect the light to the included
12-Volt transformer (Ex. 4).
NOTE: Quick-connect
connections must be fully
tightened to prevent water
from entering. Dielectric
grease, available at most home
improvement stores, can be
used in all connections to further
prevent water infi ltration.
WARNING: Do not submerge quick-connect fi ttings, as moisture
entering the connections will damage the lights.
WARNING: Aquascape color-changing lights have a max voltage
operating range between 10.8 and 15 volts. Operating the light
outside of this voltage range voids the product warranty and may
damage or shorten the life of the light.
NOTE: It is recommended to locate the transformer as close to the light
fi xture as possible to avoid voltage drops caused by long cable runs.
• Bury or conceal any visible cables. It is recommended to bury light cables
no deeper than 6".
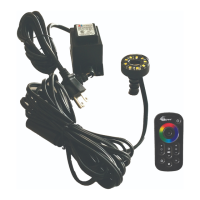
REMOTE SETUP
• Install two AAA batteries (not included)
in the back of the remote control.
• To synch the remote control to the
light, plug the transformer into a GFCI-
protected outlet while holding the power
button on the remote control
(Ex. 5).
REMOTE CONTROL FUNCTIONS
• Power/Pair – Turn lights on and off as desired. Also use this button to pair
the remote to the light.
• Color Wheel – Select your desired color
• Rate/Speed Up – Increase the speed of the cycle or strobe option
• Rate/Speed Down – Decrease the speed of the cycle or strobe option
• Select Mode – Stops the cycle or strobe to achieve the desired color
• Undo Mode – Revert back to the cycle or strobe last selected
• Brightness Up – Increase the brightness
• Brightness Down – Decrease the brightness
• Cycle – Continuously changes through all available color options
• White – Engages the white diodes for a warm white light (3,000 K)
• Strobe – Select between a variety of strobe options
INSTALLATION
FOUNTAIN CONNECTION
• Connect fountain tubing/pipe to the barb at the base of the light, using a
twisting motion to secure it in place (Ex. 1).
• Run the tubing down the fountain with the light cable (Ex. 2).
• If desired, the barbed connection
can be removed from the light for
installation in tight spaces. Simply
thread the barb counter-clockwise
until it disconnects from the light
fi xture (Ex. 3).
Ex. 1 Ex. 2
Ex. 5
 Loading...