11
EN
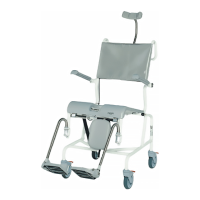
3.1 Scope of delivery
The AQUATEC OCEAN or the AQUATEC OCEAN XL
are supplied with the following parts (fig. 1):
1 Operating instructions (in plastic bag)
2a Backrest with cover and armrests (OCEAN)
2b Backrest with cover and armrests (OCEAN XL)
3 Seat frame with seat plate
4 Side sections with casters (2 x)
5 Footrests with heel loops (2 x)
6 Clips (2 x) for footrests (inserted)
Enclosed loose in bag:
7 Clips (4 x) for seat frame
8 Allen key (4 mm)
9 Screws (4 x) and curved washers (4 x)
3.2 Accessories
The grip wheels with locking brake are supplied with
the following parts (fig. 2):
1 Grip wheels (2 x)
2 Locking brake (2 x)
3 Hub (2 x)
Please note that the dimensions of the chair are differ-
ent when the grip wheels are fitted. This information
can be found in the Technical data.
3.3 Technical data
Dimensions
Width (OCEAN) 560 mm
Width (OCEAN XL) 640 mm
Width with grip wheels 675 mm
Depth 934 mm
Depth with grip wheels 1060 mm
Height 964
− 1094 mm
Seat width 480 mm
Seat depth 450 mm
Seat height 477
− 600 mm
Min. width between
side sections approx. 381 mm
Min. distance between floor
and holder for the sanitary pan approx. 408 mm
Weight approx. 15 kg
Load capacity (OCEAN)130 kg
Load capacity (OCEAN XL)150 kg
The label (fig. 8 or 9) provides important technical in-
formation.
The label is attached to the inside of the right side sec-
tion.
You can easily disassemble the commode into its com-
ponent parts (section 3.1) for transport.
For detailed instructions on how to dismantle the de-
vice, please refer to section 5.
5.1 Assembling the commode
5.1.1 Assembling the side sections
1. Take the enclosed clips (7, fig. 1) out of the bag.
2. Place the seat frame on one side.
3. Push the side section (1, fig. 3) with the guides for
the footrests (4, fig. 3) forwards onto the seat
frame (3, fig. 3).
4. Align the clip recesses (5, fig. 3) at the front and
back of the side section with a hole on the seat
frame (2, fig. 3).
5. Push the clips (6, fig. 3) from outside into the side
section until the two lugs (7, fig. 3) enclose the
seat frame tube (3, fig. 3).
6. Turn the seat frame around and fit the second side
section in the same way.
7. Place the seat frame with the fitted side sections
on to the casters.
Important!
P
Before setting up, inspect all parts for dam-
age during transport.
P
This section describes the assembly. Disas-
sembly is carried out in reverse order.
P
During assembly, make sure the parts are
positioned correctly in relation to each other
(fig. 1).
Important!
P
Push in the side section evenly and do not
jam it.
P
Fasten the side section at the same height
at the front and back.
Important!
The left and right side sections must be adjust-
ed to the same height.
4 Transport
5 Setting up