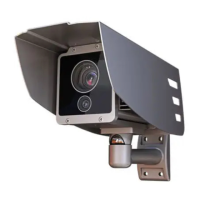
FREEWAYCAM3 / SMARTCAM3 / SPEEDCAM3
DIGITAL (IP) LPR CAMERA
QUICK INSTALL GUIDE
Document Version: 2018.02.15
Please note that this is only a quick installation guide. For detailed
information see the full installation guide (see the link on the back side)
1 INSTALLING THE HARDWARE
1.1 Remove protective film from the front of the camera.
1.2 Adjust the bracket by loosening the camera fastening screw on the bottom of the bracket
(with a size 5 Allen key). After the desired position is set, fasten the screw on the bottom.
Do not overtighten the screws. Failures due to inappropriate installation void the
warranty.
1.3 Connect the cables to the designated connectors. Seal the unused cable endings with end
sleeves before connecting to power!
Use smooth circular, quality, outdoor-certified cables. Improper cabling voids the
warranty!
Power
12 pin I/O
Ethernet
8 pin I/O
GPS*
GSM*
*in case of six connectors
1.4 Make sure the connecting cable does not lead rainwater drops into the camera housing.
1.5 Connect the camera to a computer or network switch, then power on the camera. The red
and green status LEDs on the camera front should stay on during the booting. After
finished, the green status LED flashes two times while the red one turns off signaling that
the camera is ready for operation.