Do you have a question about the ASROCK DeskMini B660 Series and is the answer not in the manual?
Details the items included in the DeskMini B660 series barebone system package, including optional accessories.
Provides detailed technical specifications for the DeskMini B660 series, covering system model, chassis, CPU, memory, I/O, etc.
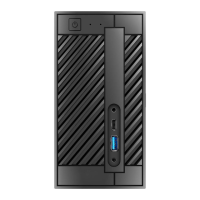
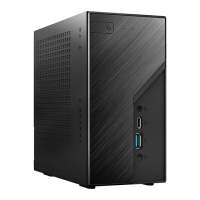
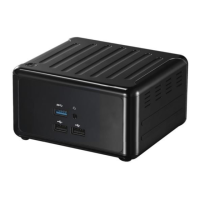
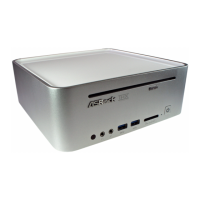
Illustrates the front panel of the DeskMini B660 series, identifying key components and ports.
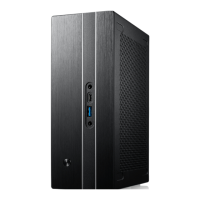
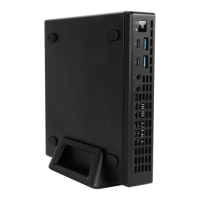
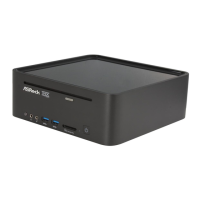
Details the rear panel of the DeskMini B660 series, showing all external connectivity ports and their functions.
Presents a diagram of the motherboard, highlighting the location of crucial connectors and components.
Illustrates the layout of connectors and slots on the back side of the motherboard.
Explains the function and operation of the Clear CMOS jumper (CLRCMOS1) for resetting BIOS settings.
Details the pin assignments and connections for the system panel header, including power, reset, and LEDs.
Describes the MONO speaker header for connecting chassis speakers to the motherboard.
Details the specifications and pin assignments for the Serial ATA3 connectors for storage devices.
Explains the USB 2.0 header and its capability to support two ports on the motherboard.
Details the two 4-pin CPU fan connectors and how to connect 3-pin or 4-pin fans.
Describes the 5-pin audio header for connecting headphone or headset audio cables.
Provides the initial steps for hardware installation, including removing the back panel and tray.
Guides users through the process of safely installing the CPU into the socket, including checks for bent pins.
Details the installation of the CPU fan and heatsink, noting the 52mm height limitation for coolers.
Explains how to install DDR4 SO-DIMM memory modules, emphasizing correct orientation and dual-channel configuration.
Guides through the installation of the WiFi module into the M.2 slot and attaching antenna cables.
Provides instructions for installing an M.2 SSD into the motherboard's M.2 slot and securing it with a screw.
Details the installation of 2.5-inch HDDs/SSDs onto the motherboard tray and connecting SATA cables.
Final steps for hardware installation, including connecting the power button cable and reattaching the chassis panel.
Instructions for attaching the VESA bracket to the chassis and mounting it to a compatible display.
Guides on connecting the Wi-Fi antenna connectors to the rear panel and positioning the antennas.
Explains how to access and navigate the UEFI SETUP UTILITY for system configuration.
Describes the EZ Mode interface, a dashboard for viewing system status and basic information.
Provides access to detailed BIOS settings beyond the basic EZ Mode dashboard.
Details the selections available in the UEFI menu bar for system configuration.
Explains the keyboard shortcuts and navigation keys used within the UEFI SETUP UTILITY.
Describes the Main screen of the UEFI SETUP UTILITY, showing system overview and favorite items.
Details the OC Tweaker screen for setting overclocking features and CPU configurations.
Details various advanced system configuration settings within the UEFI utility.
Details various CPU settings including E-Core/P-Core information, Hyper Threading, C-States, and thermal throttling.
Explains settings related to the chipset, including graphics adapter, memory decoding, and PCI Express.
Covers SATA controller settings, mode selection, power management, and S.M.A.R.T. monitoring.
Details power management settings like Suspend to RAM, PCIE/RTC/USB device wake-up.
Explains USB controller settings, including XHCI Hand-off for OS compatibility.
Covers security device support, PCR banks, and TPM module settings for enhanced security.
Details the utility tools available in the UEFI, such as Instant Flash and NVME Sanitization.
Monitors system hardware status including CPU temperature, motherboard temp, fan speed, and voltages.
Allows setting supervisor/user passwords, configuring Secure Boot, and managing Intel PTT.
Configures boot settings such as boot order, fast boot, boot beep, and boot failure guard.
Options for saving changes, discarding changes, loading defaults, and exiting the UEFI SETUP UTILITY.
| Form Factor | Mini-STX |
|---|---|
| Chipset | Intel B660 |
| CPU Socket | LGA 1700 |
| Dimensions | 155 x 155 x 80 mm |
| CPU Support | 12th Gen Intel Core Processors |
| Memory Slots | 2 x SO-DIMM |
| Max Memory Capacity | 64GB |
| Storage | 2 x 2.5" SATA |
| Video Output | HDMI, DisplayPort |
| Rear USB | 2 x USB 2.0 |
| LAN | Gigabit LAN (Realtek RTL8111H) |
| Wireless | Optional Wi-Fi |
| Power Adapter | 120W |