Do you have a question about the ASROCK X58 EXTREME6 - V1 and is the answer not in the manual?
Lists all items included in the motherboard package for user reference.
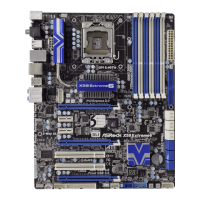
Details the technical specifications of the ASRock X58 Extreme6 motherboard.
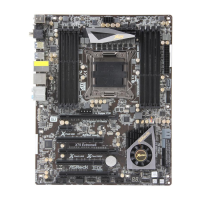
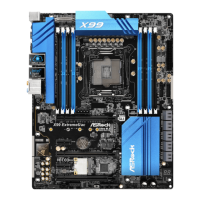
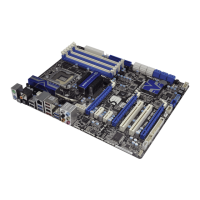
Illustrates the physical layout of components and connectors on the motherboard.
Describes the external input/output ports available on the rear of the motherboard.
Details the correct placement of screws for securing the motherboard to the chassis.
Provides essential safety and handling guidelines before installing motherboard components.
Step-by-step guide for safely installing the Intel 1366-Pin CPU onto the motherboard socket.
Instructions for properly mounting the CPU heatsink and fan assembly for effective heat dissipation.
Guidance on correctly installing DDR3 memory modules into the DIMM slots for optimal performance.
Explains the types and usage of PCI and PCI Express slots for expansion cards.
Instructions for configuring NVIDIA SLI technologies using multiple graphics cards.
Guide for implementing AMD CrossFireX technologies with multiple graphics cards.
Information on utilizing the Surround Display feature with add-on PCI Express VGA cards.
Details the function and configuration of various jumpers on the motherboard.
Identifies and explains the purpose of various onboard headers and connectors.
Step-by-step instructions for installing the front panel USB 3.0 bracket.
Describes the functions of the onboard power, reset, and clear CMOS switches.
Provides instructions for installing the rear USB 3.0 bracket.
Explains the Dr. Debug feature for troubleshooting boot process errors using diagnostic codes.
Guide for installing SATA and SATAII hard disk drives and configuring them for RAID.
Instructions for installing SATA3 hard disk drives and their RAID configuration.
Details the hot plug and hot swap capabilities for SATA/SATAII HDDs in RAID/AHCI modes.
Explains hot plug and hot swap features for SATA3 HDDs in AHCI or RAID modes.
Provides operational procedures and precautions for performing hot plug/unplug operations on HDDs.
General guidance on installing drivers from the support CD for optimal system functionality.
Step-by-step procedures for installing Windows OS with RAID configurations.
Specific instructions for installing Windows XP with RAID storage configurations.
Guide to preparing a system for future RAID migration with a single hard drive.
Steps for migrating a single drive system to various RAID configurations.
Instructions for installing Windows 7/Vista with RAID storage configurations.
Procedures for installing Windows OS without RAID configurations.
Specific instructions for installing Windows XP without RAID storage configurations.
Instructions for installing Windows 7/Vista without RAID storage configurations.
Details the Untied Overclocking Technology for enhanced system performance and stability.
Overview of the BIOS Setup Utility and how to access it for system configuration.
Describes the main menu bar options available within the BIOS Setup Utility.
Explains the keyboard keys used for navigating and interacting within the BIOS Setup Utility.
Displays the system overview and basic configuration information upon entering BIOS setup.
Configuration options for overclocking the CPU, memory, and other system components.
Provides access to detailed system configurations for CPU, Chipset, ACPI, Storage, and more.
Settings for configuring advanced CPU features like Hyper-Threading and Virtualization.
Options for configuring the motherboard's chipset features, including graphics and audio.
Settings related to power management features and system states (Suspend to RAM).
Configuration options for SATA, SATAII, and SATA3 storage devices and RAID modes.
Settings for configuring PCI and Plug and Play devices, including latency timers.
Options for configuring the floppy drive type and settings.
Configuration settings for Super IO chip, including serial and infrared ports.
Settings for enabling and configuring USB controllers, including USB 2.0 and 3.0 support.
Monitors system hardware status, including temperatures, fan speeds, and voltages.
Configures system boot settings, including boot device priority and logo display.
Specific settings for boot behavior, such as full screen logo and AddOn ROM display.
Allows setting or changing supervisor and user passwords for system security.
Options for saving changes, discarding changes, or loading default BIOS settings.
General guidance on installing supported Microsoft Windows operating systems.
Information regarding the contents and usage of the motherboard's support CD.
| Chipset | Intel X58 |
|---|---|
| Socket | LGA 1366 |
| Max Memory | 24GB |
| PCI Express x16 Slots | 3 |
| PCI Slots | 2 |
| SATA 3Gb/s Ports | 6 |
| SATA 6Gb/s Ports | 2 |
| Audio Chipset | Realtek ALC892 |
| Audio Channels | 8 Channels |
| LAN Chipset | Realtek RTL8111E |
| Max. LAN Speed | 10/100/1000Mbps |
| USB 3.0 Ports | 2 |
| USB 2.0 Ports | 8 |
| Form Factor | ATX |
| Memory Standard | DDR3 2000(O.C.)/1600(O.C.)/1333/1066 |
| PCI Express x1 Slots | 1 |
| SATA RAID | 0/1/5/10 |
| eSATA | 1 |
| Memory Slots | 6 x 240-pin DDR3 DIMM |