15
Getting started
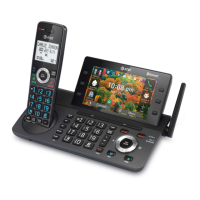
Telephone base and charger installation
Install the telephone base and charger, as shown below.
The telephone base is ready for tabletop use. If you want to mount your
telephone on a wall, use the wall-mount bracket (model W20901, sold
separately) to attach to a standard dual-stud telephone wall-mounting plate.
For more information, visit https://telephones.att.com/WM20901.
If you do not have this wall-mounting plate, you can purchase one from many
hardware or consumer electronics retailers. You may need a professional to
install the wall-mounting plate.
Telephone base installation
Raise the antenna.
Plug one end of the
telephone line cord into
a telephone jack or a
DSL lter.
Plug the small end of the telephone base
power adapter into the power adapter
jack on the back of the telephone base.
Plug the large end of the
telephone base power
adapter into a power outlet
not controlled by a wall
switch.
Plug the other end of the telephone
line cord into the telephone jack on
the back of the telephone base.
If you have DSL
high-speed Internet
service, a DSL lter
(not included) is
required.
Route the power adapter
cord and the telephone line
cord through these slots.
Route the power
adapter cord through
this slot.
 Loading...