Charge for at least 30
minutes before initial
settings.
Charge for 11 hours
before initial use.
•
•
1
2
3
Install charger
2
Install handset battery
3
This quick start guide provides you with basic instructions
only. For more complete instructions, please refer to the
user’s manual in the package, or download it at
www.telephones.att.com/manuals.
Quick start guide
TL86103/TL16013
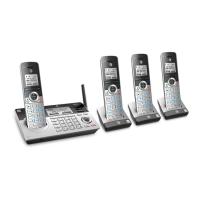
Parts checklist
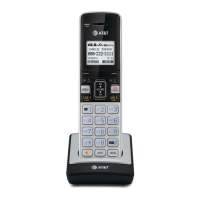
Cordless handset
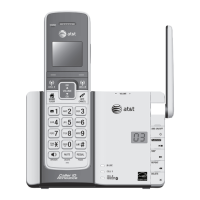
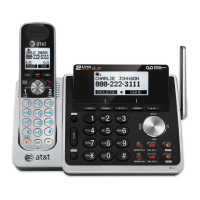
Telephone base
Corded handset with coiled
handset cord attached
Charger for cordless handset
Power adapter for charger
Belt clip for cordless handset
Battery for cordless handset
Battery compartment cover
•
•
•
•
•
•
•
•
Power adapter for
telephone base
Telephone line cords (one
black and one clear)
CD-ROM
USB cable
User’s manual
Quick start guide
•
•
•
•
•
•
Your package contains:
Basic steps to set up & operate your phone
Basic installation
1
Install telephone base
2
Install charger
3
Install handset battery
4
Connect your telephone base to PC
5
Install telephone base on the wall (optional)
Common settings
6
Use built-in answering system or voicemail?
7
Set date and time
8
Set ringer volume
9
Add a Bluetooth cell phone / headset
10
Download a cell phone directory
11
Sophone call
12
Voice command
Common operations
13
Directory
14
Caller ID
Light on!
Install telephone base
1
1
Click!
Click!
Plug!
Plug!
Route through the slots!
2
Option 1: For separate wall jacks for each line
Option 2: For a 2-line wall jack
DSL lter
If you have DSL high-speed
Internet service, DSL lter
(not included) is required.
Line 1 + line 2 wall jack
Line 2 wall jack
Line 1 wall jack
INSTALLATION COMPLETED!
Keep reading for common settings and operations.
Follow the instructions, as shown below, only if you would like to mount
the telephone on a wall.
1 2
3
4
5
6
Push to open!
If you have DSL high-speed
Internet service, a DSL lter
(not included) is required.
Align!
Align!
Align!
Align!
Click!
Rotate the handset tab!
Plug!
Flip down!
Unplug!
Unplug!
Unplug!
Install telephone base on the wall (optional)
5
Connect your telephone base to PC
4
Your new AT&T TL86103/TL16013 allows you to make and receive
sophone calls by connecting the telephone base to your computer using
the USB cable provided in the package. You can manage sophone Voice
over IP (VoIP) calls through Skype
®
or Microso
®
Lync
®
, landline calls, or
cell calls by using the AT&T Softphone Call Manager. You can also use
the voice command feature to make calls after you have installed the
AT&T Softphone Call Manager.
Compatibility:
The AT&T Softphone Call Manager works with:
Operating systems Software programs and versions
Microsoft
®
Windows
XP
®
, Windows Vista
®
,
Windows 7, Windows 8
Skype
®
5.0 or above, Windows Media Player
®
10 or
above, Microso Outlook
®
2003 or above, Microso
Lync
®
2010/2013, iTunes
®
10 or above, Landline calls
controllers
To connect the telephone base to your computer:
Plug the USB cable into your computer, as shown below. Wait for your
computer to indicate that it has recognized the telephone base.
•
Use built-in answering system or voicemail?
Your telephone has a built-in answering system which can be used
without any service subscription.
The telephone also supports voicemail feature which requires subscription
from your telephone service provider. Contact your telephone service
provider for details.
6
Record own announcement
You can use the preset announcement to answer calls, or replace it with
your own recorded announcement.
Using the telephone base:
1. Press MENU -> Press SELECT to select Answering system.
2. Press q/p to highlight Mailbox 1 or Mailbox 2 -> Press SELECT.
3. Press SELECT to select Announcement.
4. Press SELECT to select Record annc.
5. Speak towards the microphone of the telephone base to record your
announcement and press STOP to end recording.
To congure the built-in answering system
You can save the voicemail number to 1 for easy access. Contact your
telephone service provider for more information and assistance about
using your voicemail service.
To set voicemail number:
Using a cordless handset or the telephone base:
Press MENU -> Press SELECT to select Settings.
2. Press q/p to highlight Voicemail # -> Press SELECT.
3. Press q/p to highlight Line 1 or Line 2 -> Press SELECT.
4. Enter the voicemail number -> Press SAVE.
While entering numbers, you can:
Press q/p on the handset or on the telephone base to move the cursor to the le or right.
Press MUTE/DELETE on the handset or p/DELETE on the telephone base to erase a digit.
Press and hold MUTE/DELETE on the handset or p/DELETE on the telephone base to
erase all digits.
Press and hold REDIAL/PAUSE on the handset or the telephone base to enter a dialing
pause (a p appears).
To retrieve voicemail messages:
Press and hold 1.
Press q/p to highlight Line 1 or Line 2 -> Press SELECT.
1.
•
•
•
•
1.
2.
Set number of rings
You can set the answering system to answer an incoming call aer a number
of rings. You can also select toll saver to answer a call aer two rings when
you have new messages, or four rings when you have no new messages. This
feature allows you to check for new messages and avoid paying long distance
charges when calling from out of your local area. By default, the answering
system answers an incoming call aer four rings.
Using the telephone base:
1. Press MENU -> Press SELECT to select Answering system.
2. Press q/p to highlight Mailbox 1 or Mailbox 2 -> Press SELECT.
3. Press q/p to Ans system setup -> Press SELECT.
4. Press q/p to # of rings -> Press SELECT.
5. Press q/p to
choose among 6, 5, 4, 3, 2, or Toll saver -> Press SELECT.
To use voicemail (requires service subscription)
To install AT&T Sophone Call Manager:
Put the CD-ROM, which comes with the product package, into your
computer. Open My computer, and then double click to open the disk drive.
-OR-
Visit www.telephones.att.com/downloads to download the software.
Unzip the file after download.
Double click the installation file to begin the InstallShield Wizard.
Tick the option check box to authorize the installation of the
soware -> Click Run.
2. Select the language to be displayed during the installation and in the
program -> Click OK.
3. Click Next> -> Read the license agreement, and then accept the terms
by pressing the upper check box -> Press Next> to continue.
4. The default installation path is:
“C:\Program Files\AT&T\AT&T Sophone Call Manager v3”. Click the
Browse... button to change the path, if necessary -> Click Next>.
5. Select the program to connect to the soware -> Click Next>.
6. Click Install.
7. When the installation is complete, press Finish to exit the installation
program.
If you want to launch the AT&T Sophone Call Manager aer
installation, tick the option check box before pressing Finish.
Aer you have installed the AT&T Sophone Call Manager, check to
make sure the audio setting is properly congured in your Skype or
Microso Lync, if you want to use them with your telephone base.
To congure the audio settings:
Select AT&T USB Audio as the audio device under the settings of your
Skype or Microso Lync
.
1.
•
•
•
Microso Lync
®
, Microso Outlook
®
, Windows
®, Skype®,
Windows XP
®,
Windows Vista
®
and
Windows Media Player
®
are registered trademarks of Microsoft Corporation.
iTunes
®
is a registered trademark of Apple, Inc.
All other trademarks are the properties of their respective owners.
Click!
Click!
Plug!
Plug!
Plug!
Click!
Plug the small end of the USB
cable into the small port on the
right side of the telephone base.
•
Plug the large end of the
USB cable into a USB port
on your computer.
•
DSL lters
If you have DSL high-speed
Internet service, DSL lters
(not included) are required.