17.0
9.5
10.9
17.2
30.5
(単位:mm)
(units: mm)
English
日本語
安全上の注意
本製品は安全性に充分な配慮をして設計をしていますが、使いかたを誤ると事故が起こ
ることがあります。事故を未然に防ぐために下記の内容を必ずお守りください。
警告
●同梱のポリ袋は幼児の手の届く所や火の
そばに置かない
事故や火災の原因になります。
●幼児の手の届く所に置かない
事故や故障の原因になります。
●直射日光の当たる場所、暖房器具の近く、
高温多湿やほこりの多い場所に置かない
故障や不具合の原因になります。
●振動系は指で触れない
故障の原因になります。
●分 解や改造はしない
故障の原因になります。
●強い衝撃を与えない
故障の原因になります。
この表示は「取り扱いを誤った場合、使用者が死亡または重傷を負う可能
性があります 」を意 味してい ます。
注意
この表示は「取り扱いを誤った場合、使用者が傷害を負う、または物的損
害が発生する可能性があります」を意 味しています。
お買い上げありがとうございます。
ご使用の前にこの取扱説明書を必ずお読みのうえ、正しくご使用ください。
また保証書と一緒にいつでもすぐ読める場所に保管しておいてください。
VM型デュアルマグネットシステム
オーディオテクニカのVM型ステレオカートリッジは、ほかに類を見ない構造です。2本の
マグネット振動子をV字状に配置して振動系の性能を高め、レコードに音溝を刻み込んだ
カッターヘッドと相似で理想的な動作を実現しました。VM型AT90シリーズは、世界中
で定番のロングセラー商品となっています。
INSTRUCTIONS
取扱説明書
VM
型(デュアルムービングマグネット)
ステレオカートリッジ
Dual Moving Magnet Stereo Cartridge
AT95E
◆針交換のしかた
本製品の針交換はスタイラスノブを抜き差しするだけで簡単に行えます。
1.
振動系に手を触れたりしないようにプロテクターを外し、スタイラスノブを取り外してください。
2.取り付けは交換針の内側の突起をカートリッジの溝に合わせます。
※針の寿命は使用条件によって大幅に変化しますが、およそ300時間です。
①ヘッドシェルに取り付けます。
振動系を痛めないように、交換針を取り外しておきます。ビスは、通常カートリッジ側か
らシェルに向かって差し込み、仮締めをします。
※ビスをヘッドシェル側から通して固定する場合は、交換針にビスが当たらないようご
注意ください。
②出力端子の極性に注意してリードチップを接続します。
ユニバーサルアームのシェルリード線は、図 のように配列されています。カートリッ
ジの出力端子にリード線を接続します(図 参照)。リードチップが緩いときは、少しつ
ぶしてから行ってください。
※出力端子にはハンダなどの熱を絶対に加えないでください。
③カートリッジの取り付け位置を正確に決めます。(オーバーハングの調整)
アームまたはプレーヤーシステムの説明書に従ってオーバーハングの調整をします。不明
な場合は、プレーヤーに最初から付いていたカートリッジの針先位置に合わせてください。
※誤差が大きいと音質が劣化しますので、で き る だ け ±1mm以内に揃えてください。
※調整後、ビスが左右均等になるように本 締 めします。
④針圧を調整します。
本製品の適正針圧は1.5〜2.5gで、標準値は2.0gです。使用条件やお好みによって、
適正値の範囲内で針圧を調整してご使用ください。
⑤アームの高さを調整します。
ヘッドシェルの底面とレコード面が横から見て平行になるように、高さを調整してくださ
い。アームの高さが適切でないと、カートリッジのボディがレコードに当たり、音質が劣化
することがあります。
※接続する機器によっては、アームの高さを調整できない機器もあります。
⑥アンプとの接続を行います。
アンプのPHONO(MM)端子へダイレクトに接続してご使用ください。
アンプにPHONO端子がない場合は、別売のフォノイコライザーをご使用ください。
推奨負荷抵抗/容量は47kΩ/100〜200pFです。
⑦針先をいつもきれいにしておいてください。
針先にごみや汚れが付着した場合は、市販のブラシできれいにしておいてください。
汚れがひどい場合は、スタイラスクリーナー(別売)をおすすめします。
根元から針先へ向かってブラシを動かしてクリーニングしてください。
カートリッジをアームから外したときは忘れずにプロテクターを取り付けて、アンプなど
の熱源から離して保管してください。
⑧交換針は純正品をご使用ください。
AT95E
の交換針は右記のとおりです。
必ずオーディオテクニカの純正品をご使用ください。
112300820C2016.04
〒194-8666 東京都 町田市西成瀬2-46-1
http://www.audio-technica.co.jp
アフター サービスについて
本製品をご家庭用として、取
扱説明や接続・注意書きに
従ったご使用において故障
した場合、保証書記載の期
間・規定により無料修理を
させていただきます。修理が
できない製品の場合は、交
換させていただきます。お買
い上げの際の領収書または
レシートなどは、保証開始日
の確認のために保証書と共
に大切に保管し、修理などの
際は提示をお 願いします。
お問い合わせ先(電話受付 / 平日9:00〜17:30)
製品の仕様・使いかたや修理・部品のご相談は、お買い上げのお店
または当社窓口およびホームページのサポートまで お願 いします。
●お客様相談窓口(
製品の仕様・使いかた
) 0 120-773-417
(携帯電話・PHSなどのご利用は
03-6746-0211
)
FAX:042-739-9120 Eメール:
support@audio-technica.co.jp
●サービスセンター(修理・部品) 0120-887- 416
(携帯電話・PHSなどのご利用は
03-6746-0212
)
FAX:042-739-9120 Eメール:
servicecenter@audio-technica.co.jp
●ホームページ(サポート)
www.audio-technica.co.jp/atj /support /
交換針
ATN95E
(ノブカラーグリーン)
カ ートリッジ の 溝
交換針
内側の突起の
位置を合わせる
振動系を傷めないように注意しながら
カチッと音 が す るま でしっかり押し込 み ま す 。
交換針を少し後ろ方向に
引っ張ると外れます。
スタイラスノブ
前から見たシェルリード線の配列
(ユニバーサルアームの場合)
前面
ビス
リード チップ
※緩い場合は少しつぶす
白(左チャンネル・+)
緑(右チャンネル・−)
赤(右チャンネル・+)
青(左チャンネル・−)
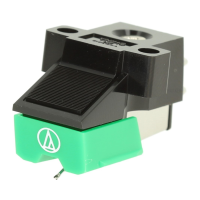
AT95E
この距離をできるだけ
正確に合わせる
プレーヤー付属の
カ ートリッジ
針先クリーニングのしかた
ブラシは必ずレコードの
進行方向に動かす。
D E
A
B C
How to clean the stylus tip
Always move the brush in
the direction in which the
record rotates.
Original cartridge
supplied with player
Make this distance
as exact as possible.
Screw
Blue (left channel / -)
青(左チャンネル・−)
Blue (left channel / -)
White (left channel / +)
白(左チャンネル・+)
White (left channel / +)
Front
Lead tip
*If loose, atten tips
out slightly
Green (right channel / -)
緑(右チャンネル・−)
Green (right channel / -)
Red (right channel / +)
赤(右チャンネル・+)
Red (right channel / +)
Layout of shell leads as seen from front
(in case of universal tonearm)
Stylus holder
The stylus can be removed
by lifting the frontpart from
the groove and pulling gently forward.
Replacement
cartridge stylus
Replacement
cartridge groove.
Position rear tab.
Firmly insert stylus until it clicks without
touching the cartridge's cantilever fulcrum.
特 長
テクニカルデータ
●型式:VM型●再生周波数範囲:20 〜 20,000 Hz●出力電圧:3.5mV
(1kHz、5cm/sec.)●チャンネルセパレーション:20dB(1kHz)●出力バラン
ス:2.0dB(1kHz)●針圧:1.5〜2.5g(2.0g標準)●コイルインピーダンス:
2.8kΩ(1kHz)●直流抵抗:410Ω●負荷抵抗:47kΩ●負荷容量:100 〜
200pF●コイルインダクタンス:400mH(1kHz)●スタチックコンプライアンス:
20×10
−6
cm/dyne●ダイナミックコンプライアンス:6.5×10
−6
cm/dyne
(100Hz)●針先形状:接合楕円0.3×0.7mil●カンチレバー:
アルミニウムパイプ
●垂直トラッキング角:20°●外形寸法:H17.2×W17.0×D30.5mm●質量:
5.7g■付属品:カートリッジ取り付けビス8mm×2、11mm×2、ワッシャー×
2、ナット×2
(改良のため予告なく変更することがあります。)
*針部分は大変デリケートです。取り扱いには充分ご注意ください。
*本製品をヘッドシェルに取り付ける際は、針を取り外してから行ってください。
使いかた
A
B
C
C
D
B
E
Thank you for purchasing this Audio-Technica AT95E cartridge. Before
using this cartridge, please read through these operating instructions
to ensure that the cartridge will be used correctly. Please retain this
manual in a safe location so that you can refer to it in the future.
Caution
This stereo cartridge was designed with painstaking attention to safety,
but product malfunction or injury may occur if it is used incorrectly. Be
sure to read these precautions before using product.
●
Keep the cartridge out of the reach of small children.
Failure to heed this precaution may result in accidents or malfunction.
●
Keep the plastic bag provided with the cartridge out of the reach of small
children and away from ames.
Failure to heed this precaution may result in accidents or re.
●
Do not put this cartridge in a location where it will be exposed to direct
sunlight, near heating devices or in places with a high temperature, high
humidity or with high concentrations of dust.
Failure to heed this precaution may result in malfunction.
●
Do not touch the cartridge's cantilever fulcrum.
●
Do not attempt to disassemble or modify the cartridge.
●
D
o not subject the cartridge to strong impact.
Failure to heed this precaution may result in malfunction.
● Dual Moving Magnet system
Audio-Technica's Dual Moving Magnet system stereo cartridges have a unique structure.
The structure improves
performance of the vibration system, allowing the stylus perfect
contact with the record surface. The Dual Moving Magnet system type AT90 series' dual
magnet vibration and generation systems are known throughout the world and have
became a best-selling series.
*The stylus section is extremely fragile. Exercise sufcient care when handling it.
*Remove the stylus assembly before mounting the cartridge.
◆ Replacing the stylus
You can easily replace the cartridge's stylus by removing and inserting the stylus
holder.
1. Remove the protector without touching the cartridge's cantilever fulcrum.
2. When installing, position the rear tab of the replacement stylus align with the
groove of the cartridge.
*Product lifetime of the stylus is around 300 hours, though this varies depending
on the conditions of use.
(1) Mount the cartridge onto the headshell.
Remove the stylus assembly before mounting the cartridge. Insert the two
mounting screws from the cartridge side, securing them to the headshell.
*It is possible to have the screws enter from the top of the headshell, however,
take care that the screws are short enough so as not to touch the replacement
stylus.
(2) Connect the lead tips, noting output polarity.
The layout of the universal arm's shell leads is as shown in gure B. Connect
leads to cartridge output terminals as shown in gure C. If a lead tip is loose,
atten it out slightly before connecting it.
*Never apply heat (from soldering iron, etc.) to the output terminals.
(3) Determine the correct position for installing the cartridge (adjust overhang).
Adjust overhang, following the instructions originally supplied with the tonearm
or the turntable user manual. If you are unsure, use the cartridge originally
provided with the turntable as a guide to the position of the stylus tip.
*An overly large gap will impair audio quality, so align within 1 mm if possible.
*After adjusting, nish tightening the screws, making sure the cartridge is
tightened equally on the left and right.
(4) Adjust tracking force.
The appropriate tracking force of this cartridge is in the range of 1.5 to 2.5 g
(standard level: 2.0 g). Depending on conditions of use or individual
preference, adjust the tracking force within the range of suitable values.
(5) Adjust arm height.
Adjust the height so that the bottom face of the headshell and the record
surface are parallel, as seen from the side. An improper arm height may cause
the body of the cartridge to make contact with the record and could impair
audio quality.
*Depending on equipment being connected, you may not be able to adjust arm
height.
(6) Connect to the amplier.
Connect directly to the PHONO (MM) terminal of the amplier. Should your
amplier not have a PHONO terminal, use a suitable phono equalizer sold
separately. Recommended load impedance/capacitance is 47 kΩ/100 〜 200 pF.
(7) Keep the stylus tip clean at all times.
A small brush is recommended to remove the dirt and dust on the stylus tip.
A stylus cleaner (sold separately) is recommended to remove stubborn dirt.
Clean the stylus tip by moving the brush from the base toward the stylus tip.
When the cartridge has been removed from the arm, do not forget to put back
the protector, and store the cartridge away from the amplier and other heat
sources.
(8) Replaceable stylus for AT95E is ATN95E.
Stylus must be replaced with Audio-Technica original.
Operation
Features
Specications
Audio-Technica Corp.
2-46-1 Nishi-naruse, Machida, Tokyo 194-8666, Japan
2015 -2016
Audio-TechnicaCorp.
A
B C
D
E
●
Type / Type / Typ / Tipo / Tipo / Тип : VM
●
Frequency response / Réponse en fréquence /
Frequenzbereich / Risposta in frequenza / Respuesta en frecuencia / Частотная
характеристика : 20to20,000 Hz
●
Output voltage / Tension de sortie / Ausgangsspannung /
Tensione di uscita / Voltaje de salida / Выходное напряжение : 3.5 mV (1 kHz, 5 cm/sec.)
●
Channel separation / Séparation entre les canaux / Kanaltrennung / Separazione dei canali /
Separación de canales / Разделение каналов : 20 dB(1 kHz)
●
Output balance / Equilibre entre
les deux canaux / Kanalbalance am Ausgang / Bilanciamento d’uscita / Balance de salida /
Баланс каналов : 2.0 dB (1 kHz)
●
Tracking force / Force d'Appui Verticale / Auflagekraft /
Forza di appoggio / Fuerza de seguimiento / Трековое усилие : 1.5to2.5 g (2.0 g standard)
●
Coil impedance / Impédance de la Bobine / Spulenimpedanz / Impedenza della bobina /
Impedancia de bobina / Внутреннее сопротивление : 2.8 kohms(1 kHz)
●
Coil DC resistance /
Résistance en Courant Continu de la Bobine / Gleichstromwiderstand der Spule / Resistenza
DP bobina / Resistencia DC bobina / Сопротивление постоянному току : 410 ohms
●
Recommended load capacitance / Charge capacitive recommandée / Empfohlene
Lastkapazität / Capacità di carico raccomandata / Capacitancia de carga recomendada /
Рекомендованная емкость нагрузки : 47 kohms
●
Load capacitance / Charge capacitive /
Lastkapazität / Capacità di carico / Capacitancia de carga / Емкость нагрузки : 100to200 pF
●
Coil inductance / Inductance de la Bobine / Spuleninduktivität / Induttanza della bobina /
Inductancia bobina / Внутренняя индуктивность : 400 mH (1 kHz)
●
Static compliance /
Compliance Statique / Statische Nadelnachgiebigkeit / Cedevolezza statica / Elasticidad
estática / Статическая податливость : 20 × 10
−6
cm/dyne
●
Dynamic compliance / Compliance
Dynamique / Dynamische Nadelnachgiebigkeit / Cedevolezza dinamica / Elasticidad
dinámica / Динамическая податливость : 6.5 × 10
−6
cm/dyne(100 Hz)
●
Stylus / Pointe de
Remplacement / Nadelschliff / Puntina / Aguja / Игла : Jointed elliptical 0.3 × 0.7 mil
●
Cantilever / Cantilever (levier porte-pointe) / Nadelträger / Cantilever / Cantilever / Кантилевер :
Aluminum pipe
●
Vertical tracking angle / Angle de Lecture Vertical / Vertikaler Abtastwinkel /
Angolo di tracciatura verticale / Ángulo de seguimento vertical / Угол наклона дорожки : 20 °
●
Dimensions / Dimensions / Abmessungen / Dimensioni / Dimensiones / Размеры : 17.2 (H) ×
17.0 (W) × 30.5 (D) mm
●
Weight / Poids / Gewicht / Peso / Peso / Вес / 5.7 g
■Accessories / Accessoires / Zubehör / Accessori / Accesorios / Комплектующие
Cartridge installation screws / Vis de montage / Befestigungsschrauben für
Tonabnehmer/ Viti di installazione della cartuccia / Tornillos instalación cápsula /
Болты для установки картриджа : 8 mm × 2 and 11 mm × 2, washer / rondelle /
unterlegscheibe / rondella / arandela / шайба : × 2, nut / écrou / Schraubenmutter /
dado / tuerca / гайка : × 2