© 2020 Avaya Inc. All Rights Reserved.
Back
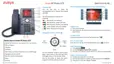
1. J100 expansion module connector.
2. 5V DC Jack—To connect the power supply.
3. Network port—To connect the Ethernet cable.
4. PC port—To connect the computer.
Note: PC port is disabled when a Wi-Fi network
is used.
2
3
4
7
6
5
5. WLAN Module Panel—To integrate the wireless
module for Wi-Fi/Bluetooth support.
Note: WLAN Module Panel is not provided in
the Avaya J169 IP Phone.
6. Handset Jack—To connect the handset.
7. Headset Jack—To connect the headset.
1

 Loading...