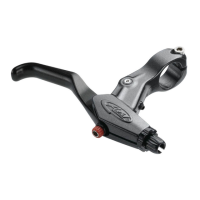
Only levers designated for side-pull brakes, such as
Avid’s Speed Dial Series and AD 3 levers, can be
used the Mountain Ball Bearing Disc Brake. For
best operation and performance Avid highly recom-
mends that you use an Avid Speed Dial lever and
premium quality brake cable and housing. Failure
to do so will reduce the performance of the sys-
tem.
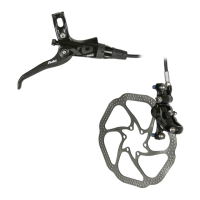
Avid Disc brakes are compatible with 44mm, 6-bolt,
International Standard hubs.
We recommend 32 or 36 spoke wheels with a 3 or
4 cross spoke lacing pattern.
DO NOT USE RADIALLY SPOKED WHEELS.
DO NOT TOUCH THE BRAKING SURFACE OF
THE ROTOR WITH YOUR BARE HANDS.
WEAR GLOVES, OR HANDLE THE ROTOR BY THE SPOKES. OILS
FROM YOUR FINGERS WILL DEGRADE THE PERFORMANCE OF
ANY DISC BRAKE. DISC BRAKES BECOME VERY HOT DURING
USE. DO NOT TOUCH THE CALIPER OR ROTOR IMMEDIATELY
AFTER USE. MAKE SURE THE BRAKE HAS COOLED DOWN
BEFORE MAKING ANY ADJUSTMENTS.
1
TOOLS NEEDED: 2.5mm & 5mm hex wrenches, T-25 TORX
®
wrench, adjustable
torque wrench [5-10Nm (40-90 IN-Lbs) range,] and cable cutters.
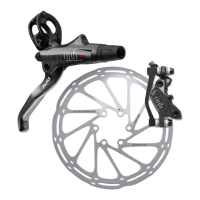
Mount rotor to hub using supplied
T-25 TORX
®
bolts and tighten to
the specified torque.
AAVVIIDD llooggoo
MMUUSSTT ffaaccee oouutt..
Install wheel into
fork or frame.
IF YOU ARE USING A HUB WITH
A REMOVABLE SHIM - YOU MAY
NEED LONGER ROTOR MOUNTING BOLTS.
CONTACT THE HUB MANUFACTURER FOR THE
RECOMMENDED BOLTS.
WWAARRNNIINNGG
2
For International Standard Mount, bolt the
caliper assembly and mounting bracket
(“AVID” facing OUT) to the I.S. mounting
tabs using the M6 bolts provided. Tighten
to the specified torque value. Loosen
slightly the two CPS bolts that attach the
caliper to the mounting bracket.
For Manitou forks, remove the mounting
bracket, leaving the CPS bolts & washer
stacks intact. Discard the bracket and
install the caliper on the fork.
DDoo nnoott ttiigghhtteenn tthhee CCPPSS bboollttss yyeett..
3
WWAARRNNIINNGG
TTOORRQQUUEE::
99-1100 NNmm ((8800-9900 IInn-LLbbss))
Install the rotor
Mount the caliper
Align the Caliper
FRONT
REAR
CPS BOLT
BRACKETS
CPS HARDWARE
DDOO NNOOTT TTIIGGHHTTEENN YYEETT!!
BBRRAAKKEE IINNSSTTAALLLLAATTIIOONN
Rotor should be offset to the outboard
side of the rotor slot. Ideal ratio is
1/3 to 2/3.
2002 Mountain Ball Bearing Disc Brake
Installation Guidelines
11//33
22//33
IMPORTANT
Brakes are a safety-critical item on a bicycle. Improper set-up or use of brakes can result
in loss of control or an accident, which could lead to a severe injury.
AAvviidd bbrraakkeess aarree aa ppeerrffoorrmmaannccee pprroodduucctt tthhaatt ooffffeerr iinnccrreeaasseedd ssttooppppiinngg
ppoowweerr oovveerr ssttaannddaarrdd bbrraakkeess..
It’s your responsibility to learn and understand prop-
er braking techniques. Consult the owner’s manual for your bicycle and a professional
bike dealer. Practice your riding and braking techniques on a flat and level surface prior
to aggressive riding.
The effectiveness of braking is dependent on many conditions over which Avid has no
control. These include the speed of the bicycle, type and condition of the riding surface,
braking lever force, proper installation and maintenance of brakes, cables, levers, brake
pads, the condition of the bike, weight of the rider, proper braking techniques, weather,
terrain, and a variety of other factors.
Avid brakes and levers are not intended for use on any motorized bicycle or vehicle. Any
such use could result in a serious personal injury.
ALWAYS RIDE UNDER CONTROL.
Remember, it takes longer to stop in wet conditions. To reduce the possibility of an
accident and minimize trail erosion, you should avoid locking-up your wheels.
FOLLOW THESE INSTRUCTIONS CAREFULLY.
IF YOU DO NOT UNDERSTAND THE INSTRUC-
TIONS, HAVE THE INSTALLATION DONE BY A
PROFESSIONAL BIKE MECHANIC.
ii
Rotor
Caliper
Turn the inboard (closest to the wheel) knob clockwise
until the rotor is properly positioned in the caliper body.
A.
B.
True the Caliper
Turn the outboard pad adjustment knob in until it is firmly squeezing
the rotor against the inboard pad - thus immobilizing the actuating
arm.
Pad
IMPORTANT:
If uusing rracks, ppanniers, oor ffenders, tthis iis aa ggood ttime
to eensure tthere iis cclearance ffor tthe ccaliper ttorque aarm
to mmove tthrough iits ccomplete rrange oof mmotion.
IMPORTANT:
The ssupplied
TORX
®
wrench
is ffor eemergencies oonly.
Use aa ttorque wwrench tto
ensure pproper ttorque
value.
TTOORRQQUUEE::
66..22 NNmm ((5555 IInn-LLbbss))
Tip:
If the adjuster knobs are difficult
to turn, turn them back and forth a
few times until they feel smooth.