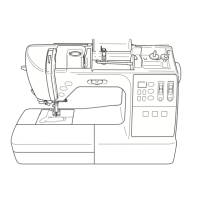
KEY FUNCTIONS
35
Embroidery Step by Step
1
Editing Patterns
Using these keys, you can edit the pattern as you like.
KEY FUNCTIONS
• If a key display is grayed out, you cannot use that function with the selected pattern.
a Shows the size of the entire combined pattern.
b Refer to “Editing Window” on page 36.
c Shows the color sequence and stitching times of each
step of the pattern currently selected.
No. Display Key Name Explanation Page
a Magnify key Touch this key to select the magnification ratio. 68
b Hand key Touch this key to move the canvas when it is magnified. 68
c Fabric scan key Touch this key to scan the fabric to align the embroidery position. 86
d Image key Touch this key for a preview of the embroidered image. 58
e Embroidery key Touch this key to call up the embroidery screen. —
f Memory key Touch this key to save a pattern in the machine’s memory, USB media or an SD
card. The pattern can also be transferred to a computer via a wireless network
connection.
101
g Pattern select key When a combined pattern is selected, use this key to select a part of the
pattern to edit. Touch this key to display the select keys and multiple selection
key.
—
h Redo key Touch this key to redo the last operation that was undone. —
i Undo key Touch this key to undo the last operation. —
j Delete key Touch this key to delete the selected pattern (the pattern outlined by the red
box).
68
k Add key Touch this key to add another pattern to the editing pattern. 80
l Select key Touch this key to change a selected pattern when multiple patterns are in the
screen.
82
m Multiple selection key Touch this key to make multiple patterns on the screen to be selected at the
same time.
83, 84

 Loading...