149R5911443 /11 UDM
Image 10–28 Example of the DMX menu
2. Choose the desired DMX mode.
3. Choose the desired starting channel.
4. Choose whether or not you want the Auto power-down feature to be enabled. If enabled, determine the
time-out.
5. If required, enable Art-Net. If enabled, determine the desired Art-Net Universe and Art-Net channel.
6. If a front XLR connector is available on your projector, you can enable the output voltage on this
connector.
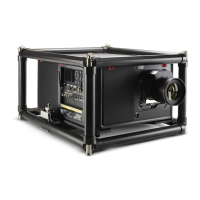
10.5 Controlling the front XLR connector
About the front XLR connector
There is a 4-pin XLR connector located on the front side of the projector, underneath the lens holder.
Image 10–29 Location of the XLR connector
The front XLR connector can be used to connect with peripheral devices. These can range from the motorized
rigging frame, an external mechanical shutter or other XLR-powered devices.
CAUTION: You can connect multiple peripheral devices if you have an XLR splitter. However, take
into account that the maximum allowed load on the front XLR connector is 2 A.
Pinout of the front XLR connector
4-pin XLR connector
Pin
Description
1 Earth
2 Data-
3 Data+
4 VCC
GUI – System Settings

 Loading...