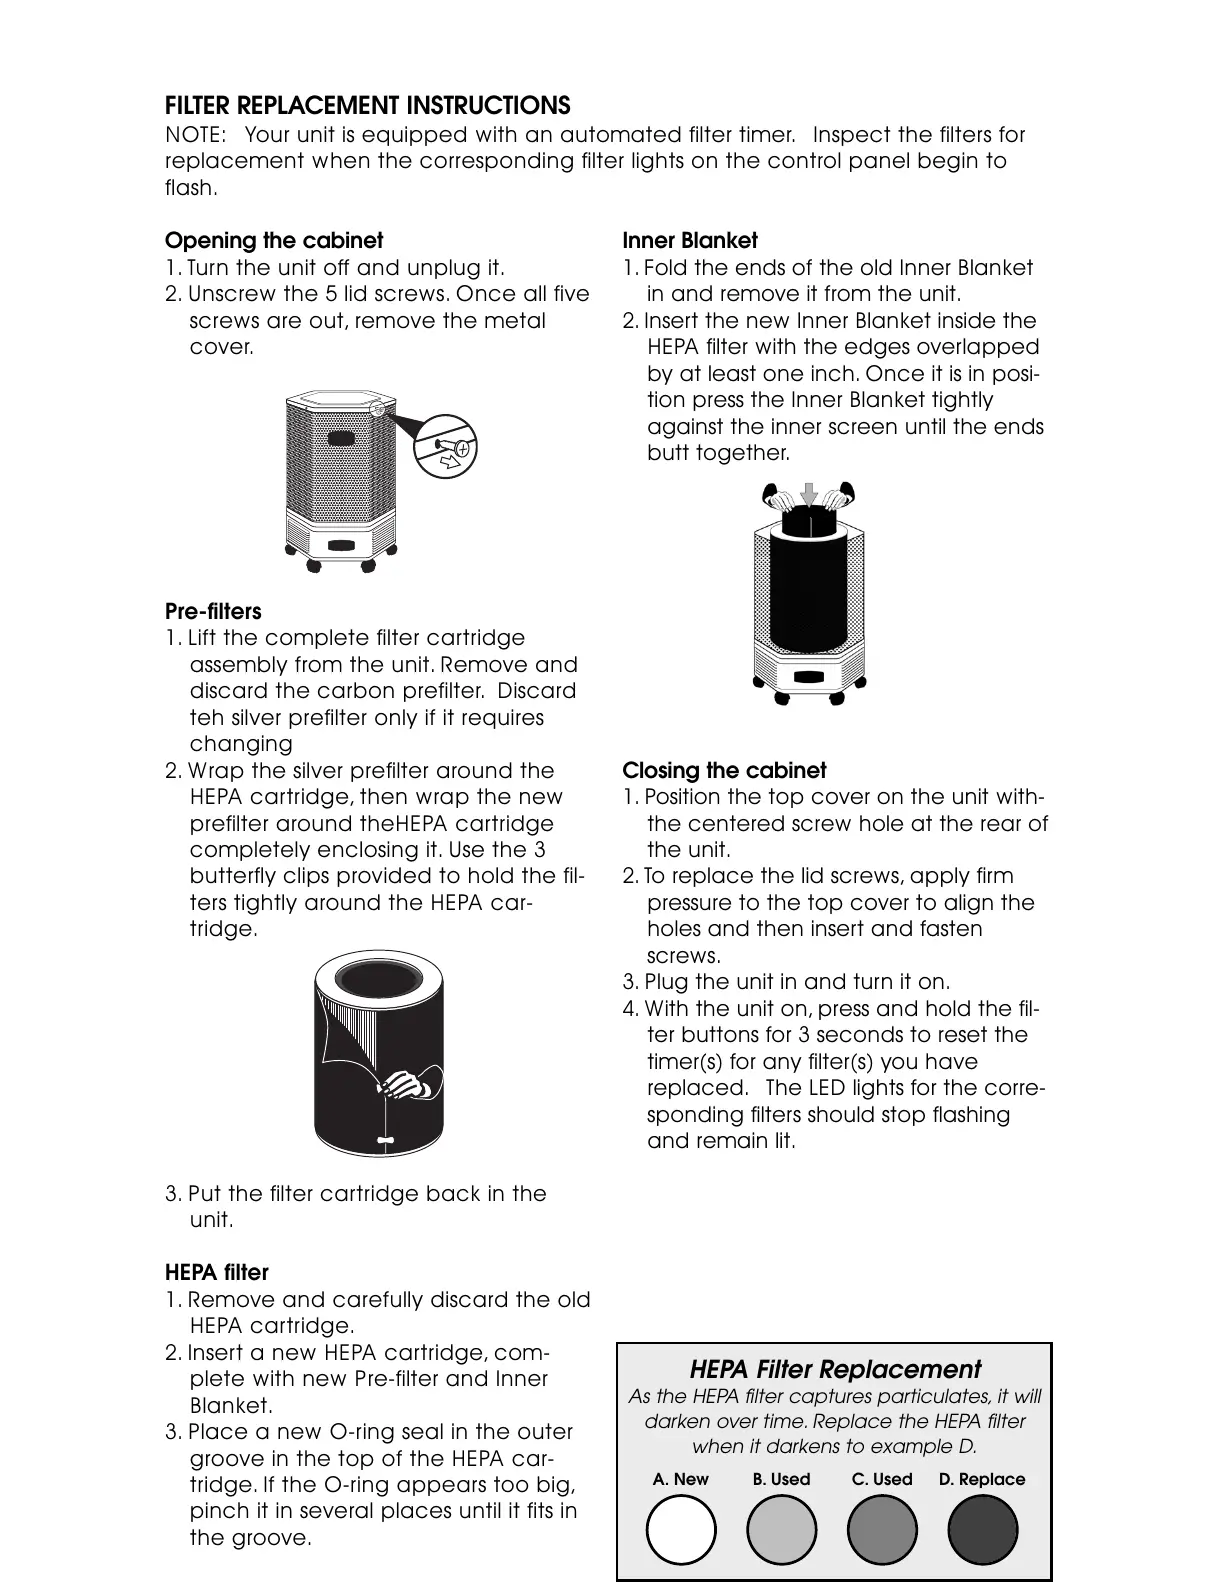
Opening the cabinet
1. Turn the unit off and unplug it.
2. Unscrew the 5 lid screws. Once all five
screws are out, remove the metal
cover.
Pre-filters
1. Lift the complete filter cartridge
assembly from the unit. Remove and
discard the carbon prefilter. Discard
teh silver prefilter only if it requires
changing
2. Wrap the silver prefilter around the
HEPA cartridge, then wrap the new
prefilter around theHEPA cartridge
completely enclosing it. Use the 3
butterfly clips provided to hold the fil-
ters tightly around the HEPA car-
tridge.
3. Put the filter cartridge back in the
unit.
HEPA filter
1. Remove and carefully discard the old
HEPA cartridge.
2. Insert a new HEPA cartridge, com-
plete with new Pre-filter and Inner
Blanket.
3. Place a new O-ring seal in the outer
groove in the top of the HEPA car-
tridge. If the O-ring appears too big,
pinch it in several places until it fits in
the groove.
Inner Blanket
1. Fold the ends of the old Inner Blanket
in and remove it from the unit.
2. Insert the new Inner Blanket inside the
HEPA filter with the edges overlapped
by at least one inch. Once it is in posi-
tion press the Inner Blanket tightly
against the inner screen until the ends
butt together.
Closing the cabinet
1. Position the top cover on the unit with-
the centered screw hole at the rear of
the unit.
2. To replace the lid screws, apply firm
pressure to the top cover to align the
holes and then insert and fasten
screws.
3. Plug the unit in and turn it on.
4. With the unit on, press and hold the fil-
ter buttons for 3 seconds to reset the
timer(s) for any filter(s) you have
replaced. The LED lights for the corre-
sponding filters should stop flashing
and remain lit.
FILTER REPLACEMENT INSTRUCTIONS
NOTE: Your unit is equipped with an automated filter timer. Inspect the filters for
replacement when the corresponding filter lights on the control panel begin to
flash.
HEPA Filter Replacement
As the HEPA filter captures particulates, it will
darken over time. Replace the HEPA filter
when it darkens to example D.
A. New B. Used C. Used D. Replace
Ouverture du coffret
1. Mettre l'unité hors-tension et la débrancher.
2. Dévisser les cinq vis du couvercle. Une fois
l'ensemble des cinq vis retirées, enlever le
couvercle de métal.
Préfiltre
1. Soulever la cartouche entière de filtres et la
retirer de l'unité. Retirer le pré-filtre à charbon
et le jeter.
2. Enrouler le nouveau pré-filtre HEPA autour
de la cartouche pour l'envelopper entière-
ment
. Utiliser les trois attaches croisées
fournies pour maintenir fermement le filtre
autour de la cartouche HEPA.
3. Replacer la cartouche de filtres dans l'u-
nité.
Filtre HEPA
1. Retirez et jetez avec soin la vieille car-
touche HEPA.
2. Insérez la nouvelle cartouche HEPA avec le
nouveau préfiltre et le coussin intérieur.
3. Placez un nouveau joint torique dans l’en-
coche extérieure pratiquée à la partie
supérieure de la cartouche HEPA. Si le joint
semble trop gros, pincez-le à plusieurs
endroits jusqu’à ce qu’il puisse être inséré
dans l’encoche.
Coussin intérieur
1. Pliez les extrémités du vieux coussin intérieur
et retirez-le de l’appareil.
2. Insérez le nouveau coussin intérieur dans le
filtre HEPA; chevauchez les extrémités sur un
pouce au moins. Une fois que le coussin est
en place, enfoncez-le dans l’écran intérieur
jusqu’à ce que les extrémités se rencon-
trent.
Fermeture du coffret
1. Placez le couvercle sur l’appareil et placez
vers l’arrière la vis de protection contre
l’accès par les enfants.
2. Remettez les boutons en appliquant une
pression ferme sur le dessus du couvercle;
alignez les orifices et insérez les boutons.
3. Remettez en place la vis de protection
contre l’accès par les enfants. Branchez
l’appareil et mettez-le en marche.
CARTOUCHE OPTIONNELLE POUR LES COV POUR LE RETRAIT EN SERVICE
INTENSE DES GAZ ET DES ODEURS
REPLACEMENT DU FILTRE HEPA
À mesure que le filtre HEPA retient les particules, il
noircira graduellement. Remplacez le filtre HEPA
lorsqu’il parvient à la couleur indiquêe en D.
A. Neuf B. Usagé C. Usagé D. Remplacer
 Loading...