The GS-USB-PRO is a third-generation gamma spectrometer designed to connect to any PC or Mac via a standard USB 2.0 port. It functions as a USB audio adapter for photomultiplier tubes, transforming your computer into a professional gamma spectrometer when used with free PC software such as PRA, Theremino, Becqmoni, or GeigerBot on iOS. The device is compatible with most common radiation detectors, including Geiger Mueller tubes and Scintillation detectors.
Function Description:
The GS-USB-PRO is powered by USB and provides a stable high-voltage positive bias, adjustable from 0 to 2000 volts, making it suitable for a wide range of radiation detectors. It processes pulses from single-wire detectors by decoupling and amplifying them through an impedance-matching preamplifier. These pulses are then digitized by an inbuilt audio codec and transmitted to the computer via USB. The data stream is subsequently analyzed by multi-channel analysis software on the PC.
For two-wire detectors, the GS-USB-PRO features a BNC signal input port with integral coupling. A dip switch located under the unit allows bypassing the internal coupling when using two-wire detectors. High-resolution pulse height analysis is achieved through smart software algorithms that calculate pulse height in real time, utilizing up to 60 sample points per pulse to produce excellent spectra. The maximum counting rate is determined by the sample rate and the number of samples selected in the software settings, preferably below 2000 counts per second (cps). The device aims to provide impressive pulse height resolution, often reaching the limit of detector specifications.
Important Technical Specifications:
- Input Power: USB (+5V)
- Maximum Current: 200 mA
- Output Bias Voltage: 0 - 2000 Volts (Variable)
- HV Connector: SHV
- Signal Input Connector: BNC
- Analogue Output Option 1: 3.5 mm Mono Jack (TS)
- Analogue Output Option 2: 3.5 mm Headset Jack (TRRS)
- Analogue Input Right Channel: 3.5 mm Stereo (TRS) Crossover
- Default Audio Channel: Left
- Optional Input: Right
- Sample Rate: 48 kHz
- Bit Rate: 16 bit
- Signal to Noise Ratio: 73.9 dB
- Preamp. Volume (adjustable): 0 - 3.3V
- Pulse Length (adjustable): 5 - 100µs
- Dimensions: 165 x 115 x 35 mm
- Weight: Approximately 450 grams
Standard Inclusions:
- 1 x GS-USB-PRO Spectrometer
- 1 x 2.5 mm Screwdriver
- 1 x USB type A to Type B Cable
- 1 x 3.5 mm Mono Audio Cable
Usage Features:
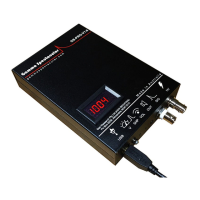
The GS-USB-PRO offers several user-adjustable controls and connectors:
- USB Connector (A): For data and power.
- Voltage Adjustment Potentiometer (B): Turn clockwise to increase voltage. A 2.5 mm screwdriver is provided for adjustment. The voltmeter displays the recommended voltage for the detector. Note that for detectors with very low impedance dividers, the voltage display may appear overstated as it measures voltage above the 1 Mohm coupling.
- Pulse Length Adjustment Potentiometer (C): Turn clockwise to decrease pulse length.
- Amplifier Volume Potentiometer (D): Turn clockwise to increase amplifier volume.
- Combination Jack Plug (E): Supports TS, TRS, and TRRS connections.
- BNC Detector Signal Input (F): For detector signal input.
- SHV High Voltage Detector Bias (G): For high voltage detector bias.
Dip Switches:
Two dip switches are located under the GS-USB-PRO unit. One selects between single and two-wire detectors, and the other changes the function of the jack plug (E) from Tip, Ring, Sleeve (TRS) to Tip, Ring, Ring, Sleeve (TRRS) jack. Note that units with serial numbers below #1255 may have these switches operating in the opposite way.
Setup Instructions (with PRA Version 22):
- Component Check: Verify receipt of all standard inclusions. Detectors and additional cables are not included unless part of a kit.
- Connect to PC: Connect the GS-USB-PRO to a live USB port. The voltage display should light up immediately. The device does not have an on/off switch.
- PC Connection Check: Open the PC control panel (Sound > Recording) and confirm that "USB AUDIO CODEC" is recognized. Optionally, check "Listen to this device" to hear detector sounds. No driver installation is typically required. If connection fails, try disconnecting and reconnecting the USB.
- Adjust Bias Voltage: Use the provided 2.5 mm screwdriver to adjust potentiometer (B) until the voltmeter displays the recommended voltage for the detector.
- Download PRA: Download and install the latest PRA software from
https://www.gammaspectacular.com/software-downloads.
- Audio Interface Settings: In PRA, go to Settings >> Audio interface. Select "USB Audio Codec" for the left channel and set the sample rate to 48 kHz or higher. A higher sample rate and number of sample points improve results. The sample window is the product of time between samples and the number of sample points. Choose a sample rate and number of samples to create a reasonable size sample window (e.g., 100 µs pulse). Setting the sample rate to 384 kHz with 60 sample points gives a 2.6 µs x 60 samples = 156 µs window.
- Connect Detector: Connect a detector using a proper high-voltage coaxial cable with a suitable SHV connector. Optionally, connect a signal cable to the BNC port if your detector has internal coupling. Ensure the voltage is in the correct range for your detector. Most detectors have an acceptable plateau of a few hundred volts. For single-wire detectors, connect the SHV port; for detectors requiring a BNC connector, an adapter cable may be needed.
- Open PRA Windows: Open four windows in PRA:
- Settings >> Data acquisition and analysis (DAA)
- View >> Counting rate vs time
- View >> Pulse height Histogram
- View >> Audio input
The audio input window's vertical scale is -100 to +100 arbitrary units, corresponding to the full dynamic 16-bit range of the sound card.
- DAA Default Settings: Check the default settings in the DAA window.
- Start Pulse Shape Acquisition: Go to Action >> Start pulse shape acquisition. The left channel pulse trace should become visible in the Audio Input window. Observe if pulses are positive or negative. If negative, return to step 5 and change the Pulse height threshold to a negative number.
- Adjust Volume: Observe the pulse height and adjust the volume (D) up or down using the small screwdriver. The occasional cosmic ray may overshoot the scale. For optimal gain, ensure the detector bias voltage is sufficient. The K40 (1460 keV) peak sits at 50 arb.u. If calibrating with Cs137, the 662 keV peak should be around 25 arb.u.
- Adjust Pulse Length: Adjust the pulse length (C). This setting is factory preset to around 100 µs, which should yield good results. A combination of shorter pulse and fewer sample points can be used to minimize dead-time. Ensure the entire pulse fits within the audio input window. Faster sampling will place the dots closer together.
- Stop Pulse Shape Acquisition (PSA): Go to Action >> Stop Pulse Shape Acquisition (PSA). A window showing the mean sample points will pop up; confirm by clicking OK. The pulse peak is usually around sample 30. Deselecting an equal number of samples at the beginning and end creates a narrower window. Make adjustments to hardware parameters if needed and repeat PSA.
- Start Data Acquisition: Go to Action >> Start data acquisition. The first spectrum will be recorded, and a spectrum forming in the pulse height histogram window should be visible.
Energy Calibration:
In the DAA, the horizontal axis of the pulse height histogram displays 100 arbitrary units (arb.u.), representing the full energy range of the analogue to digital converter (ADC). It is crucial to choose the voltage/volume combination carefully to make full use of the range. A good rule of thumb is to set the volume so K40 (1460 keV) appears at 50 arb.u. K40 is present everywhere and will show up in your spectrum after a few minutes of recording. No special calibration source is required for this.
Steps for Calibration Using One Peak:
- Record a good spectrum with well-defined known peaks. Spectroscopy is a visual art; recognizing peaks takes some practice.
- Tick the box called Gaussian in the DAA. This helps identify peaks in your spectrum.
- Select a region of interest (ROI) by clicking a bin to the left of the calibration peak and pressing "b" for beginning, then clicking a bin immediately to the right of the peak and pressing "e" for end. The ROI should now be highlighted in yellow. The ROI should include the entire area of the peak.
- Select any bin inside the region of interest and note down the mean arb.u as well as the standard deviation (SD).
- Open the Settings >> Energy calibration window and enter the recorded calibration point values into the left channel table. For single-point calibration, only one row in the table is required; for multipoint calibration, you may enter up to 8 values.
- Select the best calibration mode:
- Fit Slope: Linear fit through zero point.
- Fit Linear: Linear fit through two or more calibration points.
- Interpolate: Straight line fit between calibration points.
Follow the same procedure for multi-peak calibration by adding more points in the table and choosing interpolate for more accurate readings between points.
Coincidence Counting:
Coincidence counting experiments can be performed with PRA software using two detectors and two GS-USB-PRO spectrometers. This is achieved by using the left and right audio channels of the stereo codec. To record both left & right channel detectors, the left channel detector is connected to your PC in the normal way, and the right channel spectrometer audio output (jack) connects to the left channel spectrometer audio input (jack) with a stereo crossover cable. Both spectrometers require USB power, and only one USB CODEC is used for both the left and right recording. Audio crossover cables should be kept as short as possible for best results.
Maintenance Features:
- Waste and Electronic Equipment (2012/19/EU): The product may be returned to the original manufacturer for recycling at the end of its life.
- Hazardous Substances in Electronic Equipment (2011/65/EU): The product does not contain lead or any other restricted substance in excess of the described directive.
- Electromagnetic Compatibility (2014/30/EU): When used as described, the product complies with the general requirements 1(a) and 1(b) in Annex 1 of the directive.
Safety Instructions:
- Warning High Voltage: Always disconnect power before opening. The GS circuit operates at potentials up to 2000 volts and can cause a severe, potentially fatal shock.
- Care: Be careful when connecting or disconnecting Live SHV cables to avoid shock.
- Water: Keep away from water.
- Radioactive Materials Handling: Follow appropriate safety procedures when working with radioactive materials to avoid unnecessary exposure. Use personal protection to avoid skin exposure. Avoid any food or drink in areas where radioactive materials are used. For more information, search "Safety when handling radioactive materials" on Google.
Cables:
Only good quality 50 ohm coaxial cables with polyethylene (PE) core should be used when connecting a detector to the GS-USB-PRO. The most common type is an RG58U/C with soldered and crimped connectors. Low quality or badly fitted ends may cause high voltage arcs, leading to false counts. Custom-made cables are available.
Free Support:
Bee Research Pty Ltd offers additional support. For problems and support, email steven@gammaspectacular.com.au.
Lifetime Guarantee & Repairs:
Bee Research Pty Ltd offers a 100% customer satisfaction guarantee. If a product fails due to manufacturing or shipping, or if an unlikely event causes damage, they will endeavor to fix it. If you have had the product for a long time, you are the original owner, and it is still here, please email them before returning a product for repair.
Return Address:
Bee Research
PO Box 6259
Alexandria NSW 2015
Australia
Email: steven@beejewel.com.au
Mobile (cell phone): +61 412 422 318 (Australian Eastern Time)