16
Wird die Hilfe des Kundendienstes benötigt, unverzüglich den Inglesina-Händler kontaktieren, bei dem das
Produkt erworben wurde, wobei die „Serial Number” (Seriennummer) des Produktes, auf das sich die Anfrage bezieht,
Es ist Aufgabe des Händlers, Inglesina zu kontaktieren, um von Fall zu Fall über die optimale Vorgehensweise zu
Der Kundendienst von Inglesina steht Ihnen für alle notwendigen Informationen zur Verfügung. Bitte füllen sie das
Jeder Autokindersitz könnte unter Umständen Abdrücke auf den Sitzen des Fahrzeugs hinterlassen, die bei einer
korrekten Befestigung des Sitzen gemäß Vorgaben der Straßenverkehrsregeln normal sind. Bei der Realisierung des
Produkts wurde darauf geachtet, dass diese Abdrücke soweit wie möglich verhindert werden. Der Hersteller haftet
jedoch nicht für eventuelle
Abdrücke, die durch den Gebrauch des Autokindersitzes auf dem Autositz entstehen können.
Mechanismen und bewegliche Teile nicht gewaltsam betätigen. Im Zweifelsfall zuerst die Anweisungen zu Rate ziehen.
Das Produkt vor Witterung, Wasser, Regen oder Schnee schützten. Eine dauerhafte und lange Sonnenaussetzung kann
Handwash in cold water Do not iron
Do not bleach Do not dry clean
Do not tuble dry Do not spin-dry
Dry flat in shade
• Dry the textile lining completely before using or storing it.
CAUTION! Never wash the straps and buckle; just wipe them with a damp cloth.
It is vital for the safety of your child that the harness buckle works correctly. Malfunctions of the harness buckle may be caused
by accumulations of food, dirt or foreign bodies.
Never lubricate or oil the harness buckle.
•
•
•
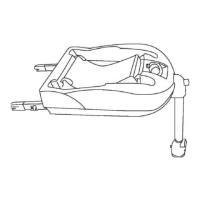
1. INSTALLING THE CHILD SEAT
To install the Beemoo Rotate child restraint system follow the steps below:
1a. Unfold the leg(12)until it is in the verticalposition as shown.
1b. Move the button(11) to slide the ISOFIX (9) backwar ds unfolding the connector fully. Do this for both connectors.
1c. Guide the connectors towards the ISOFIX anchors in your vehicle until they lock together by clicking into place and
the indicator changes from red to green on both sides of the base.
 Loading...