(EN) Step 2: Controls
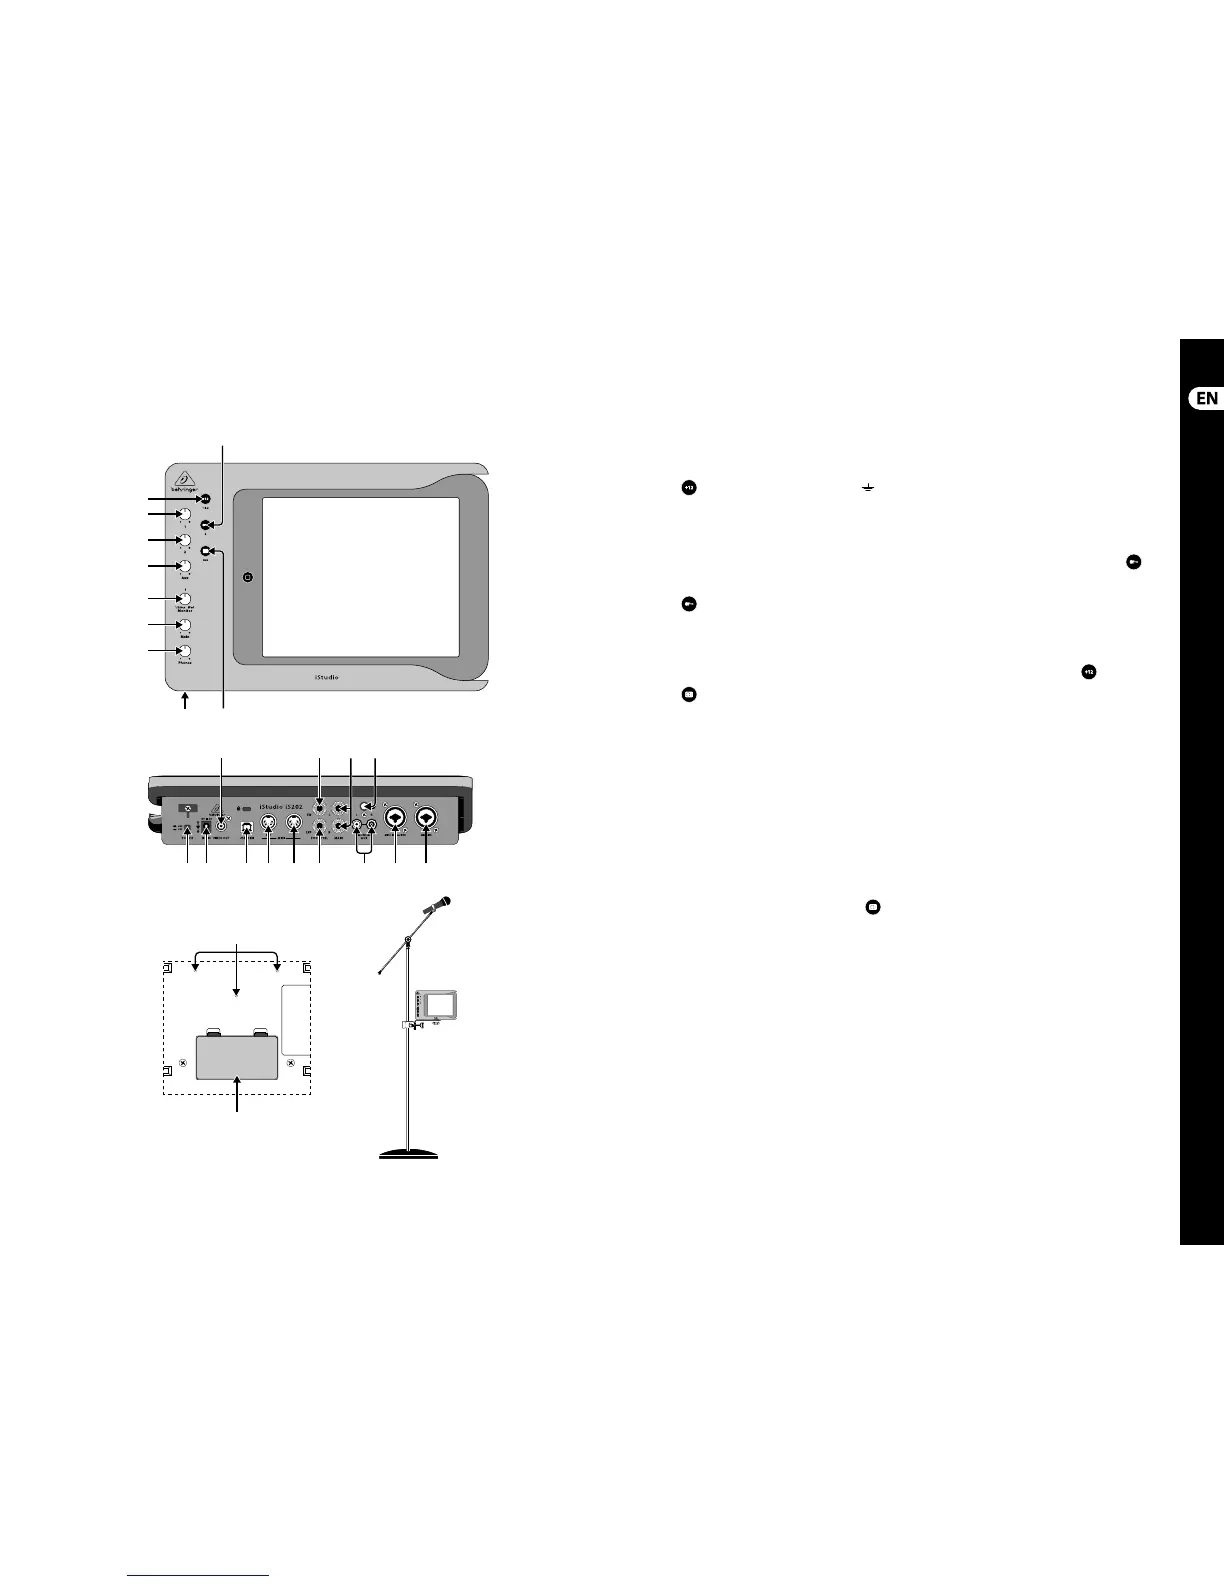
(1)
(3)
(2)
(4)
(6)
(7)
(8)
(9)
(10) (5)
(13) (14) (16) (17) (18) (19) (22)(21) (23)
(11)(15) (12)(20)
(24)
(25)
P16-MB
iStudio
(1) 1 & 2 button engages +12V
phantom power for condenser
microphones on channels 1 & 2
XLRinputs.
(2) Input 1 Gain Knob adjusts the
input level of audio sources
connected to the combination
¼ "/ XLR connector for channel 1.
(3)
2 button engages Hi-Z input
on channel 2 ¼ " input.
(4) Input 2 Gain Knob adjusts the
input level of audio sources
connected to the combination
¼ "/XLR connector for channel 2.
(5) Aux button engages phono
level input for use when a
turntable is connected to the
LINE/PHONO AUX RCA inputs.
(6) Aux Input Gain Knob adjusts
the input level of audio sources
connected to the LINE/PHONO
AUX RCA inputs.
(7) Monitor (1 / 2 / Aux
– iPad)
Knob adjusts the balance
between iStudio input levels
and iPad output levels for low
latency monitoring via the
“Phones” connector.
(8) Main Output Knob adjusts the
volume level of the main outputs.
(9) Phones Output Knob adjusts
the output volume to the
headphonesconnector.
(10) Phones output to
⁄" headphonesconnector.
(11) SW FOOT CTRL connects ¼ "input
to an external foot switch.
(12)
connects to the ground wire on
a turntable to prevent the pick up
of electromagnetic interference.
(13) ON/OFF POWER button turns the
unit on or o .
(14) DC IN connects to adapter and then
to the mains to power the unit.
(15) VIDEO OUT output connects to
an external monitor or projector
for displaying video images or
visualaccompaniments.
(16) USB MIDI connects to a computer
via USB cable for MIDI control
and iPad app integration within
DAWsoftware.
(17) MIDI OUT connects to external
MIDI controllers and input devices.
(18) MIDI IN
connects to external MIDI
sound modules for iPad control.
(19) EXP FOOT CTRL connects ¼ " input
to an external expressionpedal.
(20) L/R MAIN output connects to
powered speakers for performance
or studio monitoring.
(21) LINE/PHONO AUX L/R inputs
connect to line level RCA
inputsources (CDplayers,
MP3players, etc.) orto a turntable
( Auxpower button must
be engaged).
iSTUDIO iS202 Controls
(22) MIC/LINE/GUITAR 2 connects
input from microphones and
instruments via combination
¼ " TRS/XLR connectors.
The ¼ " TRS input on channel 2
can be used with electric guitar
level signal when the
Hi-Z
button is engaged.
(23) MIC/LINE 1 connects input
from microphones and
instruments via combination
¼ " TRS/XLR connectors.
Both channels 1 & 2 can be used
with condenser microphones
when the
button
is engaged.
(24) BATTERY COMPARTMENT
eight 1.5-Volt “AA” batteries
can power the iStudio for
mobile operation.
(25) Mounting Brackets connect the
iStudio to the optional P16-MB
for use with microphone, music,
anddrum stands.
12 iSTUDIO iS202 13 Quick Start Guide
 Loading...