MICROPOWER PS400
Welcome to BEHRINGER
Thank you for showing your con dence in us by purchasing the BEHRINGER MICROPOWER
PS400. Use this ultra-compact phantom power supply with mixers and microphone
preampli ers that do not include phantom power sources. The PS400:
• supplies phantom power (+12 V or +48 V) to any type of condenser microphone
• routes the microphone signal to a mixer or a microphone preampli er
◊ Please read the safety instructions that appear at the end of this document.
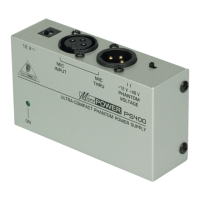
Connectors and Control Elements
This section illustrates and describes each PS400 connector and control element.
(2)
(1) (3) (4) (5)
Fig. 1: PS400 connectors and control elements
(1) 12 V connector:
To connect the power supply unit to the PS400, use the 12 V connector. Connecting the
power supply unit to the mains automatically switches the PS400 on. To disconnect
the unit from the mains, pull out the main cord plug.
(2) ON LED:
As soon as the unit is connected to the mains, the ON LED is illuminated.
(3) MIC INPUT connector:
To send a microphone signal to the PS400, you need an audio cable that includes XLR
connectors. Plug:
• one XLR connector into the MIC INPUT connector
• the other XLR connector into the condenser microphone
(4) MIC THRU connector:
To route the microphone signal from the PS400 to a mixer or a microphone
preampli er, you need an audio cable that includes XLR connectors. Plug:
• one XLR connector into the MIC THRU connector
• the other XLR connector into the mic input of a mixer or, alternatively a
microphone preampli er
(5) +12 V / +48 V PHANTOM VOLTAGE switch:
To select the voltage that you need, push this switch toward +12 V or, alternatively
+48 V. For details about what value to use, refer to instructions from the
microphone manufacturer.
SERIAL NUMBER: To register the unit, use the serial number that is located on the bottom
of the PS400.
Setup Example
The following is an example of how to set up the PS400:
MICROPOWER PS400
PROMIXER DJX750
STUDIO CONDENSER
MICROPHONE C-1
MIC THRU
MIC INPUT
Fig. 2: PS400 setup example
Warranty
For the applicable warranty terms and conditions and additional information
regarding MUSIC Group’s Limited Warranty, please see complete details online at
www.music-group.com/warranty.
Downloaded from ManualsNet.com search engine