Do you have a question about the Beta Motorcycles RR250 2T and is the answer not in the manual?
Safety measures covering carbon monoxide, petrol, and engine oil hazards.
Betamotor's policy on product improvement and documentation updates.
Betamotor's commitment to environmental awareness in vehicle use and parts disposal.
Safety precautions and handling instructions for coolant liquid.
Warnings and precautions for handling hot engine and exhaust system components.
General warnings for engine disassembly and maintenance procedures.
Technical specifications for engine bore, stroke, displacement, and compression ratio.
Technical specifications for the primary and gear ratios of the transmission.
Explains symbols used for tightening torque, threadlocker, and lubricants.
Warning about fire hazards and precautions when working with fuel.
Warning to perform operations with the engine cold and in a well-ventilated area.
Warning not to operate the clutch lever with the actuator uncoupled from the engine.
Tip to insert a cloth into the spark plug housing to prevent dirt entry.
Warning to plug the mixer tube after disconnection to prevent emptying.
Procedure for draining the clutch and gear oil.
Steps for removing the clutch control rod and pinion spacer.
Procedure for removing the piston, cylinder, and cylinder head.
Warning to place a cloth to prevent foreign objects from entering the crankcase.
Procedure for removing the engine's ignition unit.
Steps for removing the flywheel cover.
Procedure for removing the stator from the flywheel cover.
Instructions for removing the flywheel using special tools.
Procedure for removing the pick-up unit.
Overview and steps for removing the electric ignition system components.
Procedure for removing the starter motor.
Procedure for removing the Bendix coupling.
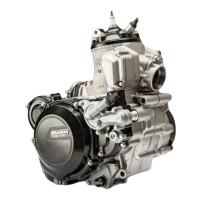
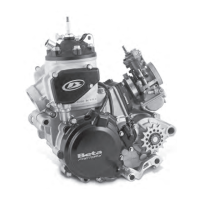
Main section covering removal of multiple engine components.
Detailed steps for removing the coolant liquid pump.
Procedure for removing the centrifugal unit and its linkage.
Steps for disassembling the clutch unit and counterweight.
Warning not to remove sliding pins during clutch disassembly.
Procedure for disassembling the optional pedal kickstart mechanism.
Procedure for disassembling the external gearshift unit.
Procedure for disassembling the intake system manifold and reed valve.
Section for disassembling the crankshaft, gearbox, and internal gearshift.
Steps for opening the engine crankcase.
Warning regarding loosening specific equipment fixing screws.
Procedure for removing the counterweight support shaft.
Steps for removing the crankshaft from the engine.
Procedure for disassembling the internal gearshift unit and the complete gearbox.
Procedures for removing parts from the detached crankcases.
Steps for removing parts from the right crankcase half.
Steps for removing parts from the left crankcase half.
Checks and operations for the crankcase halves, including cleaning.
Detailed instructions for applying parts to the right crankcase half.
Detailed instructions for applying parts to the left crankcase half.
Procedures for checking the connecting rod and engine shaft for wear and play.
Steps for assembling the complete crankshaft into the crankcase.
Procedures for checking and reassembling the gearbox unit.
Detailed checks for the gearbox unit's components and wear.
Steps for assembling the primary drive unit.
Steps for assembling the secondary drive unit.
Procedures for checking internal gearbox control components.
Steps for assembling the gearbox and internal gearshift.
Procedure for checking the counterweight support shaft.
Steps for closing and sealing the engine crankcase halves.
Checks and assembly procedures for the external gearshift.
Procedure for checking the complete drive shaft of the gearshift.
Steps for assembling the external gearshift unit.
Checks and procedures for the optional kickstarter device.
Procedures for checking and assembling the kickstart shaft unit.
Procedures for checking and assembling counterweight, primary gear, and clutch unit.
Inspection of counterweight and primary gear for wear.
Steps for applying the primary gear and counterweight.
Checks for the clutch case, roller bearing, and internal centre bearing.
Procedures for checking the thickness and condition of clutch discs.
Procedure for checking the length of clutch springs.
Checks for the clutch drum and cap, including sliding pins.
Procedure for checking the thrust bearing and its resting surfaces.
Detailed steps for assembling the clutch unit.
Procedures for assembling the coolant liquid pump and centrifugal unit.
Checks and disassembly of pump unit, centrifugal unit, and idler unit.
Steps for assembling the centrifuge unit group.
Steps for assembling the pump unit, including oil seal.
Steps for assembling the complete clutch cover and pump unit.
Checks and procedures for the electric ignition unit.
Checks for wear and operation of the Bendix coupling.
Steps for coupling the ignition unit to the engine.
General checks for the ignition system.
Electrical inspection and resistance value checks for the ignition system.
Steps for coupling the ignition system to the crankcase.
Thorough checks for the cylinder, piston, pin bolt, and elastic bands.
Procedures for checking the piston and elastic bands for wear and damage.
Procedure for checking the cylinder for signs of seizure and measuring bore.
Table detailing coupling play between piston and cylinder.
Checks and disassembly of the exhaust valve unit and flange.
Steps for assembling the exhaust valve unit.
Procedures for assembling the piston, pin bolt, elastic bands, and cylinder.
Warning to use a clean cloth to prevent foreign objects from falling into the base.
Procedure for checking crankcase/cylinder gasket thickness.
Steps for applying the cylinder head.
Procedure for adjusting the exhaust valve control unit.
Procedures for applying the valve control unit cover and expansion chamber cover.
Checks and assembly of the intake unit, including manifold and reed valve.
Procedure for inserting the clutch rod and pinion spacer.
Note on aligning the pin head notch with the frame notch.
| Brand | Beta Motorcycles |
|---|---|
| Model | RR250 2T |
| Category | Engine |
| Language | English |