This document describes a "Spot Light" device, likely a moving head light fixture, designed for professional use.
Function Description
The Spot Light is a versatile lighting fixture capable of various movements and effects. It features horizontal (pan) and vertical (tilt) rotation, color selection, gobo projection, strobe effects, dimming, and auto-play modes. It can be controlled via DMX, operate in master-slave mode, or be sound-activated. The device is designed to emit light, likely for stage, event, or architectural lighting applications.
Important Technical Specifications
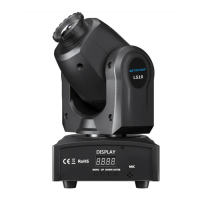
- Model: LS10
- Power Supply: AC100-240V/50-60HZ
- Rating Power: 35W
- LED Specification: 10W white
- Lifetime: 5000-10000H
- Dimming: 0-100% linear dimming
- Horizontal Angle (Pan): 540°
- Vertical Angle (Tilt): 200°
- Control Mode: Auto-play, sound-activated, DMX, master-slave
- DMX Channels: 9 or 11 channels
- Working Environment: Indoor, 10°C to 40°C
- Protection Class: IP20 (suitable for indoor use only)
DMX Channel Functions (11 Channel Mode)
- Channel 1 (Horizontal rotation): 0-255
- Channel 2 (Horizontal trimming): 0-255
- Channel 3 (Vertical operation): 0-255
- Channel 4 (Vertical trimming): 0-255
- Channel 5 (Color):
- 0-139: Color selection
- 140-255: Automatic color switch, speed increasing
- Channel 6 (Gobo):
- 0-63: Fixed gobos
- 64-127: Gobo shaking
- 128-255: Automatic gobo switch, speed increasing
- Channel 7 (Strobe): 0-255
- Channel 8 (Dimming): 0-255
- Channel 9 (Rotation speed): 0-255
- Channel 10 (Auto-play mode):
- 0-59: Other channel functions
- 60-84: Auto Mode 3
- 85-109: Auto Mode 2
- 110-134: Auto Mode 1
- 135-159: Auto Mode 0
- 160-184: Sound control Mode 3
- 185-209: Sound control Mode 2
- 210-234: Sound control Mode 1
- 235-255: Sound control Mode 0
- Channel 11 (Reposition): 250-255 (55)
DMX Channel Functions (9 Channel Mode)
- Channel 1 (Horizontal rotation): 0-255
- Channel 2 (Vertical rotation): 0-255
- Channel 3 (Color):
- 0-139: Color selection
- 140-255: Automatic color switch, speed increasing
- Channel 4 (Gobo):
- 0-63: Fixed gobo
- 64-127: Gobo shaking
- 128-255: Automatic gobo switch, speed increasing
- Channel 5 (Strobe): 0-255
- Channel 6 (Dimming): 0-255
- Channel 7 (Rotation speed): 0-255
- Channel 8 (Auto-play mode): 0-255 (Up to clockwise rotation, down to reversion)
- Channel 9 (Reposition): 250-255 (55)
Usage Features
The device is equipped with a control panel featuring a display and four buttons: MENU/ESC, UP, DOWN, and ENTER. These buttons allow users to navigate through various settings and modes.
- Addr (A001-A512): For DMX address setting. Users can select "Addr" from the menu, press "Enter" to start, use "UP" and "DOWN" to adjust the address number, and "Enter" again to save.
- CHnd: For setting the unit's channel mode (11CH or 9CH). Users select "CHnd", press "Enter", use "UP" and "DOWN" to choose the mode, and "Enter" to save.
- SLnd: For setting the unit's master-slave mode (MASR, SL1, SL2). Users select "SLnd", press "Enter", use "UP" and "DOWN" to choose the mode, and "Enter" to save.
- MAST: Master-slave Mode
- SL 1: DMX Mode
- SL 2: Assistant Mode
- SHnd: For setting the unit's memory effects (SHO, SH1, SH2, SH3). Users select "SHnd", press "Enter", use "UP" and "DOWN" to choose the effect, and "Enter" to save. "Effect 0" is recommended.
- Sound: For enabling or disabling sound mode ("ON" or "OFF"). Users select "Sound", press "Enter", use "UP" and "DOWN" to choose, and "Enter" to save.
- SEnS: For adjusting sound sensitivity (0-100). Users select "SEnS", press "Enter", use "UP" and "DOWN" to adjust, and "Enter" to save.
- bLnd Operating Mode Setting: For setting the operating mode (bLAc, HLod, Soun, Auto). Users select "bLnd", press "Enter", use "UP" or "DOWN" to choose the mode, and "Enter" to save.
- bLAc: Digital back to 0 when 512 signal off.
- HLod: Stay last DMX status when 512 signal off.
- Soun: Sound activated when 512 signal off.
- Auto: Auto-play when 512 signal off.
- LED Display Backlight Setting: For controlling the display panel backlight. Users select "LED", press "Enter", use "UP" or "DOWN" to choose "NO" (backlight always on) or "OFF" (backlight off after five seconds of inactivity), and "Enter" to save.
- dISP Display Font Reverse Direction Setting: For reversing the display font direction. Users select "dISP", press "Enter", use "UP" or "DOWN" to choose "NO" (negative direction) or "Yes" (positive direction), and "Enter" to save.
- rPAN X-Axles Inverse Setting: For reversing the X-axis direction. Users select "RPAN", press "Enter", use "UP" or "DOWN" to choose "Yes" (negative direction) or "NO" (positive direction), and "Enter" to save.
- rTiL Y-Axles Inverse Setting: For reversing the Y-axis direction. Users select "rTil", press "Enter", use "UP" or "DOWN" to choose "Yes" (negative direction) or "NO" (positive direction), and "Enter" to save.
- REST: To reset the lamp. Users select "REST", press "Enter", choose "Yes", and press "Enter" again.
- About Micro Adjustment: Accessible by pressing "Enter" for about 10 seconds when the screen shows A001. This mode allows for micro-adjustment of motor data bias for X motor (H000-255), Y motor (Y000-255), and pattern motor (G000-255). It also includes a "DEFR" option to revert to factory settings.
Installation Guidelines
- Maintain a minimum distance of 1.5 meters from flammable or explosive materials and 0.5 meters from walls.
- Verify that the power supply voltage matches the system requirements.
- Ensure ventilation and exhaust passages are clear.
- The equipment must be fixed firmly.
- For safety, the appliance must be properly earthed.
Maintenance Features
Regular maintenance is crucial for the longevity and optimal performance of the Spot Light.
Maintenance Schedule
- Inner Power Wires: Replace immediately if the insulation (skintle) of inner power wires turns yellow.
- General Maintenance: Perform every 2 months. Check all screws and connection terminals for looseness. Lack of maintenance can lead to light problems.
Cleaning Procedures
The lens and reflector surfaces must be cleaned frequently to maintain optimal light effect. The frequency depends on the operating environment; wet, smoky, or dirty conditions will cause dirt accumulation more rapidly.
- Use a soft linen cloth or a specified glass cleaning lotion.
- Carefully dry all cleaned parts.
- Wipe the exterior of the lens at least once every 20 days.
- Wipe the interior of the lens at least once every 30 days.
Troubleshooting and Repair
The manual provides a comprehensive fault-checking and repair guide for common issues:
- Not working (no light, fan off): Check power connection, fuse, voltage range, power switch, and display screen.
- DMX no control: Check DMX signal light (should be on), address code setting, CANNON cable connection, proximity of DMX cable to high-tension busbar, and try a different DMX controller.
- One channel blocked: Ensure no DMX signal is received, or the motor's driving circuit might be damaged.
- Light sources work discontinuously: Check if input voltage is too high or too low, or if inner temperature is too high (replace fan if necessary).
- Cannot be controlled by Sound: Ensure sound control is on and sensitivity is in the right range, check if the microphone is damaged, or if the light is in "HOLD" situation.
- Horizontal synchronous belt damaged: Power off, unscrew outer case, disconnect cables, replace the synchronous belt (ensure it's not too tight), reconnect all cables, and tighten screws.
- Vertical synchronous belt damaged: Switch off power, unscrew outer shell of arm parts, loosen y-axis motor driven board screws, replace the synchronous belt (ensure it's not too tight), and tighten all screws.
Warnings
- Inspect for transportation damage upon receipt. Do not use if damaged; contact the dealer or manufacturer.
- This product is for professional use only.
- Prevent impact to the device.
- Be aware of potential hazards: fire, heat, electric shock, UV radiation, lamp explosion, or shedding causing injury.
- Read instructions before energizing or installing. Follow safety methods and warnings.
- For indoor use only (IP20 protection class).
- Keep lamps dry; avoid moisture, overheating, or dusty environments. Stop operation if ambient temperature exceeds 40°C.
- Prevent contact with water or other liquids.
- Replace protection screen, optical lens, or UV screen if visibly damaged.
- Ensure facilities and hooks can withstand at least 10 times the fixture's weight when hanging.
- Verify hardware strength and integrity; use a safety rope for added security.
- Lower the hanger rod to a safe position during installation or dismantling.
- Avoid direct eye exposure to the lighted LED lamp. Do not use without lens or protection cover.
- Replace damaged components.
- Ensure voltage compliance, overload, and leakage protection. Earth every fixture correctly according to professional standards.
The manufacturer or dealers do not guarantee repairs for damages caused by misuse, malfunction, or ignoring instructions.