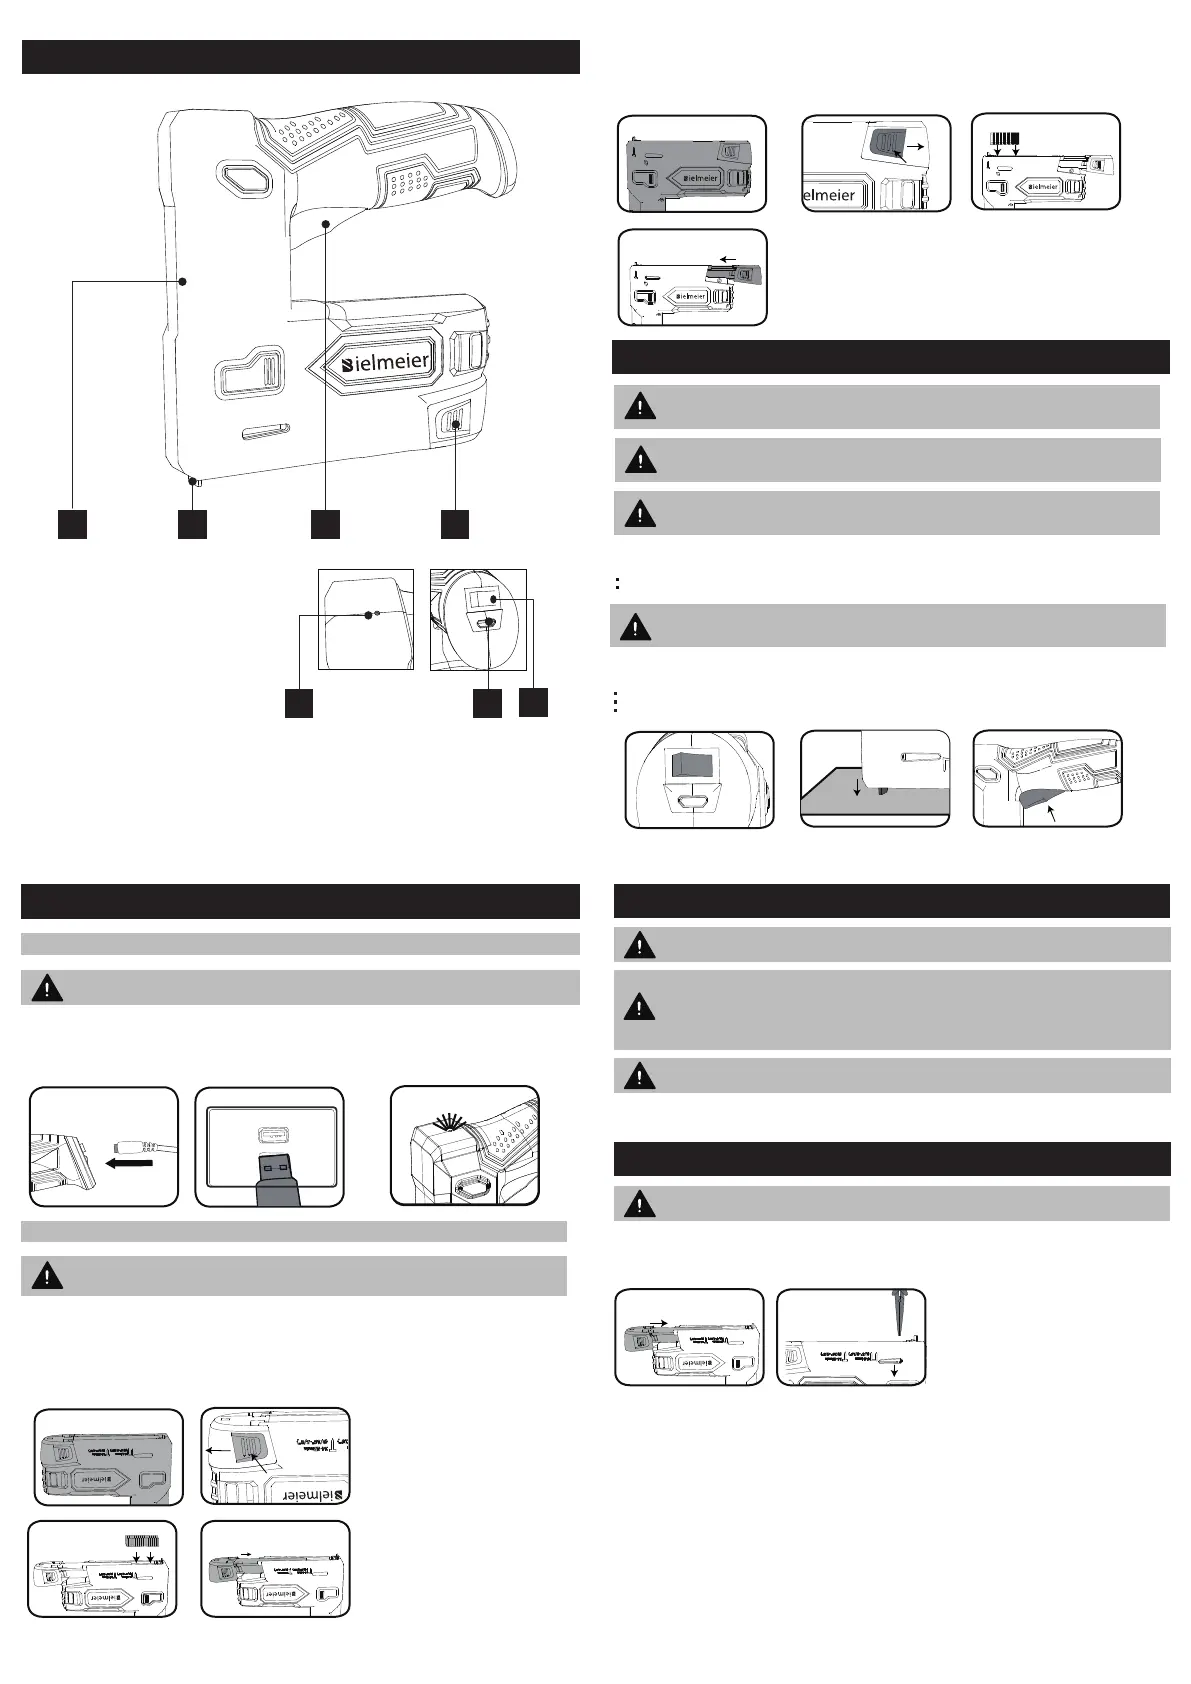
KNOW YOUR PRODUCT
UNPACK AND SETUP
OPERATION
CAUTON!
The charger for this product should be protected by a leakage current device
(rated at 30mA or less).
WARNING!
To prevent accidental starting that could cause serious personal injury,
always be sure the power switch is in the OFF position when assembling these parts.
WARNING!
Always keep your fingers away from the discharging area of the tool when
driving a staple or nail. Failure to keep fingers out of the way can result in serious
personal injury.
CHARGING
ASSEMBLY
SPECIFICATIONS
Working Voltage: 4VDC Max
Max Magazine Capacity: 50 Staples or Nails
Impact Rate: 50/min
Staple Size: 1/4”-9/16” Type 50
Nail Size: 9/16”-5/8” Brad
Battery: 4VDC Max, 1,500mAh, Li-ion
Charging Time: Approx. 2 hours (based on 5VDC/1A)
Product Weight: 1.60 lbs.
The charge indicator will illuminate red if the battery is low, indicating that the battery needs charging.
1. Plug the charging output end into the charging port on the staple gun.
2. Connect the Typ-c cable to a DC power device such as power back, computer, or connect to an AC supply through an adaptor.
Note: The charge indicator will remain red whilst charging.
3. Once fully charged, the indicator light will illuminate green.
LOADING STAPLES
This staple nailer only accepts T50 staples, other types of staples including paper staples, will jam the unit.
1. Hold the tool upside down.
2. Squeeze the magazine latches on either side of the tool and pull the magazine out of the tool.
3. Insert a row of staples into the opening behind that nose piece.
Note: Rows of more than 50 staples do not fit in the staple gun.
4. Push the loaded magazine back into the unit until it clips into place.
APPLICATIONS
You may use this product for the purposes listed below:
Driving staples or nails into wood;
Using the included accessory, driving staples or nails to secure fencing wire or wire screen.
DRIVING A STAPLE OR NAIL
Hold the handle firmly with the nose of the tool flat against the workpiece at a 90° angle.
Press the safety striker pin down against the workpiece to be fastened. The safety striker pin must be depressed before pulling the switch trigger.
The tool will drive another staple each time the trigger is depressed as long as the safety striker pin is depressed.
NOTE: Make sure that the power ON/OFF switch on the back of the staple gun is ON before operating.
2 3 4
5
6
7
1
1. Main Housing
2. Safety Striker
3. Swich Trigger
4. Magazine Latch
5. LED Lndicator
6. Micro Typ-C Changing Port
7. ON/OFF Power Switch
WARNING!
Always wear eye protection with side shields marked to
comply with ANSI Z87.1. Failure to do su could result in objects being
thrown into your eyes and other possible serious injuries.
WARNING!
Do not allow familiarity with this product to make you
careless. Remember that a careless fraction of a second is sufficient
to inflict serious injury.
WARNING!
Do not use this tool for fastening electrical cable or wire. It is
not designed for electrical cables, causing electric shock or a fire
hazard.
The Safety Striker System is a two step process where a staple or nail will only fire when the safety striker pin is pushed against the material to be fastened.
LOADING NAILS
This staple gun nailer only accepts 9/16”- 5/8” brad nails. Other types of nails will jam the unit.
1. Hold the tool upside down.
2. Squeeze the magazine latches on either side of the tool and pull the magazine out of the tool.
3. Insert a row of nails into the opening behind the nose piece. Be sure to align them to the side marked with a nail marker so that the nail head is against the internal groove.
Note: Rows of more than 65 nails do not fit in the staple nail gun.
4. Push the loading magazine back into the unit until it clips into place.
TROUBLESHOOTING
WARNING! Always make sure the power ON/OFF switch is in the OFF position before
investigating the fault.
Jammed Staple Nail Gun
Squeeze the magazine latches on either side of the tool and pull the magazine out of the tool.
Using a pair of pliers, remove any jammed staples or nails.
Note: Be careful not to bend the end of the magazine. If this occurs the unit will be inoperable.
With the magazine still open, tap the safety striker pin against a surface to dislodge any loose
staples.
The Battery Has A Short Run Time
Ensure that the battery is properly charged, it will take 4-5 charging cycles before the battery reaches optimum charge and run time.
MAINTENANCE
WARNING! To avoid serious personal injury, always be sure that the
power switch of the tool is OFF position when servicing.
WARNING! When servicing, use only identical replacement parts. Use of any other
parts can create a hazard or cause product damage.
WARNING! Never use water or any liquids to clean or rinse off your product . Corrosive
liquids, water, and chemicals can enter the product’s electronic components and/or
battery compartment and damage electronic components and/or the battery pack,
which can result in a short circuit, increase risk of fire, and serious personal injury.
Remove any buildup of dirt and debris by wiping the product clean with a dry cloth
occasionally.
When not in use, staple nail gun should be stored in a dry, frost free location, keep out of children’s reach.
If the housing of the staple nail gun requires cleaning, do not use solvents. Use of a cloth only is recommended. Never immerse any part of the staple nail gun into liquid.
Bielmeier tools will not be responsible for any damage or injuries caused by repair of the staple nail gun by an unauthorized person or mishandling.
 Loading...