B
9
8
3
A
6
A
C
B
5
2
4
7
A B
EB
B1
Assembling Your New Blade IP 2 Trolley
Montageanleitung für Ihren neuen Blade IP 2 Trolley
Assemblez Votre Nouveau Chariot Blade IP 2
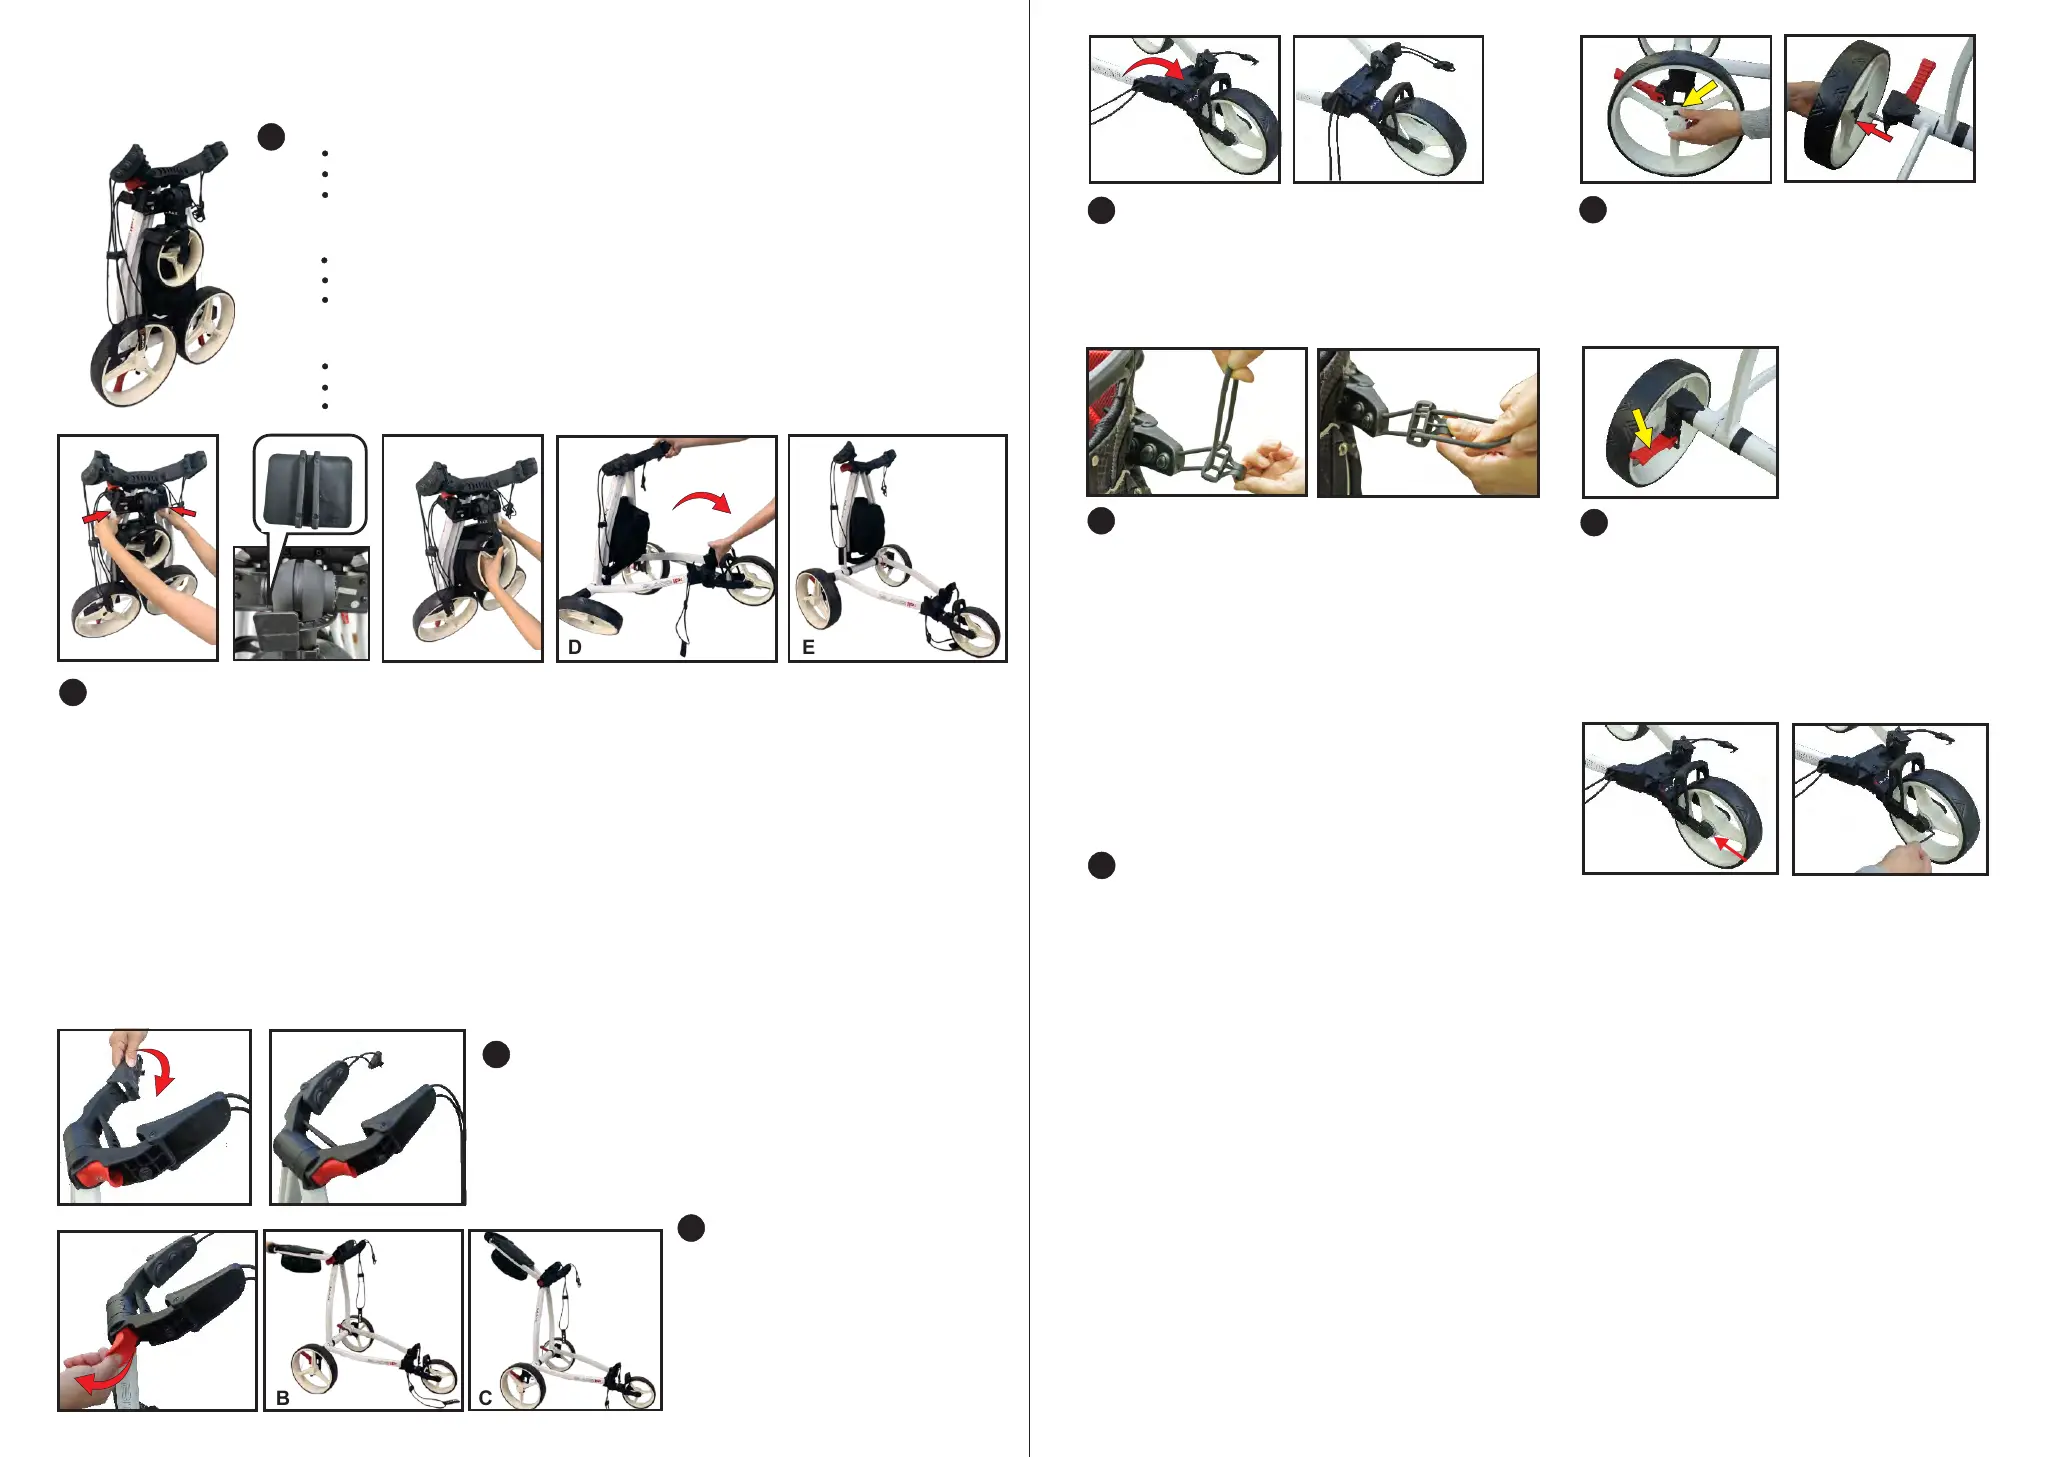
1) “Push” to open the frame.(A)
Drücken Sie den Push“Knopf um das Gestell zu öffnen. (A)
"Poussez”pour ouvrir le châssis.(A)
2) Remove the plastic protector (B1) before unfolding the front wheel.(B)
Bitte entfernen Sie den Plastik-Schutz bevor Sie das Vorderrad aufklappen (B).
Retirez le protecteur en platique (B1) avant de déplier la roue avant (B).
3) Unfold the front wheel.(C)
Klappen Sie das Frontrad aus
Dépliez la roue avant.(C)
4) Lift up the trolley to extend the frame & wheel.(D, E )
Heben Sie den Trolley ein wenig vom Boden ab um das Gestell und die Räder
vollständig auszuklappen.
Soulevez le chariot pour déplier le châssis & la roue.(D, E )
Warning: Lift wheels before fold and unfold.
Achtung:Räder vor dem Falten bzw.Auseinanderklappen anheben!
Avertissement:Soulevez les roues avant de plier et de déplier.
Put the wings of upper bag holder to its position.(A,B)
Öffnen Sie die obere Baghalterung.(A,B)
Placez les ailerons du support pour le sac en
position.(A,B)
Open latch of handle mechanism.(A)
Raise up the handle frame.(B, C)
Heben Sie den Griff an.(B,C)
Ouvrez le verrou du mécanisme de la
poignée.(A)
Soulevez le châssis de la poignée.
(B, C)
Öffnen Sie den Hebel für den Griff.(A)
Rear wheel are removeable.(A, B)
Die hinteren Räder sind abnehmbar.(A, B)
Les roues arrière sont amovibles.(A, B)
Turn the lower bag holder counterclockwise
to its position. (A, B)
Drehen Sie die untere Baghalterung gegen
den Uhrzeigersinn in ihre Position.(A, B)
Tournez le support inférieur du sac dans le
sens contraire des aiguilles d’une montre
pour le mettre en position. (A, B)
Release the cord and adjust the buckle to
required position.(A)
Clip the cord to the buckle.(B)
Lösen Sie den Gurt und stellen Sie die Schnalle
auf die gewünschte Position.(A)
Fixieren Sie anschließend den Gurt wieder an der
Schnalle.(B)
Relâchez le cordon et ajustez la boucle en
position voulue.(A)
Fixez le cordon à l'ouverture de la boucle.(B)
Press the brake pedal to engage the brake.(A)
Betätigen Sie die Bremspedale um die Bremse
zu lösen.(A)
Appuyez sur la pédale de frein pour activer le
frein.(A)
Front Wheel Adjustment Mechanism
Einstellen des Vorderrades
Mécanisme d’Ajustement de
la Roue Avant
If your cart does not track straight you can easily align the wheel by the steps below:
1) Standing in front of the cart, locate the 2 alignment screws in the front tips of each fork leg (A).
2) Using the allen wrench provided, turn the alignment screw to direct the wheels as needed (B).(see below)
** If your cart pulls to the left, tighten the right screw by turning it clockwise.
If it pulls to the right, tighten the left screw.
***If you find the screw too tight to fully adjust the wheel as desired, loosen both screws to their
stopping point and begin the process again. This will allow for a full range of adjustment.
Sollte Ihr Trolley nicht geradeaus fahren, können Sie es mit wenigen und einfachen Handgriffen
nachjustieren:
1) An der Aufhängung des Vorderrades befindet sich links und rechts jeweils 1 Schraube(A)
2) Mit dem mitgelieferten Vierkant- Schlüssel können Sie nun die Spur des Vorderrades in die
gewünschte Richtung einstellen(B) (siehe unten)
** Wenn Ihr Trolley nach links zieht, drehen Sie die rechte Schraube im Uhrzeigersinn.
Wenn es nach rechts zieht, drehen Sie die linke Schraube.
*** Wenn die Schrauben zu fest angezogen sind um das Vorderrad zu justieren, öffnen Sie beide
Schrauben und beginnen Sie den Vorgang nochmals.
Si votre chariot dévie,vous pouvez facilement aligner les roues par le biais des étapes suivantes:
1) En vous plaçant devant le chariot, localisez les 2 vis d’alignement dans la pointe avant de chaque
fourche de bras (A).
2) En utilisant la clé Allen fournie,tournez la vis d’alignement pour diriger les roues tel que désiré (B).
(Voir ci-dessous)
** Si votre chariot dévie vers la gauche, resserrez la vis droite en la tournant dans le sens des aiguilles
d’une montre. S’il dévie vers la droite, resserrez la vis gauche.
*** Si la vis est trop serrée pour ajuster complètement la roue tel que désiré, relâchez complétement
les deux vis et recommencez le processus à nouveau. Ceci permettra une gamme complète
d’ajustements.
A
C
A
B
A B BA
A
D
Nehmen Sie den Trolley aus der Verpackung und vergewissern Sie sich,
dass folgende Gegenstände vorhanden sind:
Trolley-Gestell inkl. montiertem Vorderrad
Vierkant-Schlüssel zum Adjustieren des Vorderrad
Der Vierkant-Schlüssel befindet sich in der Scorecard Abdeckung
1
Remove cart from the box and check that the following items are included:
Cart frame with front wheel attached
A small Allen Wrench for adjusting the front wheel
Allen Wrench is inside the scorecard holder
Retirez le chariot de la boîte et assurez- vous que les éléments suivants
soient inclus:
Châssis du chariot avec roue avant fixée
Une petite Clé Allen pour ajuster la roue avant
La Clé Allenest à l’intérieur du support pour carte de pointage
 Loading...