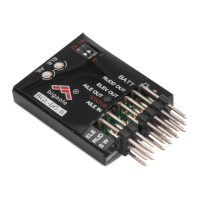
The device is a 6G-B flight control system, designed for fixed-wing aircraft. It supports three types of planes: normal, flying wing, and V-tail. This system incorporates MEMS technology to provide stability, flexibility, and reliability, making it suitable for beginners. It offers a balance function that can be turned off for more experienced pilots.
Technical Specifications
- Dimensions: 31mm*38mm
- Weight: 5.5g
- Operating Voltage: DC4.8V-----6V
- Operating Current: 20mA
- Servo Compatibility: 1.52ms analog servo/1.52ms digital servo
- Radio Compatibility: PPM, PCM, 2.4G
- Operating Temperature: -15° C — 65° C
Usage Features
Mode Selection and Transmitter Setting
To set up the device, first turn on the transmitter and create a new model. Ensure all trims and sub-trims are set to zero, and all mix-functions are off. The S1/S2 switches on the device correspond to different aircraft types:
- Normal Airplane: S1=0, S2=0. This configuration uses AIL Servo for Aileron, ELE Servo for Elevator, and RUD Servo for Rudder.
- Flying Wing: S1=0, S2=1. This configuration uses the left wing servo for Aileron and the right wing servo for Elevator, with RUD Servo for Rudder.
- V-Tail: S1=1, S2=0. This configuration uses AIL Servo for Aileron, and the left wing servo for Elevator, with the right wing servo for Rudder.
- Calibration Mode of Sensor: S1=1, S2=1. In this mode, the LED flashes rapidly for 10 seconds, then becomes steady on, indicating calibration is complete.
LED Status
When using the 6G-B for the first time, turn switches 1 and 2 to the "ON" position to initialize the device. The LED will flash rapidly for 10 seconds after power on. Once the LED becomes steady, initialization is complete. Then, power off the device, set S1 and S2 to the desired flying type, and power on again. The LED should be steady on.
Installation Method
The 6G-B must be installed on a flat and stable platform, close to the center of gravity of your plane. It should be oriented towards the front of the aircraft in a level position. It is crucial not to reverse the installation.
Mode Switch
The SW control signal is assigned to an appropriate channel on your radio. This "SW" switch allows you to change flight modes. When using a 2-section switch, you can toggle between "Gyro Off Mode" and "Balance Mode."
- Gyro Off Mode:
- Range of switch: Less
- Signal Pulse Width: 1500US
- LED Status: Steady on
- Balance Mode:
- Range of switch: More
- Signal Pulse Width: 1500US
- LED Status: Steady on
Adjusting Method
The screws for Aileron (ALE) and Elevator (ELE) have two functions: Gyro gain direction and Gyro gain range.
- Feedback Direction: The upper part of the screw corresponds to "NOMR" (Normal), and the lower part corresponds to "REV" (Reverse).
- Gyro Compensation Range: The gain margin is at its minimum in the center of the screw.
- In the NOMR part: Clockwise rotation increases gain, and anti-clockwise rotation reduces gain.
- In the REV part: Anti-clockwise rotation increases gain, and clockwise rotation reduces gain.
Gyro Gain Direction Verification
To verify the gyro gain direction for Aileron (AIL) and Elevator (ELE):
- Adjust the direction and range of the two channels AIL and ELE.
- In balance mode, pick up the aircraft around the pitch axis and the roll axis to check if the direction and range are correct. Adjust the screw to correspond to AIL and ELE to the optimal position.
Gyro Gain Correction Diagram:
- Aileron (AIL):
- Rotate the plane around the roll axis. Check the correction of gain for aileron as shown in diagrams 1 and 2.
- Rotate the plane around the roll axis. Check the correction of gain for aileron as showing in the diagram 3 and 4.
- Elevator (ELE):
- Rotate the plane around the pitch axis. Check the correction of gain for elevator as shown in diagrams 1 and 2.
- Rotate the plane around the pitch axis. Check the correction of gain for elevator as showing in the diagram 3 and 4.
Under Gyro closed mode or balance mode, adjust the forward and reverse of AIL/ELE/RUD to make the directional control the same as sensitivity-responding direction. Adjust the connecting rod length, and make the angle of rudder into right position.
Attention: If the aspect is not stable, or there is a large temperature difference between interior and outdoor, or the rudder is skewing under the balance mode, please power on again under the Initializing the gyroscope mode.
Maintenance Features
Troubleshooting
- Airplane swings regularly, rapidly and alternately: Decrease the sensitivity of the gyro.
- Airplane swings irregularly: Use the soft foam double-sided adhesive tape to set the Gyro. This can decrease the vibration of the engine and airframe.
- Airplane rotates irregularly, side tumbling or overturning after taking off: Check if the feedback direction of the 2 axis (AIL and ELE) of the gyroscope are correct. Check if the channel control direction of the AIL, ELE, and RUD are correct by moving the sticks separately.
- Rotate on a direction slowly and continually: Check if the rudder installation is level. If not, adjust the servo's center and reinitialize the gyro.