FIGURE
3
Be sure cord
protector
(Figure
1)
is in bottom
of
metal handle
tube.
Slide
metal tube
down
rnto
plastic
housing
so that
holes will line
up
(Figure
2).
5.
Fasten handle and
housing
together
with two
1-5l16" long
screws,
lockwashers and
hex
nuts. Note that the
hex nuts
go
on
the side of the
housing with
the
two hexagon shaped
recesses, which
keep the nuts
f rom turning
when
you
tighten
the screws
Also note that when
you
f irst insert the screws
it may
be
necessary to wiggle
them
carefully
to
get
them
past
the
jacketed
wires inside the tube.
CAUTION:
NEVER
use
a sharp
object
to
move
jacketed
wires
out of
the way.
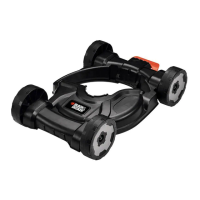
Position
SIDE HANDLE
next
-
see
Figure
3.
1
Slidc
the
brackef
"A"
down the
upper
tLrbe
to a
handle
posrtion
which is
comfortable for
you
When nu1 rs
f inger trght, twrst
the
handle in
direction of arrow,
"8",
to f
ully
tighten
the bolt
(head
of
bolt
f its
into a hexagonal-shaped
recess inside
handle to keeo
bolt
from
turning
)
Extension
Cords
Double insulated tools have
2-wire cords and can be used
with
2-wire or
3-wire
extensions. Only
round
jacketed
extension cords
should be used, and we recom-
mended that they
be
listed by
Under-
writer's Laboratories
(U.L.) (C.S.A.
in
Canada).
lf
the extension
will be used
outside, the cord must be suitable
for
outdoor work.
The letters
"WA"
on
the cord
jacket
indicate
that
the cord
is
suitable for outdoor use.
An
extension must
have
adequate
wire size
(AWG
or
American Wire
Gauge)
for
safety, and to
prevent
loss
of
power
and overheating. The
smaller the
qauoe
number ol lhe
I
4.
wire, the
greater
the capacity
of the
cable, that
is 16
gauge
has
more
capacity than
1I
gauge.
When using
more than one extension
to
make
up
the total
length,
be
sure each
exten-
sion contains at
least the
minimum
wire size.
To determine the
minimum
wire
size
reouired. refer lo the
chart
Delow.
MINIMUM GAUGE
FOR
CORD SETS
Before using an extension cord,
inspect it
for
loose
or exposed
wires,
damaged
insulation,
and defective
lit-
tings. Make any needed
reparrs or
replace
the cord if necessary.
Black &
Decker has
extension
cords available
that are
U.L.
(C.S.A.
in Canada)
listed
for
outdoor use.
Extension
Cord
Retainer
1
Look
into
the
end of
the Switch
Handle and
you
wtll
see
2
slots
The WIDER end
of the
Retainer
goes
into
the
TOP slot
(Frgure 4)
2
Plug
extension
cord
into Switch
Handle and
tit cord
into Retainer,
leaving a little slack
(Ftgure
5)
NOTE.
The retainer
may be
removed
from
the
tool
tor
replacement
il damaged,
or
if
improperly
assembled.
Two
"disengage
slots"
are
located
in
the
top and bottom
of the
handle.
(Figure
4) To drsengage
the
retarner,
pull
on each
end
ot the
retarner
in
turn
while
pushing
a
screwdriver
gently
into the
appropriate slot.
FIGUBE 4
OISENGAGE
SLOTS
SWITCH
HANDLE
3
120 Volts Total Length of Cord
in Feet
Ampere Ratrng 25
lr
50
ft 100 f1
150 fl
N.4ore
Not More
Than Than A.W.G.
0 6
18 16
14
6 10
16 12
0
12 16
12
t6
12
WIDER END
WITH CONICAL
WASHER
Blade
Guard
The
guard
swings open
for
cleaning
Ins,de
of
housing
or changing
blades ALWAYS UNPLUG TOOL
BEFORE OPENING
GUARDI
TO
OPEN GUARD
push
down on
knob
"F"
(F gure
6) and turn it
clockwise
(facing
top of knob)
untrl
rt
stops {a
turn
of about 90't.
The
guard
may
now be
opened
as
in
Figure
6
WHEN
CLOSING GUARD
be
sure
that arm"G"
(F
gure
6) f rls
into
slot
H
'
Push
in knob
"F"
and
turn
it
counterclockwise about 90'
l^ hnli n,,a'n ^l^^nn
tu
rruru
vuoru
uruJEU
BE SURE GIJARD
IS PROPERLY
CLOSED
BEFORE
OPERATING
EDGER
BLADE
Be
sure
tool
is
unplugged!
The
Blade,
two Spacers
and
Hex Nut
tvtth
conica
washer shou d be
attached
to
your
Edger
in the order
shown below
Plcase
check
that the blade
has
been
proPerlv
mounted before us
ng
your
Edger
TO
REMOVE
THE BLADE
FOR
REPLACEMENT:
l Open blade
guard
2 Loosen
the
hex nut wtth conical
washer
Use
two wrenches
to keep the shaft
from turning, as
shown
in Fgure
7
*tt*
H
FIGURE
7
{J
=\-
g
t4-$-.----sencrn
\y
spncrn---@
 Loading...