10
10
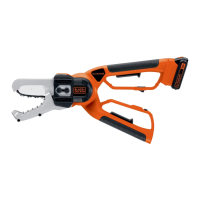
Preparing Your Alligator
Lopper
TM
For Use
WARNING: Read and understand all instructions. Failure to follow all
instructions listed below may result in electric shock, fire and/or serious
personal injury
WARNING: Sharp moving blade. To prevent accidental operation,
ensure that the tool is disconnected from the power source before
performing the following operations. Failure to do this could result in
serious personal injury.
CAUTION: Sharp moving blade. Always wear protective gloves
when installing or removing the chain. The chain is sharp and can cut
you when it is not running.
Chain tension adjustment (fig. A)
WARNING: Before chain or other adjustments, make sure that the
tool is switched off and unplugged.
If the chain can not be correctly tensioned, it may need to be replaced.
Contact your nearest service center.
The product comes ready assembled. However we recommend that you
check the tension of the chain, and chain retention nuts before use and if
required adjust.
Checking and adjusting the chain tension (fig. A)
To tension the chain slacken the two chain cover retention nuts (11) with
the wrench (2) and the chain tensioning device will push the chain bar out,
setting the correct tension. Retighten the two retention nuts (11) securely.
Check that the correct tension has been set by lightly pulling on the chain.
The tension is correct when the chain snaps back after being pulled 1/8”
inch (3 mm) away from the guide bar. There should be no “sag” between
the guide bar and chain on the underside.
Note: Do not over tension the chain as this will lead to excessive wear
and reduce the life of the bar and chain. It will also lead to reduced
product performance.
Note: With first use and when the chain is new, check tension frequently
as a new chain stretches slightly.
Replacing the chain and chain bar
After prolonged use the chain and / or chain bar may need replacing. Use
Black & Decker replacement chain RC600 only.
Low-Kickback saw chain is a chain which has met the kickback
performance requirements of ANSI B175.1 when tested on the
representative sample of chain saws.
Removing the saw chain & chain bar (figs. A & B)
WARNING: Before chain or other adjustments, make sure that the
tool is switched off and unplugged.
WARNING: Laceration hazard. Always wear protective gloves when
installing or removing the saw chain. The saw chain is sharp and can cut
you when it is not running.
WARNING: Burn hazard. The chain guide bar and chain may become
hot during use. Allow to cool before adjustment or removal.
- Place the tool on a firm surface.
- Rotate the two retention nuts (11) counter clockwise with wrench (2)
provided and remove completely.
- Remove the chain access cover (12).
- Open the handles and pull back the top chain cover (6).
- Pull back chain bar (8) and then lift the saw chain (9) out of the groove
in the guide bar. The chain can then be removed from the unit.
- The chain bar can then be angled up and over the bolts.
Assembling the chain bar and chain (figs. C&D)
WARNING: Before chain or other adjustments, make sure that the
tool is switched off and unplugged.
WARNING: Always wear protective gloves when installing or removing
the saw chain. The saw chain is sharp and can cut you when it is not
running.
- Ensure the operation is carried out on a firm surface.
- Open the handles and pull back the top jaw (6).
- Insert the chain bar (8) into the space between the chain tensioner and
the first bolt, angle the chain bar down over the bolts.
- Place the chain (9) around the front of the chain bar and engage in the
nose sprocket of the chain bar. Make sure chain is installed properly, with
the cutting teeth facing forward as shown here.

 Loading...